Читайте также:
|
12.2b... then free the inner cable nipple from the lever
Unscrew the bolt and detach the choke knob bracket
Fuel and exhaust systems 4»15
|
|
|
|

|
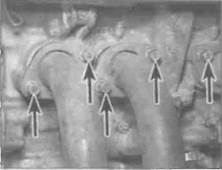
13.2 Unscrew the downpipe nuts (arrowed)...
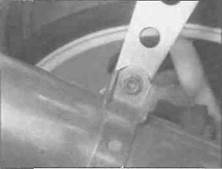
13.3... the silencer bolt...
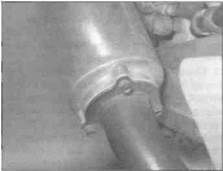
13.5 The silencer end can is secured by three bolts
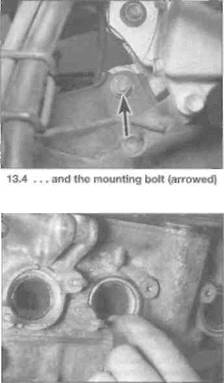
13.6a Lever out the old gaskets...
13.6b... and install new ones

|
Removal
1 Remove the lower fairing (see Chapter 8).
2 Unscrew the nuts securing the downpipes to the cylinder head (see Illustration).
3 Unscrew the nut and remove the bolt securing the silencer to the bracket (see illustration).
4 Unscrew the nut that secures the exhaust system to the dame, but leave Hie bull in place (see illustration). Support the system, then withdraw the mounting bolt and manoeuvre the exhaust away from the bike.
5 If required, remove the three bolts to separate the silencer end can from the downpipe assembly (see illustration). Discard the joint gasket as a new one must be used.
Installation
6 Installation is the reverse of removal, noting
the following:
a) Leave all fasteners loose until the entire system has been installed, making alignment easier.
b) Use new gaskets in each cylinder head port and between the downpipe assembly and the silencer end can, If separated (see illustrations). Use a dab of grease to hold them in place while installing the exhaust.
c) Check the condition of the rubber mountings on the silencer end can bracket and the frame and renew them if they are damaged or deteriorated.
d) Tighten the mounting nuts, and on J and К models the bolts to the torque settings specified at the beginning of the Chapter. Tighten the downpipe nuts first.
e) Run the engine and check that there are no exhaust gas leaks.
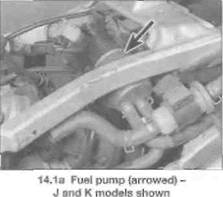
14 Fuel pump - check,
removal and installation;%
| A |
Warning: Gasoline (petrol) is extremely flammable, so take extra precautions when you work on any part of the fuel system. Don't smoke or allow open flames or bare light bulbs near the work area, and
don't work in a garage where a natural gas-type appliance (such as a water heater or clothes dryer) is present. If you spill any fuel on your skin, rinse it off immediately with soap and water. When you perform any kind of work on the fuel system, wear safety glasses and have a fire extinguisher suitable for a class В type fire (flammable liquids) on hand.
Check
| 14.1b Cut-of relay (arrowed)-J and К models |
1 All models are fitted with a fuel pump. The fuel pump is located under the rider's seat (see illustration). The fuel cut-off relay is also located under the seat on J and К models, but on L. N and R models it is on the right-hand side of the frame ahead of the rear master cylinder reservoir (see illustrations). Remove
4*16 Fuel and exhaust systems
Дата добавления: 2015-10-29; просмотров: 161 | Нарушение авторских прав
| <== предыдущая страница | | | следующая страница ==> |
| Locate the cable holder in the | | | L, N and R models |