|
Читайте также: |
B... then install the thermostat
WTJ
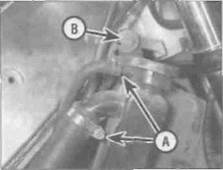
6.9c Locate the hole (A) over the pin (B) - L, N and R models shown
3*6 Cooling system
|
|
|
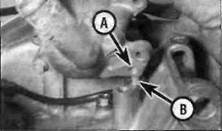
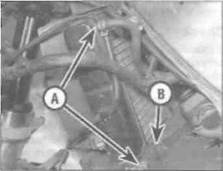
7.2a Radiator upper hose (A) and mounting bolt (B) (one on each side)...
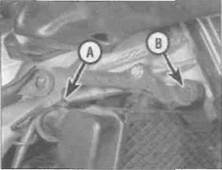
7.2b... and lower hose (A) and mounting bolts (B) - J and К models
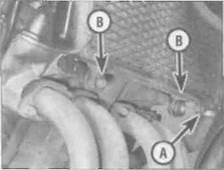
C Hoses (A) and mounting bolts (B) -right-hand side...
hose clamps securely (see illustrations 6.4 or 6.5a).
10 Refill the cooling system (see Chapter 1).
11 Install the air filter housing (J and К models) and the fuel tank (see Chapter 4).
7 Radiator - ^
removal and installation ^
Removal
| A |
Warning: The engine must be completely cool before carrying out this procedure.
1 Remove the lower fairing (see Chapter 8) and drain the cooling system (see Chapter 1). On L, N and R models, also remove the fairing and the front trim panels (see Chapter 8).
2 Slacken the clamps securing the main hoses to the top right-hand side and bottom left-hand side of the radiator and detach the hoses (see illustrations). On L, N and H models, also detach the small hoses from the filler neck and the top left-hand side of the radiator, and unclip the rubber insulating pad from the top of the radiator (see illustrations). Unscrew the radiator lower mounting boit(s| and swing the bottom of the radiator forward. Disconnect the fan wiring connector (see illustration 4.3c). Also disconnect the wiring connector from the fan switch in the radiator (see illustration 4.9).
3 Unscrew the radiator upper mounting bolts, noting the arrangement of the collars and rubber grommets, and remove tne radiator (see illustrations 7.2a and b or с and d).
4 If necessary, separate the cooling fan (see Section 4) from the radiator.
5 Where fitted, remove the stone guard from the radiator. Check the stone guard and the radiator for signs of damage and clear any dirt or debris that might obstruct air flow and inhibit cooling. If the radiate fins are badly damaged or broken the radiator must be renewed. Also check the rubber mounting grommets, and renew them if necessary.
Дата добавления: 2015-10-29; просмотров: 125 | Нарушение авторских прав
| <== предыдущая страница | | | следующая страница ==> |
| Filler neck hose clamps (A), cover | | | A Access to the inner hose (arrowed) is restricted |