Читайте также:
|
Proper direction.
Thrust washer
2nd gear pinion
Splined washer
6th gear pinion
6th gear pinion
bush
Splined washer and
circlip
Combined 3rd/4th
gear pinion
Circlip and splined
washer
5th gear pinion
| m 11 12 |
bush
5th gear pinion
Thrust washer
Input shaft with
integral 1st gear
pinion
2«50 Engine, clutch and transmission
|
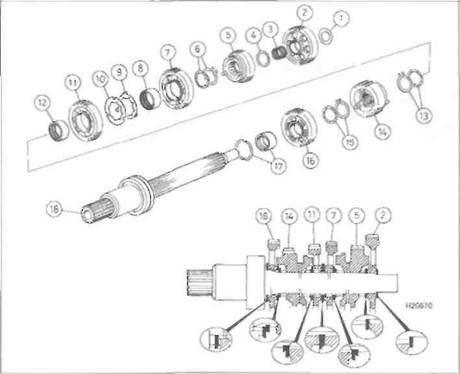
| 29.1b Transmission output shaft components |
| J Thrust washer 2 1 si gear pinion 3 Needle bearing 4 Thrust washer 5 5th gear pinion 6 Circlip and splined washer Input shaft |
| Disassembly 2 On Jand Кmodels, if the needle bearing did not remain in its cage in the crankcase, slide it off the left-hand end of the shaft. On L, N and R models, slide the needle bearing cage and bearing off the left-hand end of the shaft (see illustrations 29.18b and a). 3Slide the thrust washer, the 2nd gear pinion, the splined washer, the 6th gear pinion and its bush, and the splined washer off the shaft (see illustrations 29.17f, e, d, c, b and a). 4Remove the circlip securing the combined |
| 14 6th gear pinion 15 Circlip and splined washer 16 2nd gear pinion 17 2nd gear pinion bush and thrust washer 18 Output shaft with integral |
7 3rd gear pinion
8 3rd gear pinion bush
9 Lockwasher
10 Splined washer
11 4th gear pinion
12 4th gear pinion bush
13 Splined washer and circlip bearing
3rd/4th gear pinion, then slide the pinion off the shaft (see illustrations 29.16b and a).
5 Remove the circlip securing the 5th gear pinion, then slide the splined washer, the pinion and its bush, and the thrust washer off the shaft (see illustrations 29.1 5e, d, c, b and a).
6 The 1st gear pinion is integral with the shaft.
Inspection
7 Wash all of the components in clean solvent and dry them off.
8 Check the gear teeth for cracking, chipping. pitting and other obvious wear or damage.
Any pinion that is damaged as such must be renewed.
9 Inspect the dogs and the dog holes in the
gears for cracks, chips, and excessive wear
especially in the form of rounded edges. Make
sure mating gears engage properly. Renew
the paired gears as a set If necessary.
10 Check for signs of scoring or bluing on the pinions, bushes and shaft. This could be caused by overheating due to inadequate lubrication. Check that all the oil holes and passages are clear. Renew any damaged pinions or bushes.
11 Check that each pinion moves freely on the shaft or bush but without undue freeplay. Check that each bush moves freely on the shaft but without undue freeplay. If the necessary measuring equipment is available, the gear, bush and shaft dimensions can be checked and compared with the specifications at the beginning of this chapter.
12 The shaft is unlikely to sustain damage unless the engine has seized, placing an unusually high loading on the transmission, or the machine has covered a very high mileage. Check the surface of the shaft, especially where a pinion turns on it, and renew the shaft if it has scored or picked up. or if there are any cracks. Damage of any kind can only be cured by renewal.
13 Check the washers and circlips and renew any that are bent or appear weakened or worn. Use new ones if in any doubt. It is good practice to renew the washers and circlips as a matter of course when overhauling the gearshaft.
Reassembly
14 During reassembly, apply engine oil to the mating surfaces of the shaft, pinions and bushes, and to the bearings. When installing the circlips. do not expand the ends any further than is necessary. Install the stamped circlips so that their chamfered side faces the pinion it secures (see correct fitting of a stamped circlip illustration in Tools and Workshop Tips of the Reference section) Also refer to illustration 29." a.
15 Slide the thrust washer onto the left-hand end of the shaft, followed by the 5th gear pinion bush, aligning:he oil hole in the bush with the hole in the shaft, and the 5th gear

|
| ^J | ||||||
| <== предыдущая страница | | | следующая страница ==> |
| A Discard the oil seal if it is worn, damaged, or shows signs of leakage | | | A Slide on the thrust washer ... 29.15b ... the 5th gear pinion bush . |