|
Читайте также: |
specified, renew both the piston and rings as a set. If new rings are being used, measure the clearance using the new rings. If the clearance is greater than that specified, the piston Is worn and must be renewed.
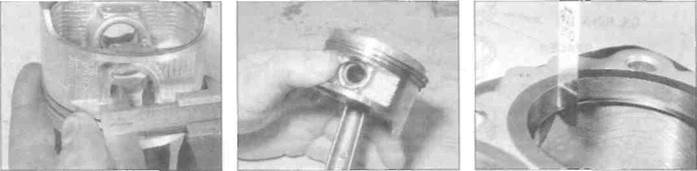
13 Check the piston-to-bore clearance by measuring the bore (see Section 22) and the piston diameter. Make sure each piston is matched to its correct cylinder. Measure the piston at the specified distance (see Specifications) up from the bottom of the skirt and at 90° to the piston pin axis (see illustration). Subtract the piston diameter from the bore diameter to obtain the clearance. If it is greater than the specified figure, the piston must be renewed (assuming the bore itself is within limits).
14 If not already done (see Section 24). apply clean engine oil to the piston pin, insert it into the piston and check for any freeplay between the two (see illustration). Measure Ihe pin external diameter (see illustration 24.9b), and the pin bore in the piston (see illustration). Calculate the difference to obtain the piston pln-to-piston pin bore clearance. Compare the result to the specifications at the beginning of the Chapter, If the clearance is greater than specified, renew the components that are worn beyond their specified limits. Repeat the measurements between tine pin and the connecting rod small-end (see illustration 24.9c).
Installation
15 Inspect and install the piston rings (see Section 26).
16 Lubricate the piston pin. the piston pin bore and the connecting rod small-end bore with molybdenum disulphide oil (a 50/50 mixture of molybdenum disulphide grease and clean engine oil).
17 When installing the pistons onto the connecting rods, make sure that the IN mark Is on the same side as the oil hole in the connecting rod. Install a new circlip In one side of the piston (do not re-use old circllps). Line up the piston on its correct connecting rod, and insert the piston pin from the other side (see illustration 25.4b). Secure the pin with the other new circlip. When installing the circlips, compress them only just enough to fit them in the piston, and make sure they are properly seated in their grooves with the open end away from the removal notch (see illustration).
18 On J and К models, Install the cylinder block (see Section 14). then fit engine into the frame (see Section 5).
19 On L, N and R models, install the piston/connecting rod assemblies (see Section 24). Reassemble the crankcase halves (see Section 21). then fit the engine into the frame (see Section 5).
| % | ^ |
26 Piston rings -
inspection and installation
1 It is good practice to renew the piston rings when an engine is being overhauled. Before installing the new piston rings, the ring end gaps must be checked with the rings Installed in the cylinder.
2 Lay out the pistons and the new ring sets so the rings will be matched with the same piston and cylinder during the end gap measurement procedure and engine assembly.
3 To measure the Installed ring end gap, insert the top ring into the top of the first cylinder and square it up with the cylinder walls by pushing it in with the top of the piston. The ring should be about 20 mm below the top edge of the cylinder. To measure the end gap, slip a feeler gauge between the ends of the ring and compare the measurement to the specifications ot the beginning of the Chapter (see illustration).
4 If the gap is larger or smaller than specified, double check to make sure that you have the correct rings before proceeding.
5 If the gap is too small, it must be enlarged or the ring ends may come in contact with each other during engine operation, which
|
Дата добавления: 2015-10-29; просмотров: 138 | Нарушение авторских прав
| <== предыдущая страница | | | следующая страница ==> |
| B Connecting rod size number (A) and weight code (B) | | | B Measure the internal diameter of the bore in the piston |