Читайте также:
|
and reconnect it (see illustrations 5.12a and b). Install the fuel tank (see Chapter 4).
20 Refill the engine with oil (see Chapter 1).
21 Install the lower fairing (see Chapter 8).
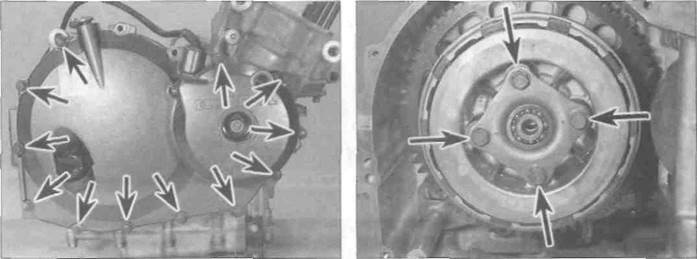
| I |
16 Clutch - removal, inspection and installation
Note: The clutch can be removed with the engine in the frame. If the engine has been removed, ignore the steps which don't apply.

|
| Ш | . |
| GBSm ! ШШ | HE!4 |
| (,^J.- ^^d | ^^ |
| '■ | |
| и |
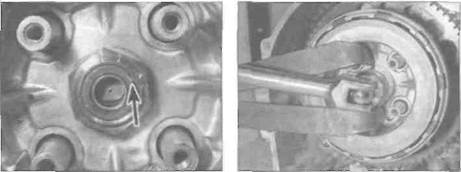
A Locate the gasket over the dowel (arrowed)
B... and install the cover
2»26 Engine, clutch and transmission
|
16.5 Clutch cover bolts (arrowed) - two cable bracket bolts already removed
16.6 Unscrew the bolts (arrowed) and remove the plate and springs

|
| 16.7b... and slacken it as described the release bearing in the centre of the clutch release plate. 6 Working evenly in a criss-cross pattern, gradually slacken the clutch release plate bolts until spring pressure is released, then remove the bolts, plate and springs (see illustration). |
16.7a Unstake the nut (arrowed)...
Removal
1 Remove the lower talrlng (see Chapter 8).
2 Drain the engine oil (see Chapter 1).
3 Unscrew the two bolts securing the clutch cable bracket to the alternator/cluxh cover on the right-hand side of the engine, then free the cable end from the release lever (see illustrations 17.2a and b). Position the cable clear of the engine.
4 Remove the fuel tank (see Chapter 4). Trace the alternator wiring from the alternator/clutch cover and disconnect it at the white (J and К models) or red (L, N and R models) 3-pin connector (see illustrations 5.11a and b). Release the wiring from any clips or ties, noting its routing, and feed it through to the cover.
5 Unscrew the cover bolts and remove the cover, being prepared to catch any residual oil (see illustration). Discard the gasket as a new one must be used. Remove the two dowels from either the cover or the crankcase if they are loose. Note the pushrod fitted in the bottom of the shaft in the cover and remove it for safekeeping if required (see illustration 16.34). It is possible that it is stuck to
7 The clutch nut Is staked against the transmission input shaft (see illustration). Unstake the nut using a screwdriver, a punch, or a small drill. To slacken the clutch nut the input shaft must be locked. This can be done in several ways:
a) If the engine is in the frame, engage 1st gear and have an assistant hold the rear brake on hard with the rear tyre in firm contact with the ground.
b) Use the Honda service tool, available from a dealer.
c) A home-made tool made from two strips of steel bent at the ends and bolted together in the middle (see Tool tip), can be used to stop the clutch centre from turning
whilst the nut is slackened (see illustration).
d) If the engine is out of the frame, fit a
close-fitting ring spanner or socket over
the output shaft splines, select top gear
and hold the spanner or socket while the
nut is slackened.
ШПЁ

|
| 2-SIN ДРРЯОХ. |
Tip
Дата добавления: 2015-10-29; просмотров: 163 | Нарушение авторских прав
| <== предыдущая страница | | | следующая страница ==> |
| Unscrew the bolts (arrowed) and remove the cover | | | A clutch centre holding tool can easily be made using two strips of steel bent over at the ends and bolted together in the middle |