Читайте также:
|
A Unscrew the nut (arrowed)..
B... and on L, N and R models, remove the position marker
Brakes, wheels and tyres 7*17
|
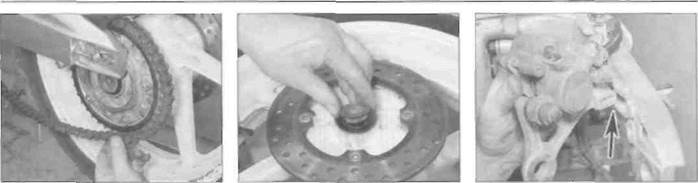
15.4 Disengage the chain and remove the wheel
15.6 Remove the collars
15.7 Locate the lug on the bracket into the slot in the swingarm (arrowed)
4 Disengage the chain from the sprocket and
remove the wheel from the swingarm (see
illustration).
Caution: Do not lay the wheel down and allow it to rest on the disc or the sprocket - they could become warped. Set the wheel on wood blocks so the disc or the sprocket doesn't support the weight of the wheel. Do not operate the brake pedal with the wheel removed.

|
| 15.10a Slide in the axle from the left... |
5 Check the axle for straightness by rolling It
on a flat surface such as a piece of plate glass
(if the axle is corroded, first remove the
corrosion with fine emery cloth). If the
equipment is available, place the axle in
V-blocks and check the runout using a dial
gauge. If the axle is bent or the runout
exceeds the limit specified at the beginning of
the Chapter, renew it.
6 Remove the collar from each side of the
wheel for safekeeping (see illustration). Refer
to Section 16 if wheel bearing renewal is
required.
Installation
7 Apply a thin coat of grease to the lips of each grease seal, and also to the collars and the axle. Slide the right-hand adjustment position marker onto the swingarm on J and К models and onto the axle on L. N and R models, making sure it is the correct way round. If displaced, locate the brake caliper bracket into the swingarm (see illustration).
8 If removed, install the collars into the wheel (see illustration 15.6). Manoeuvre the wheel so that it is in between the ends of the swingarm and apply a thin coat of grease to the axle. Make sure the brake caliper bracket is still correctly positioned against the swingarm.
9 Engage the drive chain with the sprocket and lift the wheel into position (see illustration 15.4). Make sure the collars and caliper bracket remain correctly in place, and that the brake disc fits squarely into the caliper with the pads positioned correctly each side of the disc.
10 Install the axle from the left-hand side; on
L, N and R models ensure that the left-hand
adjustment marker is in position. As the axle is
inserted, make sure that on J and К models it
passes through the chain adjusters, and on all
models that it passes through the caliper
bracket (see illustration). Check that everything is correctly aligned, then on L. N and R models fit the right-hand adjustment position marker (see illustration 15.2b). Fit the nut and tighten it to the specified torque setting, counter-holding the axle head on the other side of the wheel (see illustrations).
11 Check the chain slack as described in Chapter 1 and adjust if necessary.
12 Operate the brake pedal several times to bring the pads into contact with the disc. Check the operation of the rear brake carefully before riding the bike.

Дата добавления: 2015-10-29; просмотров: 136 | Нарушение авторских прав
| <== предыдущая страница | | | следующая страница ==> |
| Remove the spacers from the wheel | | | Front wheel bearings |