Читайте также:
|
15.6a Unscrew the bolt and remove the timing rotor (arrowed)...
15.6b... then slide the starter clutch off
15 Starter clutch and idle/
reduction gear - removal, ^k
inspection and installation ^
Note: The starter clutch can be removed with the engine in the frame. If the engine has been removed, ignore the steps which don't apply.
1 Remove the lower fairing (see Chapter 8).
2 Drain the engine oil (see Chapter 1).
3 Remove the fuel tank (see Chapter 4). Trace the ignition pulse generator wirhg from the left-hand side of the engine and disconnect it at the red 4-pin connector (J and К models) or brown 2-pin connector (L, N and R models) (see illustrations 5.12a and b). Release the wiring from any clips or ties, and feed it through to the cover, noting its routing.

15.7 Withdraw the shaft and remove the gear
4 Unscrew the bolts securing the starter clutch cover and remove the cover, being prepared to catch any residue oil (see illustration). Discard the gasket as a new one must be used. Remove the dowel from either the cover or the crankcase if It is loose.
5 To slacken the timing rotor/starter clutch bolt the engine must be prevented from turning. If the engine is still in the frame, select a gear and have an assistant apply the rear brake. If the engine has been removed. remove the clutch/alternator cover from the right-hand side of the engine (see Section 16) and hold the alternator rotor using a rotor strap.
Caution: Do not hold the rotor using a socket on the rotor bolt as it could become loose.
6 Unscrew the bolt and remove the washer and the timing rotor (see illustration). Draw the starter clutch off the end of the crankshaft, and remove the splined thrust washer from behind it (see illustration). Note how the wider grooves in the timing rotor, starter clutch and thrust washer fit over the wider spline on the shaft,
7 Withdraw the starter Idle/reduction gear shaft from the centre of the gear, then remove the gear, noting how it fits (see illustration).
Inspection
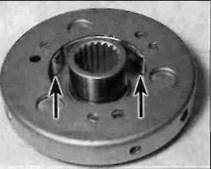
8 With the starter clutch face-down on a workbench, check that the starter driven gear rotates freely in an anti-clockwise direction
and locks against the rotor In a clockwise direction (see illustration). If it doesn't, renew the starter clutch.
9 Withdraw the needle roller bearing and
starter driven gear from the starter clutch (see
illustration). If the gear appears stuck, rotate
it anti-clockwise as you withdraw it to free it
from the starter clutch.
10 Check the condition of the rollers inside the clutch body (see illustration). If they are damaged, marked or flattened at any point, the starter clutch should be renewed -individual components are not available.
11 Check the bearing surface of the starter driven gear hub and the needle roller bearing. If the bearing surface shows signs of excessive wear or the or the bearing Itself is worn or damaged, they should be renewed.
12 Check the teeth of the starter idle/ reduction gear and the corresponding teeth of the starter driven gear and starter motor drive shaft. Renew the gears and/or starter motor if worn or chipped teeth are discovered on related gears. Also check the idle/reduction gear shaft for damage, and check that the gear is not a loose fit on the shaft. Renew the shaft if necessary.
Installation
13 Lubricate the hub of the starter driven
gear with clean engine oil, then install the
starter driven gear into the clutch, rotating it
anti-clockwise as you do so to spread the
rollers and allow the hub of the gear to enter
 | | |

|
|
—:
Дата добавления: 2015-10-29; просмотров: 148 | Нарушение авторских прав
| <== предыдущая страница | | | следующая страница ==> |
| Cylinder block (J and К | | | C ... and tighten it to the specified torque |