reverse of the removal sequence. Use new O-rings on the centre plug and the timing inspection plug and smear them and the plug threads with molybdenum disulphide oil (a 50/50 mixture of molybdenum disulphide grease and engine oil) (see illustration).
Every 12,000 miles (18,000 km) or 18 months
Carry out all the items under the 4000 mile (6000 km) check:

|
Caution: If the machine is continually ridden in continuously wet or dusty conditions, the filter should be renewed more frequently.
1 Remove the old air filter as described In Section 8 and install a new one.
Every 24,000 miles (36,000 km) or two years
Carry out all the items under the 8000 mile (12,000 km) and 12,000 mile (18,000 km) checks, plus the following:

|
27 Cooling system - draining, flushing and refilling
Warning: Allow the engine to cool completely before performing this maintenance operation. Also, don't allow antifreeze to come into contact with your skin or the painted surfaces of the motorcycle. Rinse off spills immediately with plenty of water. Antifreeze is highly toxic if ingested. Never leave antifreeze lying around in an open container or in puddles on the floor; children and pets are attracted by its sweet smell and may drink it. Check with local authorities (councils) about disposing of antifreeze. Many communities have collection centres which will see that antifreeze is disposed of safely. Antifreeze is also combustible, so don't store it near open flames.
Draining
1 Remove the lower fairing panel (see Chapter 8). On J and К models, remove the fuel tank (see Chapter 4). On L, N, and R
models, if required for Improved access, remove the trim panel covering the ргеззиге cap (see Chapter 8). Remove the pressure cap by turning it anti-clockwise until it reaches a stop (see illustrations 10.6a and b). If you hear a hissing sound (indicating there is still pressure in the system), wait until it stops. Now press down on the cap and continue turning the cap until it can be removed. 2 Position a suitable container beneath the water pump on the left-hand side of the
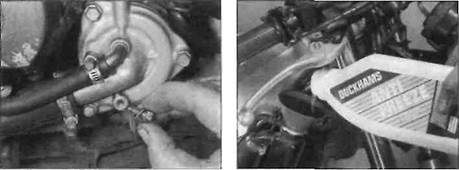
A Unscrew the drain plug (arrowed)...
engine. Remove the coolant drain plug and its sealing washer and allow the coolant to completely drain from the system (see illustrations). Retain the old sealing washer for use during flushing.
Flushing
| 27.2b... and allow the coolant to drain |
3 Flush the system with clean tap water by inserting a garden hose in the radiator filler neck. Allow the water to run through the system until it is clear and flows cleanly out of
.24 Every 24,000 miles (36,000 km) or two years
|
(pre-ride) checks). On J and К models, install the fuel tank (see Chapter 4).
| 27.12 Fill the system using the specified mixture down on the cap and remove it completely. 9 Drain the system once again. 10 Fill the system with clean water and repeat the procedure in Steps 6 to 9. Refilling 11 Fita new sealing washer onto the drain plug and tighten it securely (see illustration). 12Fill the system with the proper coolant mixture (see this Chapter's Specifications) (see illustration). Note: Pour the coolant in slowly to minimise the amount of air entering the system. 13 When the system is full (all the way up to the top of the radiator filler neck), install the pressure cap. Also top upthe coolant reservoir to the UPPER level mark (see Daily |
| 27.11 Use a new sealing washer on the drain plug the drain holes. If the radiator is extremely corroded, remove it (see Chapter 3) and have it cleaned at a radiator shop. 4 Clean the drain hole then install the drain plug using the old sealing washer. 5 Fill the cooling system with clean water mixed with a flushing compounc. Make sure the flushing compound is compatible with aluminium components, and follow themanufacturer's instructions carefully. 6 Start the engine and allow it to reach normal operating temperature. Let it run for about ten minutes. 7 Stop the engine. Let it cool for a while, then cover the pressure cap with a heavy rag and turn it anti-clockwise to the first stop. releasing any pressure that may be present in the system. Once the hissing stops, push Every four years |
14 Start the engine aid allow it to idle for 2 to 3 minutes. Flick the throttle twistgrip part open 3 or 4 times, so that the engine speed rises to approximately 4000 - 5000 rpm, then stop the engine.
15 Let the engine cool then remove the pressure cap as described In Step 1. Check that the coolant level is still up to the radiator filler neck. If It's low, add the specified mixture until it reaches the top of the filler neck. Refit the cap.
16 Check the coolait level in the reservoir and top up if necessary.
17 Check the system for leaks.
18 Do not dispose of the old coolant by pouring it down the drain. Instead pour It into a heavy plastic container, cap it tightly and take it into an authorised disposal site or service station - see Warning at the beginning of this Section.
| I |
28 Brake caliper seals and master cylinder seals -
renewal
1 Brake seals will deteriorate over a period of time and lose their effectiveness, leading to sticking operation or fluid loss, or allowing the ingress of air and dirt. Refer to Chapter 7 and dismantle the components for seal renewal.

|
29 Brake hoses - renewal
1 The hoses will in time deteriorate with age and should be renewed regardless of their apparent condition.
2 Refer to Chapter 7 and disconnect the brake hoses from the master cylinders and calipers. Always renew the banjo union sealing washers.
A Warning: Petrol (gasoline) is extremely flammable, so take extra precautions when you work on any part of the fuel system. Don't smoke or allow open flames or bare light bulbs near the work area, and don't work in a garage where a natural gas-type appliance is present. If you spill any fuel on your skin, rinse it off immediately with soap and water. When you perform any kind of work on the fuel
system, wear safety glasses and have a fire extinguisher suitable for a Class В type fire (flammable liquids) on hand.
1 The fuel delivery and vacuum hoses should be renewed regardless of their condition.
2 Remove the fuel tank (see Chapter 4). Disconnect the fuel hoses from the fuel tap and from the carburettors, noting the routing of each hose and where it connects (see Chapter 4 if required). It is advisable to make a sketch of the various hoses before removing them to ensure they are correctly installed.
3 Secure each new hose to its unions using new clamps. Run the engine and check for leaks before taking:he machine out on the road.
Дата добавления: 2015-10-29; просмотров: 142 | Нарушение авторских прав
| <== предыдущая страница | | | следующая страница ==> |
| Align the marks as shown and check the inlet valves for cylinders 2 and 4 | | | Cylinder compression - |