Читайте также:
|
Routine maintenance and servicing
1*13
Every 8000 miles (12,000 km) or 12 months
Carry out all the items under the 4000 mile (6000 km) check, plus the following:
 | |||
 | |||
|
12 Engine/transmission -
oil and oil filter change
| A |
Warning: Be careful when draining the oil, as the exhaust pipes, the engine, and the oil itself can cause severe burns.
1 Consistent routine oil and filter changes are the single most important maintenance procedure you can perform on a motorcycle. The oil not only lubricates the internal parts of the engine, transmission and clutch, but it also acts as a coolant, a cleaner, a sealant, and a protectant. Because of these demands, the oil takes a terrific amount of abuse and should be changed often with new oil of the recommended grade and type. Saving a little money on the difference in cost between a good oil and a cheap oil won't pay off if the engine is damaged.
2 Before changing the oil, warm up the engine so the oil will drain easily. Remove the lower fairing (see Chapter 8).
3 Put the motorcycle on its sdestand, and position a clean drain tray below the engine. Unscrew the oil filler cap from the clutch cover to vent the crankcase and to acl as a reminder that there is no oil In the engine (see illustration 7.3).
4 Next, unscrew the oil drain plug from the sump on the bottom of the engine and allow the oil to flow into the drain tray (see illustrations 7.4a and b). Check the condition of the sealing washer on the drain plug and obtain a new one if it is damaged or worn.
Р^ТСЯ To help determine whether ШШшл^ аПу abnormal or excessive Hi Ml engine wear is occurring,
place a strainer between the engine and the drain tray so that any debris in the oil is filtered out and can be examined.
the recommended type and amount of oil (see Daily (pre-ride) checks). With the motorcycle vertical, the oil level should lie between the upper and lower level lines on the dipstick (see Daily (pre-ride) checks). Install the filler cap (see illustration 7.3). Start the engine and let it run for two or three minutes (make sure that the oil pressure light extinguishes after a few seconds). Shut it off, wait a few minutes, then check the oil level. If necessary, add more oil to bring the level up to the upper level line on the dipstick. Check around the drain plug and the oil filter for leaks.
| Saving a little money on the | |
| Hint | difference between good and cheap oils won't pay off |
| if the engine is damaged as a result. |
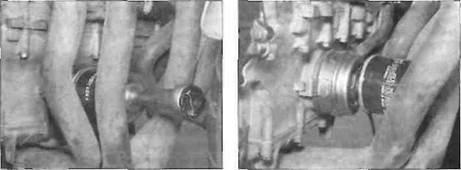
| 12.6a Unscrew the filter... |
9 The old oil drained from the engine cannot be re-used and should be disposed of properly. Check with your local refuse disposal company, disposal facility or environmental agency to see whether they will accept the used oil for recycling. Don't pour used oil into drains or onto the ground.
| hint |
flETflrfg-l Check the old oil carefully - ИиШВН jf Ц iS very metallic coloured,
Then the engine is experiencing wear from break-in (new engine) or from insufficient lubrication. If there are flakes or chips of metal in the oil, then something is drastically wrong internally and the engine will have to be disassembled for inspection and repair. If there are pieces of fibre-like material in the oil, the clutch is experiencing excessive wear and should be checked.

|
| 0800 66 33 66 |
| 12.6b... and drain it |
Note: It is antisocial and illegal to dump oil down the drain. To find the location of your local oil recycling bank, call this number free.

|
5 When the oil has completely drained, fit the plug to the sump, using a new sealing washer if necessary, and tighten it securely (see illustration 7.5). Avoid overtightening, as damage to the sump will result.
6 Now place the drain tray below the oil filter. Unscrew the oil filter using a filter adapter or a Strap wrench and tip any residue oil into the drain tray (see illustrations).
7 Smear clean engine oil onto:he rubber seal on the new filter, then manoeuvre it into position and screw it onto the engine (see illustrations). Tighten it securely using a filter wrench, or if one is not available, tighten the filter as tight as possible by hand (see illustration).
8 Refill the engine to the proper level using
Дата добавления: 2015-10-29; просмотров: 186 | Нарушение авторских прав
| <== предыдущая страница | | | следующая страница ==> |
| Wheels and tyres | | | Throttle cables |