|
Читайте также: |
the British bikes had pushrods, they had electric starters when the Brits relied on the kickstart, they had 12V electrics when even the biggest British bike used a 6V system. There seemed no end to the technical wizardry and when in 1968 the first four-cylinder CB750
road bike arrived the world changed for ever. They even had to invent a new word for it: superblke. Honda raced again with the CB750 at Daytona and won the World Endurance title with a prototype DOHC version that became the CB900 roadster. There was the six-cylinder CBX, the first turbocharged production bike, they invented the full-dress tourer with the Goldwing and came back to GPs with the revolUionary oval-pistoned NR500 four-stroke, a much-misunderstood bike that was more rolling experiment than racer. It was true, thOLgh. that Mr Honda was not keen on two-strokes - early motocross engines had to be explained away to him as lawnmower motors! However, in 1982 Honda raced the NS500, an agile three-cylinder lightweight against the big four-cylinder opposition in 500 GPs. The bike won in the first year and in '83 took the world title for Freddie Spencer. In four-stroke racing the V4 layout took over from the straight four, dominating TT, F1 and Endurance championships and when Superbike arrived Honda were ready with the RC30. On the roads the VFR V4 became an instant classic while the CBR600 invented another new class of bike on its way to becoming a best-seller.
And then there was the NR750. This limited-edition technological tour-de-force embodied many of Soichiro Honda's ideals. It used the latest techniques and materials in every component, from the oval-piston, 32-valve V4 motor to the titan urn coating on the windscreen, it was - as Mr Honda would have wanted - the best it could possibly be. A fitting memorial to the man who has shaped the motorcycle industry and motorcycles as we know them today.
Introduction 0.7
 |

|
| NC23 Tri-Arm - the firstCBR400RR |
Precision Miniatures
hen the grey imports phenomenon took off commercially, it bought to the UK two different types of bike. To understand the difference you must first understand a few basic facts about the Japanese home market, where the vast majority of these machines came from. Firstly, Japan's draconian licensing system effectively restricted riders to 400 cc four-strokes and 250 cc two-strokes. Secondly, the Japanese market is fashion conscious in the extreme. If a manufacturer gets it right then it will sell thousands of units. Get it wrong and your bikes will languish in the showrooms for ever, or until some budding entrepreneur buys them up cheaply and ships them to Europe.
So when the greys started landing, UK motorcyclists were not very surprised to discover that there was a 400 cc model in the CBR range beside the 1000 cc sports tourer and the best-selling C3R600. These were used bikes which those same restrictive laws effectively took off the roads of Japan once they were a few years old. The second type tended to be weird models that had failed Japanese youth's style test and arrived over here hardly used and sometimes even brand new.
Right at the head of the first category was the CBR400RR that first hit Japan's roads in 1988 and instantly stormed to the top of the sales charts. And no wonder. Although the motor was a development of the earlier CBR400 Aero that looked just like an early 'jellymould' CBR, the double-R had gear-driven cams and an aluminium frame as well as a 17-inch front wheel and mouth-watering styling complete with twin-headlamp fairing. Bear in mind that the FireBlade was four years
away and Hie 600 uu CBR had oainsliafls
driven by chains and a tubular steel chassis and you can see why the double-R was such a success. In fact in terms of technology, it was nearer to the RC30 that was launched for 1988 and its 400 cc sibling the NC30, or
VFR400R, as shown by the fact that the 400 cc in-line four also had a factory code: NC23. In fact it was better known as the Tri-Arm, a reference to the sticker on the side of the fairing meant to draw attention to the heavily triangulated swinging arm that looked like it had just been unbolted from a factory racer.
The commercial domination of the Tri-Arm was continued in 1990 by the next generation of CBR400RR, the L-model, the first of the Gull-Arms or NC29. Despite the superficial similarities of the two bikes, the Gull-Arm was a completely new machine whose cycle parts had much in common with the VFR400R including 17-inch wheels front and rear. The motor's cylinders and upper crankcase half were cast in one piece, again before the FireBlade and the CBRG00 M-model used the same layout. The bike's name came from the new swinging arm design, again derived from current race-track practice. Instead of the straight, rectangular cross-sectional members, each side of the arm was a single,
massive fabrication. On the right side, it had an elbow bend in it to accommodate the exhaust pipe without compromising ground clearance. Again this was copied from Grand Prix practice (despite the real racers being two-strokes) just a year after the design was first seen on the track, and it was this feature that gave the bike the Gull-Arm name.
The smaller bike has regularly been given the same colour schemes as the bigger Blade and has basically remained otherwise unchanged. There have been minor adjustments and tie claimed power output has even gone down a fraction and the weight up by a kilogram - just like on the 400 cc V4s.
When the 900 cc FireBlade hit world markets and revolutionised the sports bike market sector in 1992 the Gull-Arm got the same paintwork and even a FireBlade sticker on the fairing. Even though the 400 was the earlier design, it was immediately (or rather lately) christened the Baby Blade and as far as anyone can tell became the best-selling grey import machine in the UK.
Acknowledgements
| O |
ur thanks are due to Elliott Motorcycles of Swindon who supplied the machines featured in the Illustrations throughout this manual and provided technical literature. We would also like to thank NGK Spark Plugs (UK) Ltd for supplying the colour spark plug condition photos and the Avon Rubber Company for supplying information on tyre fitting.
The introduction 'The Birth of a Dream' was written by Julian Ryder.
About this Manual
| T |
he aim of this manual is to help you get the best value from your motorcycle. It can do so in several ways. It can help you decide what work must be done, even if you choose to have it done by a dealer: it provides information and procedures for routine maintenance and servicing; and it offers diagnostic and repair procedures to follow when trouble occurs.
We hope you use the manual to tackle the work yourself. For many simpler jobs, doing it yourself may be quicker than arranging an appointment to get the motorcycle into a dealer and making the trips to leave it and pick it up. More importantly, a lot of money can be saved by avoiding the expense the
shop must pass on to you to cover Its labour and overhead costs. An added benefit is the sense of satisfaction and accomplishment that you feel after doing the job yourself.
References to the left or right side of the motorcycle assume you are sitting on the seat, facing forward.
We take great pride in the accuracy of information given in this manual, but motorcycle manufacturers make alterations and design changes during the production run of a particular motorcycle of which they do not inform us. No liability can be accepted by the authors or publishers for loss, damage or injury caused by any errors in, or omissions from, the information given.
о«8 Identification numbers
The frame serial number is stamped into the right side of the steering head. The engine number is stamped into the right upper side of the crankcase, directly above the clutch unit. Both of these numbers should be recorded and kept in a safe place so they can be furnished to law enforcement officials in the event of a theft. The carburettor number is stamped into the back of each carburettor.
The frame serial number, engine serial
number and carburettor identification number should also be kept in a handy place (such as with your driver's licence) so they are always available when purchasing or ordering parts for your machine.
Identifying model years
The procedures in this manual identify the bikes by model code. The model code (e.g. CBR400RR-L) is printed on the colour code
label, which is located on the top of the rear mudguard under the passenger seat. The model code and production year can also be determined from the engine and frame serial numbers in the accompanying table. Note: Do not identify your bike using the date of registration; in some cases, especially where a new bike has been imported into the UK, the registration date will differ considerably from the model code year.
| Model, cpde and production year | Frame number | Engine number | Carburettor number |
| CBR400RR-J(1988) | NC23-1020001 to 1036454 | NC23E-1020001 to1036510 | VG04A |
| CBR400RR-K(1989) | NC23 1090001 to 1098116 | NC23E 1090001 to1098123 | VG04B |
| CBR400RR-L(1990and91) | NC29-1000001 to 1010598 | NC23E 1300001 to1310636 | VP01A |
| CBR400RR-N(1992and93) | NC29-1050001 on | NC23E-1420001 on | VP01A |
| CBR400RR-R(1994-on) | NC29-1100001 on | NC23E-1500001 on | VP01B |
Buying spare parts
Once you have found all the identification numbers, record them for reference when buying parts. Since the manufacturers change specifications, parts and vendors (companies that manufacture various components on the machine), providing the ID numbers is the only way to be reasonably sure that you are buying the correct parts.
Whenever possible, take the worn part to the dealer so direct comparison with the new component can be made. Along the trail from the manufacturer to the parts shelf, there are numerous places that the part can end up with the wrong number or be listed incorrectly.
The two places to purchase new parts for your motorcycle - the accessory shop and the motorcycle dealer - differ in the type of parts they carry. While dealers can obtain virtually every part for your motorcycle, the accessory shop is usually limited to normal high wear items such as shock absorbers, tune-up parts, various engine gaskets, caoles, chains, brake parts, etc. Rarely will an accessory outlet have major suspension components, cylinders, transmission gears, or cases.
Used parts can be obtained for roughly half the price of new ones, but you can't always be sure of what you're getting. Once again, take your worn part to the breaker for direct comparison.
Whether buying new, used or rebuilt parts, the best course is to deal directly with someone who specialises in parts for your particular make.
Unofficial (grey) imports
All CBR400RR models in the UK are unofficial (grey) imports from Japan. The majority are second-hand machines and are allocated age-related licence plates for UK use (the licence plate letter reflects the production year in Japan), although new CBRs are allocated current year UK registration letter plates.
Common changes made prior to sale in the UK are the disabling of the rev-limiter device (or more correctly 'speed-limiter' device), which is fitted to comply with Japanese market regulations. The device is located in the speedometer head and is linked to the
ignition control unit to cut the ignition when 180 kmh (112 mph) is reached. The importers have several methods of disabling the device, either fitting a plug-in unit at the speedometer head or ignition control unit, or by modifying the llmiter mechanism.
Speedometers calibrated in kilometres (kmh) must have a miles per hour (mph) scale applied. This can be done simply by applying a suitable overlay to the speedometer lens or a more professional approach is to fit one of the replacement dial faces to the speedometer itself. In each case It is important that the correct size overlay or dial face is used.
The ratings of certain bulbs (headlight, sidelight, brake/tail light and turn signal lights) differ from those normally used on UK market machines. Of these, the brake/tail light bulbs will most likely have been replaced with the regulation 21/5W UK fitment.
Note that restrictor kits can be fitted to the CBR engines to reduce their power output to 33 bhp (25 kw) to comply with the UK full standard category A licence. Kits can be obtained from and fitted by grey importers.
Identification numbers 0.9

|
 The colour code label is under the passenger seat
The engine number is stamped on the top The frame number is stamped on the right-
of the crankcase on the right-hand side of hand side of the steering head
the engine
о.ю Safety first!
Professional mechanics are trained in safe working procedures. However enthusiastic you may be about getting on with the job at hand, take the time to ensure that your safety is not put at risk. A moment's lack of attention can result In an accident, as can failure to observe simple precautions.
There will always be new ways of having accidents, and the following is not a comprehensive list of all dangers; it is intended rather to make you aware of the risks and to encourago a safe approach to all work you carry out on your bike.
Asbestos
• Certain friction, insulating, sealing and
other products - such as brake pads, clutch
linings, gaskets, etc. - contain asbestos.
Extreme care must be taken to avoid
inhalation of dust from such products since it
Is hazardous to health. If in doubt, assume
that they do contain asbestos.
Fire
• Remember at all times that petrol is highly
flammable. Never smoke or have any kind of
naked flame around, when working on the
vehicle. But the risk does not end there - a
spark caused by an electrical short-circuit, by
two metal surfaces contacting each other, by
careless use of tools, or even by static
electricity built up in your body under certain
conditions, can ignite petrol vapoLr, which in
a confined space is highly explosive. Never
use petrol as a cleaning solvert. Use an
approved safety solvent.
• Always disconnect the battery earth terminal before working on any part of the fuel or electrical system, and never risk spilling fuel on to a hot engine or exhaust.
• It is recommended that a fire extinguisher of a type suitable for fuel and electrical fires is kept handy in the garage or workplace at all times. Never try to extinguish a fuel or electrical fire with water.
Fumes
• Certain fumes are highly toxic and can quickly cause unconsciousness and even death if inhaled to any extent. Petrol vapour comes into this category, as do the vapours from certain solvents such as trichloro-ethylene. Any draining or pouring of such volatile fluids should be done in a well ventilated area.
• When using cleaning fluids and solvents, read the instructions carefully. Never use materials from unmarked containers - they may give off poisonous vapours.
• Never run the engine of a motor vehicle In an enclosed space such as a garage. Exhaust fumes contain carbon monoxide which is extremely poisonous: if you need to run the engine, always do so in the open air or at least have the rear of the vehicle outside the workplace.
The battery
• Never cause a spark, or allow a naked
light near the vehicle's battery. It will normally
be giving off a certain amount of hydrogen
gas, which is highly explosive.
• Always disconnect the battery ground (earth) terminal before working on the fuel or electrical systems (except where noted).
• If possible, loosen the filler plugs or cover when charging the battery from an external source. Do not charge at an excessive rate or the battery may burst.
• Take care when topping up, cleaning or carrying the battery. The acid electrolyte, evenwhen diluted, is very corrosive and should not be allowed to contact the eyes or skin. Always wear rubber gloves and goggles or a face shield. If you ever need to prepare electrolyte yourself, always add the acid slowly to the water; never add the water to the acid.
Electricity
• When using an electric power tool, inspection light etc., always ensure that the appliance is correctly connected to its plug and that, where necessary, it is properly grounded (earthed). Do not use such appliances in damp conditions and, again, beware of creating a spark or applying excessive heat in the vicinity of fuel or fuel vapour. Also ensure that the appliances meet national safety standards.
• A severe electric shock can result from touching certain parts of the electrical system, such as the spark plug wires (HT leads), when the engine is running or being cranked. particularly if components are damp or the insulation is defective. Where an electronic ignition system is used, the secondary (HT) voltage is much higher and could prove fatal.

 Remember...
X Don't start the engine witnout first
ascertaining that the transmission is in
neutral.
X Don't suddenly remove the pressure cap
from a hot cooling system - cover it with a
cloth and release the pressure gradually first,
or you may get scalded by escaping coolant.
X Don't attempt to drain oil until you are
sure it has cooled sufficiently to avoid
scalding you.
X Don't grasp any part of the engine or
exhaust system without first ascertaining
that it is cool enough not to burn you.
X Don't allow brake fluid or antifreeze to
contact the machine's paintwork or plastic
components.
X Don't siphon toxic liquids such as fuel,
hydraulic fluid or antifreeze by mouth, or
allow them to remain on your skin.
X Don't inhale dust - it may be injurious to
health (see Asbestos heading).
X Don't allow any spilled oil or grease to
remain on the floor - wipe it up right away,
before someone slips on it.
X Don't use ill-fitting spanners or other
tools which may slip and cause injury.
X Don't lift a heavy component which may
be beyond your capability - get assistance.
X Don't rush to finish a job or take
unverified short cuts.
X Don't allow children or animals in or
around an unattended vehicle.
X Don't inflate a tyre above the
recommended pressure. Apart from
overstressing the carcass, in extreme cases
the tyre may blow off forcibly.
• Do ensure that the machine is supported securely at all times. This is especially important when the machine is blocked up to aid wheel or fork removal.
• Do take care when attempting to loosen a stubborn nut or bolt. It is generally better to pull on a spanner, rather than push, so that if you slip, you fall away from the machine rather than onto it.
• Do wear eye protection when using power tools such as drill, sander, bench grinder etc.
• Do use a barrier cream on your hands prior to undertaking dirty jobs - it will protect your skin from Infection as well as making the dirt easier to remove afterwards; but make sure your hands aren't left slippery. Note that long-term contact with used engine oil can be a health hazard.
• Do keep loose clothing (cuffs, ties etc. and long hair) well out of the way of moving mechanical parts.
• Do remove rings, wristwatch etc.. before working on the vehicle - especially the electrical system.
• Do keep your work area tidy - it is only too easy to fall over articles left lying around.
• Do exercise caution when compressing springs for removal or installation. Ensure that the tension is applied and released in a controlled manner, using suitable tools which preclude the possibility of the spring escaping violently.
• Do ensure that any lifting tackle used has a safe working load rating adequate for the job.
• Do get someone to check periodically that all is well, when working alone on the vehicle.
• Do carry out work in a logical sequence and check that everything is correctly assembled and tightened afterwards.
• Do remember that your vehicle's safety affects that of yourself and others. If in doubt on any point, get professional advice. • If in spite of following these precautions, you are unfortunate enough to injure yourself, seek medical attention as soon as possible.
Daily (pre-ride) checks o.n
Note: The daily (pre-ride) checks outlined in the owner's manual covers those items which should be inspected on a daily oasis.
1 Engine/transmission oil level check
| Before you start: |
| • Start the engine and allow it to reach normal operating temperature. Caution: Do not run the engine in an enclosed space such as a garage or workshop. • Stop the engine and support the motorcycle in an upright position, using an auxiliary stand if required. Allow it to stand |
undisturbed for a few minutes to allow the oil level to stabilise. Make sure the motorcycle is on level ground.
Bike care:
• If you have to add oil frequently, you should check whether you have any oil leaks. If there is no sign of oil leakage from the joints and gaskets the engine could be burning oil (see Fault Finding).
| The correct oil • Modern, high-rewing engines place great demands on thei' oil. It is very important that the correct oil for your bike Is used, • Always top up with a good quality oil of the specified type and viscosity and do not overfill the engine. | |
| Oil type | API grade SE, SF orSG |
| Oil viscosity | SAE10W40 |
|
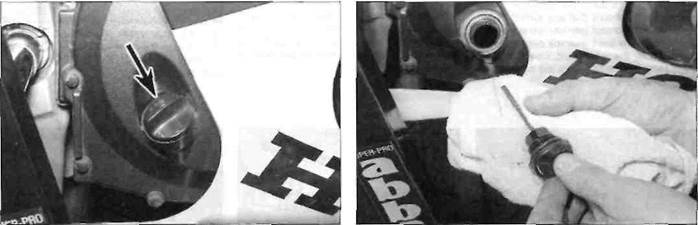
Unscrew the oil filler cap (arrowed) from the right-hand crankcase cover. The dipstick is integral with the oil filler cap, and is used to check the engine oil level.
| screw it in. |
Using a clean rag or paper towel, wipe off all the oil from the dipstick. Insert the clean dipstick back into the engine, but do not

|
Remove the dipstick and observe the level of the oil, which should be somewhere In between the upper and lower level lines (arrowed).
If the level is below the lower line, top the engine up with the recommended grade and type of oil. to bring the level up to the upper line on the dipstick. Do not overfill.
o.i2 Daily (pre-ride) checks
2 Brake fluid level checks
A
Warning: Brake hydraulic fluid can harm your eyes and damage painted surfaces, so use extreme caution when handling and pouring it and cover surrounding surfaces with rag. Do not use fluid that has been standing open for some time, as it absorbs moisture from the air which can cause a dangerous loss of braking effectiveness.
|
Before you start:
• Support the motorcycle in an upright position, using an auxiliary stand If required, and turn the handlebars until the top of the front master cylinder is as level as possible. The rear master cylinder reservoir is located behind the seat cowling on the right-hand side of the machine.
• Make sure you have the correct hydraulic fluid. DOT 4 is recommended.
• Wrap a rag around the reservoir being worked on to ensure that any spillage does not come into contact with painted surfaces.
• Access to the front reservoir cap screws is restricted by the windshield. Use a short or angled screwdriver to access the screws.
Bike care:
• The fluid in the front and rear brake master cylinder reservoirs will drop slightly as the brake pads wear down.
• If any fluid reservoir requires repeated topping-up this is an indication of an hydraulic leak somewhere in the system, which should be investigated immediately.
• Check for signs of fluid leakage from the hydraulic hoses and components - if found. rectify immediately.
• Check the operation of both brakes before taking the machine on the road; If there is evidence of air in the system (spongy feel to lever or pedal), it must be bled as described in Chapter 7.
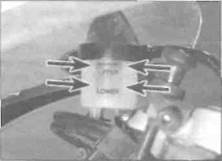
The front brake fluid level is visible through the reservoir body - it must be between the UPPER and LOWER level ines (arrowed).

|
If the level is below the LOWER level line. remove the two reservoir cap screws and remove the cap, the diaphragm plate and the diaphragm.
| З |
Тор up with new DOT 4 hydraulic fluid, until the level is just below the UPPER level line. Do not overfill the reservoir, and take care to avoid spills (see Warning above).
Ensure that the diaphragm Is correctly seated before installing the plate and cap. Tighten the cap screws securely.
|
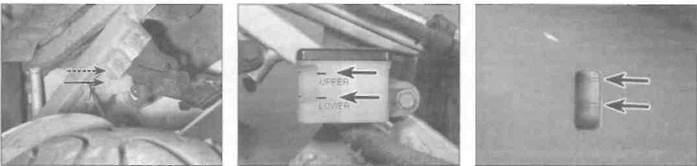
On J and К models, the rear brake fluid level is visible by looking across the top of the rear wheel at the window In the rear corner of the reservoir body - the fluid level must be between the UPPER and LOWER level lines (arrowed).
If the lines aren't visible, remove the seat cowling (see Chapter 8). The lines are also marked on the outer corner (arrows).
On L, N and R models, the rear brake fluid level is visible by looking through the aperture in the seat cowling at the window in the reservoir body - the fluid level must be between the UPPER and LOWER level lines (arrowed).
Daily (pre-ride) checks o,
|
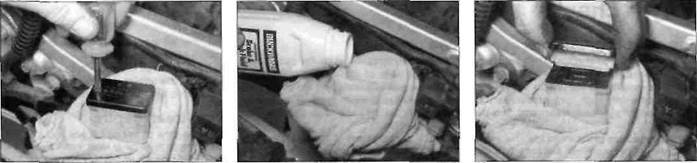
If the level is below the LOWER level line, remove the seat cowling (see Chapter 8). Unscrew the reservoir cover screws and remove the cover, diaphragm plate and diaphragm.
Top up with new DOT 4 hydraulic fluid, until the level is just below the UPPER level line. Do not overfill the reservoir, and take care to avoid spills (see Warning above).
| 1 |
r\ Ensure that the diaphragm is correctly U seated before installing the plate and cover. Tighten the cover screws securely, then install the seat cowling (see Chapter 8).
Дата добавления: 2015-10-29; просмотров: 202 | Нарушение авторских прав
| <== предыдущая страница | | | следующая страница ==> |
| Inside this Manual | | | Coolant level check |