Читайте также:
|
1 Clutch cable upper adjuster
2 Steering head beanngs
3 Air filter
4 Idle speed adjuster
5 Fuel filter
6 Battery
7 Drive chain adjuster
8 Coolant drain bolt
9 Engine/transmission oil drain bolt
10 Engine/transmission oil filter
1.6 Introduction
1 This Chapter is designed to help the home mechanic maintain his/her motorcycle for safety, economy, long life and peak performance.
2 Deciding where to start or plug into the routine maintenance schedule depends on several factors. If the warranty period on your motorcycle has just expired, and if it has been maintained according to the warranty standards, you may want to pick up routine maintenance as it coincides with the next mileage or calendar interval. If you have owned the machine for some time but have never performed any maintenance on it, then you may want to start at the nearest interval
and include some additional procedures to ensure that nothing important is overlooked. If you have just had a major engine overhaul, then you may want to start the maintenance routine from the beginning. If you have a used machine and have no knowledge of its history or maintenance record, you may desire to combine all the checks into one large service initially and then settle into the maintenance schedule prescribed.
3 Before beginning any maintenance or repair, the machine should be cleaned thoroughly, especially around the oil filter, spark plugs, valve cover, seat cowling, carburettors, etc. Cleaning will help ensure
that dirt does not contaminate the engine and will allow you to detect wear and damage that could otherwise easily go unnoticed. 4 Certain maintenance information is sometimes printed on decals attached to the motorcycle. If the Information on the decals differs from that included here, use the Information on the decal.
Models are identified by their production code letter - refer to 'Identification numbers'at the front of this manual for details.
Every 600 miles (1000 km)
1 Drive chain and sprockets - ^
check, adjustment and Ц
lubrication ^
Check - every 600 miles (1000 km)
1 A neglected drive chain won't last long and can quickly damage the sprockets. Routine chain adjustment and lubrication isn't difficult and will ensure maximum chain and sprocket life.
2 To check the chain, place the bike on its sidestand and shift the transmission Into neutral. Make sure the ignition switch is OFF.
3 Push up on the bottom run of the chain and measure the slack midway between the two sprockets, then compare your measurement to that listed in this Chapter's Specifications (see illustration). As the chain stretches with wear, adjustment will periodically be necessary (see below). Since the chain will rarely wear evenly, roll the bike forwards so that another section of chain can be checked; do this several times to check the entire length of chain.
4 In some cases where lubrication has been neglected, corrosion and galling may cause the links to bind and kink, which effectively shortens the chain's length. Such links should be thoroughly cleaned and worked free. If the
chain is tight between the sprockets, rusty or kinked, it's time to renew it. If you find a tight area, mark it with felt pen or paint, and repeat the measurement after the bike has been ridden. If the chain's still tight in the same area, it may be damaged or worn. Because a tight or kinked chain can damage the transmission ouput shaft bearing, it's a good idea to renew it. Caution: If the machine is ridden with excessive slack in the drive chain, the chain could contact the frame and swingarm, causing severe damage.
Check - every 8000 miles (12,000 km) or 12 months
5 Check the entire length of the chain for damaged rollers, loose links and pins, and missing O-rings and renew it if damage is found. Note: Never install a new chain on old sprockets, and never use the old chain if you install new sprockets - renew the chain and sprockets as a set.
6 Remove the front sprocket cover (see Chapter 6). Check the teeth on the front and rear sprockets for wear (see illustration).
7 Inspect the drive chain slider on the swingarm for excessive wear and renew it if worn (see Chapter 6).
Adjustment
8 Rotate the rear wheel until the chain is
positioned with the tightest point at the centre
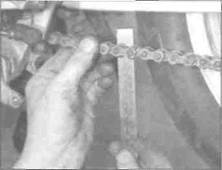
1.3 Push up on the chain and measure the slack
of its bottom run. If available, raise the rear wheel off the ground using an auxiliary stand or support.
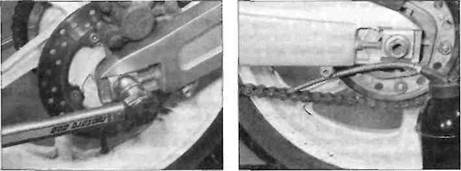
9 Slacken the rear axle nut. and on L. N and R
models the locknut on each chain adjuster
(see illustrations).
10 Turn the axle adjusters on both sides of
the swingarm until the specified chain tension
is obtained (get the adjuster on the chain side
close, then set the adjuster on the opposite
side) (see illustrations 1.9a and b). Be sure
to turn the adjusters evenly to keep the rear
wheel in alignment. If the adjusters reach the
end of their travel, the chain is excessively
worn and should be renewed (see Chapter 6).

 DIRECTION OF ROTATION
ENGINE SPROCKET REAR SPROCKET
WORN TOOTH WORN TOOTH
овин
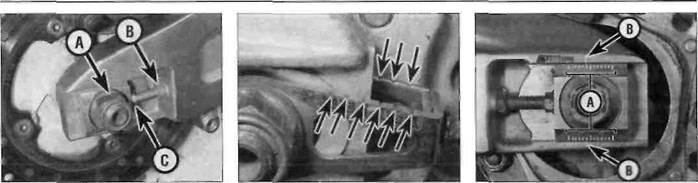
1.6 Check the sprockets in the areas indicated to see if they are worn excessively
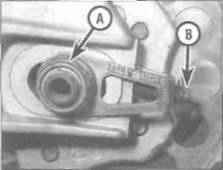
1.9a Rear axle nut (A), chain adjuster (B) -J and К models
Every 600 miles (1000 km)
1*7
|
|
1.9b Rear axle nut (A), locknut (B), adjuster (C) - L, N and R models
The chain wear decals will also indicate the need for chain renewal.
11 When the chain has the correct amount of slack, check that the wheel Is correctly aligned by making sure the marks on each adjustment marker are in the same position relative to the back of the swingarm on J and К models, or the notches in the swingarm on L, N and R models (see illustrations). If there is any discrepancy in the chain adjuster positions, adjust one of them so that Its position is exactly the same as the other, then recheck the chain freeplay as described above. It is important each adjuster is identically aligned otherwise the rear wheel will be out of alignment with the front.
12 Tighten the axle nut to the torque setting specified at the beginning of the Chapter (see illustration). On L, N and R models, tighten the chain adjuster locknuts securely.
Lubrication
13 If required, wash the chain in paraffin
(kerosene), then wipe it off and allow It to dry,
using compressed air If availabe. If the chain
is excessively dirty it should be removed from
the machine and allowed to soak in the
paraffin (see Chapter 6).
Caution: Don't use petrol, solvent or other
Дата добавления: 2015-10-29; просмотров: 150 | Нарушение авторских прав
| <== предыдущая страница | | | следующая страница ==> |
| Torque settings | | | Slacken the lockring (A) and turn the adjuster (B) in or out as required |