Читайте также:
|
Release the spring end from the pin (arrowed) and withdraw the release shaft
2*28 Engine, clutch and transmission
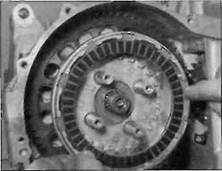
16.23a Slide on the thrust washer.
16.23b... and the drive sprocket and chain...
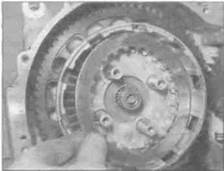
16.24... and fit the bush into the centre of the sprocket
|
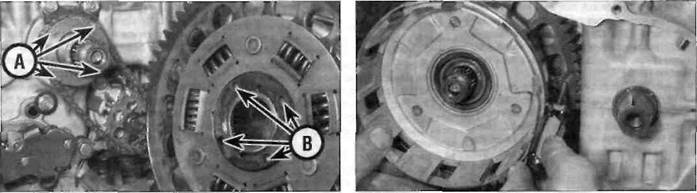
16.26a The pins (A) must locate in the holes (B)
16.26b Align the teeth of the pinions as described and slide the housing home
Installation
22 Remove all traces of old gasket from the crankcase and alternator/cMch cover surfaces.
23 If removed, slide the thrust washer onto the shaft, followed by the oil Dump drive sprocket, with its pins facing out, then loop the chain around both the drive and driven sprockets (see illustrations).
24 Smear the clutch housing bush with clean engine oil, then slide It onto the shaft and into the middle of the oil pump drive sprocket (see illustration).
25 Turn the engine using a socket or spanner on the alternator rotor bolt until the line next to the T on the rotor is positioned roughly
between the 1 and 2 o'clock positions - the idea is to position the crank web so that it does not interfere with the clutch housing as it is slid onto the shaft.
26 Slide the clutch housing onto the bush on the input shaft, making sure that the teeth of the primary driven gear on the back of the housing engage with those of the primary drive gear, and that the pins on the oil pump drive sprocket engage with the holes in the back of the housing (see illustration). As the primary driven gear is a split sprung gear, the teeth will be felt to engage with the drive gear and then go no further. At this point the teeth of the solid pinion and the sprung pinion have to be aligned by inserting a screwdriver blade between them and twisting it - the housing
will be felt to slide further in when they align and engage fully with the drive gear (see illustration). Use a screwdriver to turn the oil pump driven sprocket to locate the drive sprocket pins in their holes.
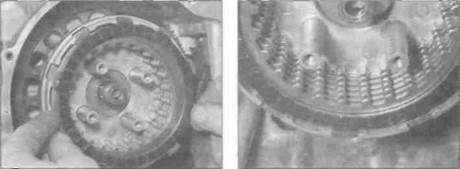
27 On L, N and R models, slide the thrust plate onto the shaft (see illustration).
28 Slide the pressure plate onto the shaft (see illustration).
29 Coat each clutch plate with engine oil, then build up the plates in the housing, making sure the oute-most friction plate, and on J and К models also the outermost plain plate, are correctly identified and fitted last (see Step 9). Start with a friction plate, then a plain plate and alternate friction and plain plates until all are Installed (see illustrations).
|
| 16.27 On L, N and R models, slide on the 16.28 Slide the pressure plate on the shaft thrust plate |
| JJPT* | |
| Br!1 | i |
| BS | |
| Wli |
| \ | ^— | ||
| i | w@? | Ш | ^ ~ |
| m | л\к С ш< | и * | |
| • 1 | ф^А |
16.29a Fit a friction plate first.
Engine, clutch and transmission 2*29
|
|
Дата добавления: 2015-10-29; просмотров: 150 | Нарушение авторских прав
| <== предыдущая страница | | | следующая страница ==> |
| A clutch centre holding tool can easily be made using two strips of steel bent over at the ends and bolted together in the middle | | | C Unscrew the nut... |