|
Читайте также: |
8.5c... and push the needle up from the 8.6a Thread a screw into the retainer... bottom
Fuel and exhaust systems 4«7
B... and use it to pull the retainer out
fits inside the holder. Push the needle up from the bottom of the piston and withdraw it from the top (see illustration 10.12a). Note the washer that fits between the head of the needle and the piston. Discard the O-ring on the holder as a new one must be used.
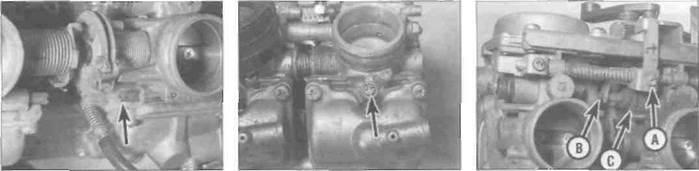
7 Remove the screws securing the float chamber to the base of the carburettor and remove it (see illustration). Remove the rubber gasket and discard it as a new one must be used. On J and К models, when working on Nos. 1 or 2 carburettors, first remove the idle speed adjuster holder (see illustration).
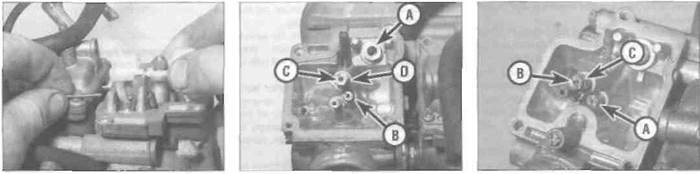
8 Using a pair of thin-nose pliers, carefully withdraw the float pin (see illustration). If necessary, displace the pin using a small
A Float chamber screws (arrowed) -L, N and R models shown
punch or a nail. Remove the float and unhook the float needle valve, noting how it fits onto the tab on the float (see illustration 10.8a). On J and К models, if required, unscrew and remove the float needle valve seat and its sealing washer (see illustration 8.9a).
9 Unscrew and remove the pilot jet (see
illustrations).
10 Unscrew and remove the main jet from the base of the needle jet (see illustration 8.9a or b).
11 Unscrew and remove the needle jet (see illustration 8.9a or b).
12 The pilot screw can be removed if required, but note that its setting will be disturbed (see Haynes Hint). Unscrew and remove the pilot screw along with its spring,
8.7b The holder is secured by two screws (arrowed)
washer and O-ring (see illustrations). Discard the O-ring as a new one must be used.
IfJrfWWI To record the pilot screw's ШмшаЛ current setting, turn the
screw in until it seats lightly, counting the number of turns necessary to achieve this, then fully unscrew it. On installation, the screw is simply backed out the number of turns you've recorded.
13 On J and К models, if you want to remove a choke plunger, slacken the screw on the plunger actuating arm, then lift the arm off the plunger (see illustration). Unscrew the choke
|
Withdraw the float pin and remove the float assembly
A Float needle valve seat (A), pilot jet
(B), main jet (C), needle jet (D) -
J and К model
B Pilot jet (A), main jet (B), needle jet (C)
Дата добавления: 2015-10-29; просмотров: 139 | Нарушение авторских прав
| <== предыдущая страница | | | следующая страница ==> |
| D Carefully lift the carburettors off the inlets 7.8 Carburettor drain screws (arrowed) | | | B ... noting how the arms locate on the plungers (A) and the return spring (B) fits |