|
Читайте также: |
will be enlarged, causing the fuel and air metering rates to be upset.
Inspection
18 Check the operation of the choke plunger. If it doesn't move smoothly, inspect the plunger assembly and linkage components and renew any that are worn, damaged or bent (see illustration).
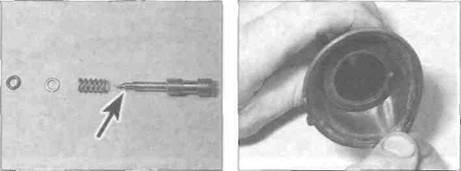
19 If removed from the carburettor, check the tapered portion of the pilot screw and the spring and O-ring for wear or damage (see illustration). Renew them if necessary.
20 Check the carburettor body, float chamber and top cover for cracks, distorted sealing surfaces and other damage. If any defects are found, renew the faulty component, although renewal of the entire carburettor will probably be necessary (check with a dealer on the availability of separate components).
21 Check the piston diaphragm for splits, holes and general deterioration (see illustration). Holding it up to a light will help to reveal problems of this nature.
22 Insert the piston in the carburettor body and check that the piston moves up-and-down smoothly. Check the surface of the piston for wear. If it's worn excessively or doesn't move smoothly in the guide, renew the components as necessary.
23 Cheek the jet needle for straightness by rolling it on a flat surface such as a piece of glass, Renew it if it's bent or if the tip is worn.
24 Check the tip of the float needle valve and the valve seat (see illustration). If either has
Choke plunger components-L, N and R models
grooves or scratches in it, or is in any way worn, they must be renewed as a set. Gently push down on the rod on the top of the needle valve then release it - if it doesn't spring back, renew the valve. On J and К models, also check the condition of the valve seat sealing washer.
25 Operate the throttle shaft to make sure the throttle butterfly valve opens and closes smoothly. If it doesn't, cleaning the throttle linkage may help. Otherwise, renew the carburettor.
26 Check the float for damage. This will usually be apparent by the presence of fuel inside the float. If the f oat is damaged, it must be renewed.
9 Carburettors -
| i |
separation and joining
| A |
Warning: Refer to the precautions given in Section 1 before proceeding
Separation
1 The carburettors do not need to be separated for normal overhaul. If you need to separate them (to renew a carburettor body, for example), refer to the following procedure.
2 Remove the carburettors from the machine (see Section 7). Mark the body of each carburettor with its cylinder location to ensure that it is positioned correctly on reassembly (see illustrations). On L. N and R models, if

|
Дата добавления: 2015-10-29; просмотров: 135 | Нарушение авторских прав
| <== предыдущая страница | | | следующая страница ==> |
| B ... then remove the retainer ... | | | C Slacken the screws (arrowed) and lift off the arms |