Читайте также:
|
10 Remove the instrument cluster (see Section 15).
11 Using a very small Phillips screwdriver. remove the screw in the centre of the odometer trip knob and remove the knob (see illustration).
12 Remove the screws securing the instrument cluster front cover, noting the positions of the wiring clips, and remove the cover (see illustration).
13 Remove the two screws securing the speedometer gearbox and lift off the box (see illustration).
14 Remove the blanking cap from the entry hole for the speedometer wiring (see illustration 16.13). Disconnect the speedometer wiring connector (see illustration 16.13).
15 Remove the two screws securing the speedometer to the casing (see illustration 16.13). Carefully withdraw the speedometer from the front, feeding the wiring and its connector through the hole as you do.
16 Installation is the reverse of removal.
Electrical system 9*13
|
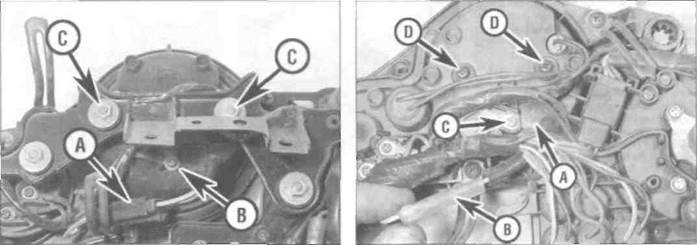
16.19 Disconnect the wiring connector (A), then remove the 16.26 Remove the blanking cap (A), disconnect the wiring
screw (B) and the nuts (C) connector (B), remove the screw (C) and detach the wire, then
remove the tachometer screws (D)
| 16.38 Remove the screws (arrowed) and detach the wires g |
Tachometer
Check
17 Special instruments are required to
properly check the operation of this meter. If it
is believed to be faulty, take the tachometer to
a dealer or automotive electrician for
assessment.
Replacement - J and К models
18 Remove the instrument cluster (see Section 15).
19 Disconnect the tachometer wiring connector, and remove the screw securing the earth wire (see illustration).
20 Remove the two nuts and their washers securing the tachometer to the bracket (see illustration 16.19).
21 Carefully pull the tachometer light bulbholders out of the oack of the tachometer, and withdraw the tachometer from the front.
22 Installation is the reverse of removal. Make sure the wires are correctly and securely connected.
Replacement - L, N and R models
23 Remove the instrument cluster (see Section 15).
24 Using a very small Phillips screwdriver, remove the screw in the;entre of the odometer trip knob and remove the knob (see illustration 16.11).
25 Remove the screws securing the instrument cluster front cover, noting the positions of the wiring clips, and remove the cover (see illustration 16.12).
26 Remove the blanking cap from the entry hole for the tachometer wiring (see illustration). Disconnect the wiring connector. Also remove the screw securing the earth wire.
27 Remove the two screws securing the tachometer to the casing (see illustration 16.26). Carefully withdraw the tachometer
from the front, feeding the wiring and Its connector through the hole as you do.
28 Installation is the reverse of removal.
Дата добавления: 2015-10-29; просмотров: 121 | Нарушение авторских прав
| <== предыдущая страница | | | следующая страница ==> |
| Removal - L, N and R models | | | Coolant temperature gauge |