Читайте также:
|
Tail light
4 If the tail light fails to work, check the bulbs and the bulb terminals first, then the fuse, then check for battery votage at the brown (J, K, L, N models) or brown/white wire (R model) terminal on the suppy side of the tail light wiring connector. If voltage is present, check the earth (ground) circuit for an open or poor connection.
5 If no voltage is indicated, check the wiring between the tail light and the ignition switch, then check the switch. Also check the lighting switch.
Brake light
6 If the brake light fails to work, check the bulbs and the bulb terminals first, then the fuse, then check for battery voltage at the green/yellow terminal on the supply side of the tail light wiring connector, with the brake lever pulled in or the pedal depressed. If voltage is present, check the earth (ground) circuit for an open or poor connection.
7 If no voltage is indicated, cheek the brake light switches, then the wiring between the tail light and the switches.
8 See Section 14 for brake switch checks and Section 9 for tail/brake light bulb renewal.
Instrument and warning lights
9 See Section 17 for instrument and warning
light bulb renewal,
Turn signal lights
10 See Section 11 for the turn signal circuit check.

|

|

|
A Headlight relay (arrowed) -J and К models
6.3b Headlight relay (arrowed) - L, N and R models
C Displace the relay, then remove the
Rubber cover and disconnect the wiring
Connector
9«6 Electrical system

|

|
| Ы&^Хт |
7.1a Disconnect the wiring connector...
7.1b... and remove the dust cover
7.2a Release the clip,
7 Headlight bulbs and sidelight lb bulbs - renewal
Note: The headlight bulbs are ot the quartz-halogen type. Do not touch the bulb glass as skin acids will shorten the bulb's service life. If the bulb is accidentally touched, it should be wiped carefully when cold with a rag soaked in methylated spirit and dried before fitting.
| A |
Warning: Allow the bulbs time to cool before removing them if the headlight has just been on.
Headlight

|
| f, |
| 7.2b... and remove the bulb |
1 Disconnect the relevant wiring connector from the back of the headlight assembly and
remove the rubber dust cover, noting how it fits (see illustrations).
2 Release the bulb retaining clip, noting how it fits, then remove the bulb (see illustrations).
3 Fit the new bulb, bearing In mind the information in the Note above. Make sure the tabs on the bulb fit correctly in the slots in the bulb housing, and secure It in position with the retaining clip.
4 Install the dust cover, making sure it is correctly seated and with the 'TOP' mark at the top, and connect the wiring connector.
5 Check the operation of the headlight.
llWIWIWi Always use a paper towel or lirillklTI dry сМп wnen handnng new

|
| 7.6a Remove the bulbholder... |
HllUT bulbs to prevent injury if the bulb should break and to increase bulb life.
Sidelight
6 Pull the bulbholder out of its socket in the base of the headlight, then carefully pull the bulb out of the holder (see illustrations).
7 Install the new bjlb in the bulbholder, then install the bulbholder by pressing it in. Make sure the rubber cover is correctly seated.
8 Check the operation of the sidelight.
| I |
Headlight assembly -
removal and installation
J and К models
Removal
1 Remove the fairing (see Chapter 8).
2 Remove the instrument cluster (see Section 15).
3 The headlights are mounted individually. Disconnect the headlight and sidelight wiring connectors (see illustrations). Release the wiring from any clips or ties on the headlight.
4 Each headlight is secured by three bolts -one at the top and two at the bottom. Unscrew the bolts and remove the headlight, noting how it fits (see illustrations).
5 To separate the beam unit from its holder, first mark each unit according to its side and note the positions of the beam adjusting screws. Check the current aim setting by

|
7.6b... and pull out the bulb
8.3a Disconnect the headlight wiring connector...
8.3b... and the sidelight wiring connector
Electrical system 9«7
8.4a Unscrew the bolts (arrowed)...
8.4b... and remove the headlight
8.5 Remove the pivot screw (arrowed)

|

|
|
| 8.8b... and the sidelight wiring connector |
measuring the amount of thread projecting from the holder on each beam adjusting screw. Remove the beam unit pivot screw and open the pivot cover (see illustration). Also remove the two headlight beam adjusting screws. Lift the beam unit off the holder. noting how the pivot locates, and remove the adjuster springs. Remove the captive nuts from the beam unit.
Installation
6 Installation is the reverse of removal. Make
sure all the wiring is correctly connected and
secured. Check the operation of the
headlights and sidelights. Check the headlight
aim (see Chapter 1).
L, N and R models
Removal
Note: R models are not equipped with sidelight bulbs.
| 9.2 Release the bulbholder... |
7 Remove the fairing (see Chapter 8).
8 To remove an individual headiight. disconnect the headlight and sidelight wiring connectors (see illustrations). Release the wiring from any clips or ties on the headlight. Carefully pull the top inner turner of Hie headlight away from the mounting bracket to release the pivot ball from its socket (see illustration). Now slide the headlight sideways out of the bracket, pushing in on the adjuster springs to help release them from their slots in the bracket if necessary.
9 To remove the complete headlight assembly, disconnect the headlight and sidelight wiring connectors for both headlights (see illustrations 8.8a and b) Release the
8.8a Disconnect the headlight wiring connector...
8.8c Pull the unit off the pivot (A) and slide
it out to release the adjuster (B) from the
bracket
| 9.3... and remove the bulb |
wiring from any clips or ties on the headlight. Unscrew the three bolts securing the headlight bracket and remove the headlight assembly, noting how it fits (see illustration).
8.9 Unscrew the three bolts (arrowed) and remove the assembly
Installation
10 Installation is the reverse of removal. Make sure all the wiring is correctly connected and secured. Check the operation of the headlights and sidelights. Check the headlight aim (see Chapter 1).
Brake/tail light bulbs -
renewal
1 Remove (J and К models) or raise (L, N and R models) the passenger seat (see Chapter 8).
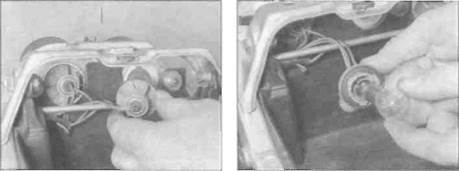
2 Turn the bulbholder anti-clockwise and withdraw it from the tail light (see illustration).
3 Push the bulb into the holder and twist it anti-clockwise to remove it (see illustration).
9*8 Electrical system

|

|

|
10.2a Tail light wiring connector (arrowed) - J and К models
10.2b Tail light wiring connector (arrowed) - L, N and R models
Дата добавления: 2015-10-29; просмотров: 171 | Нарушение авторских прав
| <== предыдущая страница | | | следующая страница ==> |
| B ... and remove the battery | | | Unscrew the nuts (arrowed) and remove the tail light |