Читайте также:
|
6*10 Frame, suspension and final drive
|
|

|
7.18 Renew the damper rod piston ring if it is worn or damaged
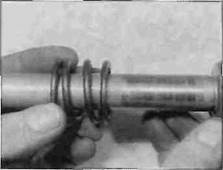
7.19a Slide the rebound spring onto the damper rod
7.19b Fit the seat to the bottom of the rod

|
|

|
7.20a Slide the tube into the slider
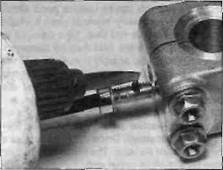
7.20b Apply a thread-locking compound to
the damper rod bolt and use a new sealing
washer
7.21a Install the top bush...
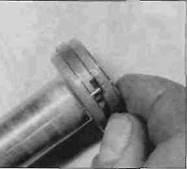
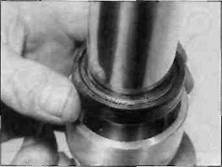
18 Check the damper rod and its piston ring
for damage and wear, and renew them if
necessary (see illustration). Do not remove
the ring from the piston unless it requires
renewal
Reassembly
19 If removed, install the new piston ring into the groove in the damper rod head, then slide the rebound spring onto the rod (soc illustration). Insert the damper rod into the fork tube and slide it Into place so that it projects fully from the bottom of the tube, then install the seat on the bottom of the damper rod (see illustration).
20 Oil the fork tube and bottom bush with the specified fork oil and insert the assembly into the slider (see illustration). Fit a new copper sealing washer to the damper rod bolt and apply a few drops of a suitable non-permanent thread-locking compound, then install the bolt into the bottom of the slider (see illustration). Tighten the bolt to the specified torque setting. If the damper rod rotates inside the tube, temporarily install the fork spring and top bolt (see Steps 26 and 27) and compress the fork to hold the damper rod. Alternatively, a long metal bar pressed hard into the damper rod head quite often suffices.
21 Push the fork tube fully into the slider, then oil the top bush and slide it down over the tube (see illustration). Press the bush squarely Into its recess in the slider as far as possible, then
install the oil seal washer (see illustration). Either use the Honda service tool or a suitable piece of tubing to tap the bush fully into place; the tubing must be slightly larger in diameter than the fork tube and slightly smaller in diameter than the bush recess in the slider. Take care not to scratch the fork tube during this operation; it is best to make sure that the fork tube is pushed fully into the slider so that any accidental scratching is confined to the area above the oil seal.
22 When the bush is seated fully and squarely in Its recess in the slider, (remove the washer to check, wipe the recess clean, then reinstall the washer), install the new oil seal.
...
_____ ^3_________________
7.21b... followed by the washer
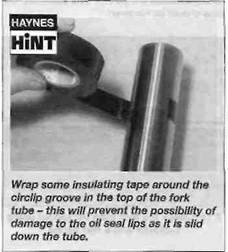
Smear the seal's lips with fork oil and slide it over the tube so that its markings face upwards and drive the seal into place as described In Step 21 until the retaining clip groove is visible above the seal (see illustration).
7.22 Make sure the oil seal is the correct way up
Frame, suspension and final drive 6»11
Дата добавления: 2015-10-29; просмотров: 136 | Нарушение авторских прав
| <== предыдущая страница | | | следующая страница ==> |
| A Slide the fork up through the bottom yoke... | | | A Install the spring ... |