Читайте также:
|
B... and fit the circlip and handlebar onto it
A Tighten the bottom yoke clamp bolt...
6»8 Frame, suspension and final drive

|
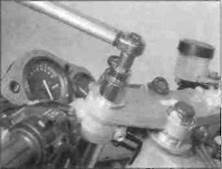
6.6b... then the fork top bolt...
torque setting (see illustration). Now tighten the fork clamp bolts in the top yoke and the handlebar holder clamp bolts to the specified torque setting (see illustration). 7 If displaced, make sure the front brake

6.6c... and finally the top yoke and
Handlebar clamp bolts to their specified
Torque settings
master cylinder clamp is installed with the UP mark facing up and tighten the clamp bolts to the torque setting specified at the beginning of the Chapter (see illustration 5.1b). 8 Install the front wheel (see Chapter 7), and
the front mudguard (see Chapter 8). Mount the front brake hose/pipe union on the fork and tighten its bolt (see illustration 6.2). 9 Check the operation of the front forks and brakes before taking the machine out on the road.
7 Forks - disassembly, ^
inspection and reassembly 5|
J, K, L and N models
Disassembly
1 Always dismantle the fork legs separately to avoid interchanging parts and thus causing an accelerated rate of wear. Store all components in separate, clearly marked containers (see illustration).
2 Before dismantling the fork, it is advised that the damper rod bolt be slackened at this stage. Compress the fork tube in the slider so that the spring exerts maximum pressure on the damper rod head, then have an assistant slacken the damper rod bolt in the base of the fork slider (see illustration 7.31), If an assistant is not available, clamp the slider via its brake caliper mounting lugs in a soft-jawed vice to support the fork. If required, remove the circlip securing the mudguard holder to the top of the fork slider and remove the holder.
3 If the fork top bolt was not slackened with the fork in situ, release any air pressure in the forks on J and К models and adjust the spring pre-load to a minimum on L and N models (see Section 12), then carefully clamp the fork tube in a vice equipped with soft jaws, taking care not to overtighten or score its surface, and slacken the top bolt.
4 Unscrew the fork top bolt from the top of' the fork tube (see illustration).
A Warning: The fork spring is pressing on the fork top bolt with considerable pressure. Unscrew the bolt very carefully, keeping a downward pressure on it and release it slowly as it is likely to spring clear. It is advisable to wear some form of eye and face protection when carrying out this operation.
I
 | |
| 1 Top bolt (L and N model | 7 Damper rod |
| shown) | 8 Rebound spring |
| 2 O-ring | 9 Fork tube |
| 3 Spacer | 10 Bottom bush |
| 4 Spring seat | 11 Dust seal |
| 5 Spring | 12 Retaining clip |
| 13 Oil seal |
6 Piston ring
| 14 15 16 17 18 19 |
Washer Top bush Damper rod seat Fork slider Sealing washer Damper rod bolt
20 Me clamp bolt
Дата добавления: 2015-10-29; просмотров: 179 | Нарушение авторских прав
| <== предыдущая страница | | | следующая страница ==> |
| C If required, slacken the fork top bolt 6.4a Slacken the clamp bolt (arrowed) in | | | Prise off the bottom bush using a flat-bladed screwdriver |