Читайте также:
|
USE, COMPETITION USE ONLY or similar, will fail the MOT.
• If the tyre sidewall carries a direction of rotation arrow, this must be pointing in the direction of normal wheel rotation (see illustration 16).
• Check that the wheel axle (spindle) nuts (where applicable! are properly secured. A self-locking nut or castellated nut with a split-pin or R-pin can be used (see illustration 17).
• Wheel alignment is checked with the motorcycle off the stand and a rider seated. With the front wheel pointing straight ahead, two perfectly straight lengths of metal or wood and placed against the sidewalls of both tyres (see illustration 18). The gap each side of the front tyre must be equidistant on both sides. Incorrect wheel alignment may be due to a cocked rear wheel (often as the result of poor chain adjustment) or in extreme cases, a bent frame.
General checks and condition
• Check the security of all major fasteners, bodypanels, seat, fairings (wl"ere fitted) and mudguards.
• Check that the rider and pillion footrests, handlebar levers and brake pedal are securely mounted.
• Check for corrosion on the frame or any load-bearing components. If severe, this may affect the structure, particularly under stress.
Sidecars
A motorcycle fitted with a sidecar requires additional checks relating to Ihe stability of the machine and security of attachment and
swivel joints, plus specific wheel alignment (toe-in) requirements. Additionally, tyre and lighting requirements differ from conventional
motorcycle use. Owners are advised to check MOT test requirements with an official test centre.
ref.26 Storage
Preparing for storage
|
Before you start
If repairs or an overhaul is needed, see that this is carried out now rather than left until you want to ride the bike again.
Give the bike a good wash and scrub all dirt from its underside. Make sure the bike dries completely before preparing for storage.
Engine
|
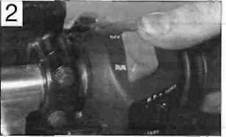
| Squirt a drop of motor oil into each cylinder |
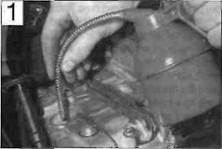
| Flick the kill switch to OFF... |
|
• Remove the spark plug(s) and lubricate the cylinder bores with approximately a teaspoon of motor oil using a spout-type cil can (see illustration 1). Reinstall the spark plug(s). Crank the engine over a couple of times to coat the piston rings and bores with oil. If the bike has a kickstart, use this to turn the engine over. If not, flick the kill switch to the OFF position and crank the engine over on the starter (see illustration 2). If the nature on the ignition system prevents the starter operating with the kill switch in the OFF position.
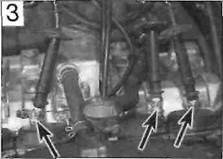
.. and ensure that the metal bodies of the
plugs (arrows) are earthed against the
cylinder head
remove the spark plugs and fit them back in their caps; ensure that the plugs are earthed (grounded) against the cylinder head when the starter is operated (see illustration 3).
| A |
Warning: It is important that the plugs are earthed (grounded) away from the spark plug holes otherwise there is a risk of atomised fuel from the cylinders igniting.
JlflflflZzI 0n з single cylinder four- ишШшЛ stroke engine, you can seal
| the combustion chamber completely bypositioning the piston atTDC on thecompression stroke. |
|
Hint
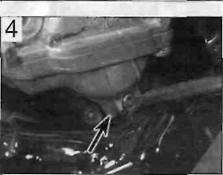
Connect a hose to the carburettor float
chamber drain stub (arrow) and unscrew
the drain screw
• Drain the carburettor(s) otherwise there is a risk of jets becoming blocked by gum deposits from the fuel (see illustration 4).
• If the bike is going into long-term storage, consider adding a fuel stabiliser to the fuel In the tank. If the tank is drained completely, corrosion of its internal surfaces may occur if left unprotected for a long period. The tank can be treated with a rust preventative especially for this purpose. Alternatively, remove the tank and pour half a litre of motor oil into It, install the filler cap and shake the tank to coat its internals with oil before draining off the excess. The same effect can also be achieved by spraying WD40 or a similar water-dispersant around the inside of the tank via its flexible nozzle.
• Make sure the cooling system contains the correct mix of antifreeze. Antifreeze also contains important corrosion inhibitors.
• The air intakes and exhaust can be sealed off by covering or plugging the openings. Ensure that you do not seal in any condensation; run the engine until it is hot, then switch off and allow to cool. Tape a piece of thick plastic over the silencer end(s) (see illustration 5). Note that some advocate pouring a tablespoon of motor oil into the silencer(s) before sealing them off.
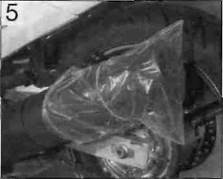
Exhausts can be sealed off with a plastic bag
Battery
• Remove it from the oike - in extreme cases of cold the battery may freeze and crack its case (see illustration 6).
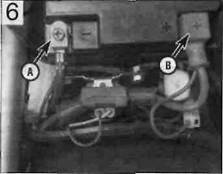
Disconnect the negative lead (A) first, followed by the positive lead (B)
|
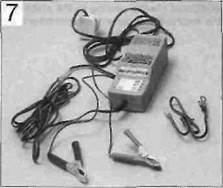
| Use a suitable battery charger - this kit also assess battery condition |
• Check the electrolyte level and top up if necessary (conventional refillable batteries). Clean the terminals.
• Store the battery off the motorcycle and away from any sources of fire. Position a wooden block under the battery if it is to sit on the ground.
• Give the battery a t-ickle charge for a few hours every month (see illustration 7).
Storage
REF-27
Tyres
• Place the bike on its centrestand or an auxiliary stand which will support the motorcycle in an upright position. Position wood blocks under the tyres to keep them off the ground and to provide insulation from damp. If the bike Is being put into long-term storage, ideally both tyres should be off the ground; not only will this protect the tyres, but will also ensure that no load is placed on the steering head or wheel bearings.
• Deflate each tyre by 5 to 10 psi, no more or the beads may unseat from the rim, making subsequent inflation difficult on tubeless tyres.
Pivots and controls
• Lubricate all lever, pedal, stand and footrest pivot points. If grease nipples are fitted to the rear suspension components, apply lubricant to the pivots.
• Lubricate all control cables.
Cycle components
• Apply a wax protectant to all painted and plastic components. Wipe off any excess, but don't polish to a shine. Where fitted, clean the screen with soap and water.
• Coat metal parts with Vaseline (petroleum jelly). When applying this to the fork tubes, do
not compress the forks otherwise the seals will rot from contact with the Vaseline.
• Apply a vinyl cleaner to the seat.
Storage conditions
• Aim to store the bike in a shed or garage which does not leak and is free from damp.
• Drape an old blanket or bedspread over the bike to protect it from dust and direct contact with sunlight (which will fade paint). This also hides the bike from prying eyes. Beware of tight-fitting plastic covers which may allow condensation to form and settle on the bike.
Getting back on the road
Engine and transmission
• Change the oil and replace the oil filter. If this was done prior to storage, check that the oil hasn't emulsified - a thick whitish substance which occurs through condensation.
• Remove the spark plugs. Using a spout-type oil can, squirt a few drops of oil into the cylinder(s). This will provide initial lubrication as the piston rings and bores comes back into contact. Service the spark plugs, or fit new ones, and install them in the engine.
• Check that the clutch isn't stuck on. The plates can stick together if left standing for some time, preventing clutch operation. Engage a gear and try rocking the bike back and forth with the clutch lever held against the handlebar. If this doesn't work on cable-operated clutches, hold the clutch lever back against the handlebar with a strong elastic band or cable tie for a couple of hours (see Illustration 8).

Hold clutch lever back against the handlebar with elastic bands or a cable tie
• If the air intakes or silencer end(s) were blocked off, remove the bung or cover used.
• If the fuel tank was coated with a rust preventative, oil or a stabiliser added to the fuel, drain and flush the tank and dispose of the fuel sensibly. If no action was taken with
the fuel tank prior to storage, it is advised that the old fuel is disposed of since it will go off over a period of time. Refill the fuel tank with fresh fuel.
Frame and running gear
• Oil all pivot points and cables.
• Check the tyre pressures. They will definitely need inflating if pressures were reduced for storage.
• Lubricate the final drive chain (where applicable).
• Remove any protective coating applied to the fork tubes (stanchions) since this may well destroy the fork seals. If the fork tubes weren't protected and have picked up rust spots, remove them with very fine abrasive paper and refinish with metal polish.
• Check that both brakes operate correctly. Apply each brake hard and check that it's not possible to move the motorcycle forwards. then check that the brake frees off again once released. Brake caliper pistons can stick due to corrosion around the piston head, or on the sliding caliper types, due to corrosion of the slider pins. If the brake doesn't free after repeated operation, take the caliper off for examination. Similarly drum brakes can stick due to a seized operating cam, cable or rod linkage.
• If the motorcycle has been in long-term storage, renew the brake fluid and clutch fluid (where applicable).
• Depending on where the bike has been stored, the wiring, cables and hoses may have been nibbled by rodents. Make a visual check and investigate disturbed wiring loom tape.
Battery
• If the battery has been previously removal and given top up charges it can simply be reconnected. Remember to connect the positive cable first and the negative cable last.
• On conventional refutable batteries, if the battery has not received any attention,
remove it from the motorcycle and check its electrolyte level. Top up if necessary then charge the battery. If the battery fails to hold a charge and a visual checks show heavy white sulphation of the plates, the battery is probably defective and must be renewed. This is particularly likely if the battery is old. Confirm battery condition with a specific gravity check.
• On sealed (MF) batteries, if the battery has
not received any attention, remove it from the
motorcycle and cnarge it according to the
information on the battery case - if the battery
fails to hold a charge it must be renewed.
Starting procedure
• If a kickstart is fitted, turn the engine over a couple of times with the ignition OFF to distribute oil around the engine. If no kickstart is fitted, flick the engine kill switch OFF and the ignition ON and crank the engine over a couple of times to work oil around the upper cylinder components. If the nature of the ignition system is such that the starter won't work with the kill switch OFF, remove the spark plugs, fit them back into their caps and earth (ground) their bodies on the cylinder head. Reinstall the spark plugs afterwards.
• Switch the kill switch to RUN, operate the choke and start the engine. If the engine won't start don't continue cranking the engine - not only will this flatten the battery, but the starter motor will overheat Switch the ignition off and try again later. If the engine refuses to start. go through the fault finding procedures in this manual. Note: If the bike has been in storage for a long time, old fuel or a carburettor blockage may be the problem. Gum deposits in carburettors can block jets - if a carburettor cleaner doesn't prove successful the carburettors must be dismantled for cleaning.
• Once the engine has started, check that the lights, turn signals and horn work properly.
• Treat the bike gently for the first ride and check all fluid levels on completion. Settle the bike back into the maintenance schedule.
ref.28 Fault Finding
This Section provides an easy reference-guide to the more common faults that are likely to afflict your machine. Obviously, the opportunities are almost limitless for faults to occur as a result of obscure failures, and to try and cover all eventualities would require a book. Indeed, a number have been written on the subject.
Successful troubleshooting is not a mysterious 'black art' but the application of a bit of knowledge combined with a systematic and logical approach to the problem. Approach any troubleshooting by first accurately identifying the symptom and then checking through the list
of possible causes, starting with the simplest or most obvious and progressing in stages to the most complex.
Take nothing for granted, but above all apply liberal quantities of common sense.
The main symptom of a fault is given in the text as a major heading below which are listed the various systems or areas which may contain the fault. Details of each possible cause for a fault and the remedial action to be taken are given, in brief, in the paragraphs below each heading. Further information should be sought in the relevant Chapter.
1 Engine doesn't start or is difficult to start
G Starter motor doesn't rotate
□ Starter motor rotates but engine does not turn over
□ Starter works but engine won't turn over (seized)
П No fuel flow
□ Engine flooded
□ No spark or weak spark П Compression low
□ Stalls after starting D Rough idle
Дата добавления: 2015-10-29; просмотров: 173 | Нарушение авторских прав
| <== предыдущая страница | | | следующая страница ==> |
| Grasp the swingarm at the ends to check for play in its pivot bearings | | | Poor running at low speed |