Читайте также:
|
• Drive chains for all but small bikes are
continuous and do not have a clip-type
connecting link. The chain must be broken
using a chain breaker tool and the new chain
securely riveted together using a new soft
rivet-type link. Never use a clip-type
connecting link instead of a rivet-type link,
except in an emergency. Various chain
breaking and riveting tools are available, either
as separate tools or combined as illustrated in
the accompanying photographs - read the
instructions supplied with the tool carefully.
| A |
Warning: The need to rivet the new link pins correctly cannot be overstressed - loss of control of the motorcycle is very likely to result if the chain breaks in use.
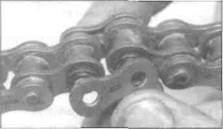
• Rotate the chain and look for the soft link.
The soft link pins look like they have been
deeply centre-punched instead of peened over

8.3... and separate the chain link
like all the other pins (see illustration 8.9) and its sideplate may be a different colour. Position the soft link midway between the sprockets and assemble the chain breaker tool over one of the soft link pins (see illustration 8.1). Operate the tool to push the pin out through the chain (see illustration 8.2). On an O-ring chain, remove the O-rings (see illustration 8.3). Carry out the same procedure on the other soft link pin.
Caution: Certain soft link pins (particularly on the larger chains) may require their ends to be filed or ground off before they can be pressed out using the tool.
• Check that you have the correct size and strength (standard or heavy duty) new soft link - do not reuse the old link. Look for the size marking on the chain sideplates (see illustration 8.10).
• Position the chain ends so that they are engaged over the rear sprocket. On an O-ring chain, install a new O-ring over each pin of the link and insert the link through the two chain


|
| 8.5... install the O-rings over the pin ends... |
|
8.4 Insert the new soft link, with O-rings, through the chain ends...
8.6... followed by the sideplate
ends (see illustration 8.4). Install a new O-ring over the end of each pin, followed by the sideplate (with the chain manufacturer's marking facing outwards) (see illustrations 8.5 and 8.6). On an unsealed chain, insert the link through the two chain ends, then install the sideplate with the chain manufacturer's marking facing outwards. • Note that it may not be possible to install the sideplate using finger pressure alone. If using a joining tool, assemble it so that the plates of the tool clamp the link and press the sideplate over the pins (see illustration 8.7). Otherwise, use two small sockets placed over

8.7 Push the sideplate into position using a clamp
Tools and Workshop Tips ref.19

|
| PITCH |
| 8.8 Assemble the chain riveting tool over one pin at a time and tighten it fully |

 8.9 Pin end correctly riveted (A), pin end unriveted (B)
the rivet ends and two pieces of the wood between a G-clamp. Operate the clamp to press the sideplate over the pins.
• Assemble the joining tool over one pin
(following the maker's instructions) and
tighten the tool down to spread the pin end
securely (see illustrations 8.8 and 8.9). Do
the same on the other pin.
| A |
Warning: Check that the pin ends are secure and that there is no danger of the sideplate coming loose. If the pin ends are cracked the soft link must be renewed.
Final drive chain sizing
| 8.10 Typical chain size and type marking |
• Chains are sized using a three digit number, followed by a suffix to denote the chain type (see illustration 8.10). Chain type is. either standard or heavy duty (thicker sideplates), and also unsealed or O-ring/ X-ring type.
• The first digit of the number relates to the pitch of the chain, ie the distance from the centre of one pin to the centre of the next pin (see illustration 8.11). Pitch is expressed in eighths of an inch, as follows:
Дата добавления: 2015-10-29; просмотров: 167 | Нарушение авторских прав
| <== предыдущая страница | | | следующая страница ==> |
| Typical bearing failures | | | Or thick card and self-locking grips |