Читайте также:
|
Tools and Workshop Tips ref.is
• Checking individual components for warpage, such as clutch plain (metal) plates, requires a perfectly flat plate or piece or plate glass and feeler gauges.
4 Torque and leverage
What is torque?
• Torque describes the twisting force about a shaft. The amount of torque applied is determined by the distance from the centre of the shaft to the end of the lever and the amount of force being applied to the end of the lever; distance multiplied by force equals torque,
• The manufacturer applies a measured torque to a bolt or nut to ensure that it will not slacken in use and to hold two components securely together without movement in the joint. The actual torque setting depends on the thread size, bolt or nut material and the composition of the components being held.
• Too little torque may cause the fastener to loosen due to vibration, whereas too much torque will distort the joirt faces of the component or cause the fastener to shear off. Always stick to the specified torque setting,
Using a torque wrench
• Check the calibration of the torque wrench and make sure it has a suitable range for the job. Torque wrenches are available in Nm (Newton-metres), kgf m (kilograms-force metre), Ibf ft (pounds-feet), Ibf in (Inch-pounds). Do not confuse Ibf ft with Ibf in.
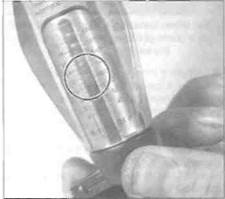
• Adjust the tool to the desired torque on the scale (see illustration 4.1). If your torque wrench is not calibrated in the units specified, carefully convert the figure (see Conversion Factors). A manufacturer sometimes gives a torque setting as a range (8 -o 10 Nm) rather than a single figure - in this case set the tool midway between the two settings. The same torque may be expressed as 9 Nm ± 1 Nm. Some torque wrenches have a method of locking the setting so that it isn't inadvertently altered during use.
• Install the bolts/nuts in their correct location and secure them lightly. Their threads must be clean and free of any old locking compound. Unless specified the threads and flange should be dry - oiled threads are necessary in certain circumstances and the manufacturer will take this into account in the specified torque figure. Similarly, the manufacturer may also specify the application of thread-locking compound.
• Tighten the fasteners in the specified sequence until the torque wrench clicks, indicating that the torque setting has been reached. Apply the torque again to double-check the setting. Where different thread diameter fasteners secure the component, as a rule tighten the larger diameter ones first.
• When the torque wrench has been finished with, release the lock (where applicable) and fully back off its setting to zero - do not leave the torque wrench tensioned. Also, do not use a torque wrench for slackening a fastener.
Angle-tightening
|
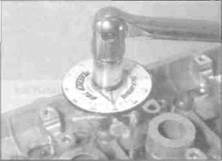
| 4.2 Angle tightening can be accomplished with a torque-angle gauge... |
|
• Manufacturers often specify a figure in degrees for final tightening of a fastener. This usually follows tightening to a specific torque setting.
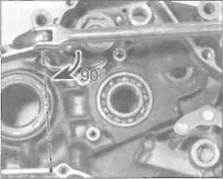
• A degree disc can be set and attached to the socket (see illustration 4.2) or a protractor can be used to mark the angle- of movement on the bolt/nut head and the surrounding casting (see illustration 4.3).
Loosening sequences
• Where more than one bolt/nut secures a component, loosen each fastener evenly a little at a time. In this way, not all the stress of the joint is held by one fastener and the components are not likely to distort.
• If a tightening sequence is provided, work in the REVERSE of this, but if not. work from the outside in, in a criss-cross sequence (see illustration 4.4).
4.4 When slackening, work from the outside inwards
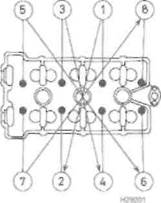
Tightening sequences
• If a component is held by more than one fastener it is important that the retaining bolts/nuts are tightened evenly to prevent uneven stress build-up and distortion of sealing faces. This is especially important on high-compression joints such as the cylinder head.
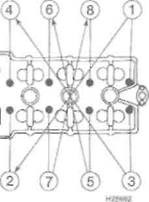
• A sequence is usually provided by the manufacturer, either in a diagram or actually marked in the casting. If not, always start in the centre and work outwards in a criss-cross pattern (see illustration 4.5). Start off by securing all bolts/nuts finger-tight, then set the torque wrench and tighten each fastener by a small amount in sequence until the final torque is reached. By following this practice,
4.1 Set the torque wrench index mark to the setting required, in this case 12 Nm
4.3... or by marking the angle on the surrounding component
4.5 When tightening, work from the inside outwards
ref.14 Tools and Workshop Tips
 the joint will be held evenly and Will not be distorted. Important joints, sucn as the cylinder head and big-end fasteners often have two- or three-stage torque settings.
Дата добавления: 2015-10-29; просмотров: 216 | Нарушение авторских прав
| <== предыдущая страница | | | следующая страница ==> |
| Oil pressure gauge and take-off point adapter (arrow) | | | Temperature change |