Читайте также:
|

|
| Dia.1 |
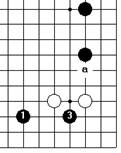
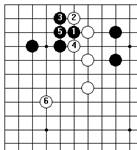
Dia.2. If White fails to extend on the lower side, Black will play 1. White has to defend at 2, or at the point directly above 2. Black is expanding on a large scale, while White's corner is clearly cramped.
Dia.3. If White dares to ignore Black 1, Black 3 will follow, and White will have to resort to emergency measures —starting with a —to make some kind of living shape.

| 
|
| Dia.2 | Dia.3 |
| b elsewhere |

| 
|
| Dia.4 | Dia.5 |
Dia.4. White 1 here is in the right direction, but it goes a little too far. Considering the black stones nearby, White cannot afford to leave the opening at a. If White played 1, Black would play at the three-three point in the upper left corner, just as in Dia.1, but later...
Dia.5. Black could come crashing in at 1. If White answers at a, he is back where he was in Dia.2. If he answers at b, however, Black can live underneath White's stones. Having already lost his chance to extend up the right side, White cannot afford to lose his territory on the lower side, too.

|
| Dia.6 |
Dia.6. The attachment at 1 is a big play, enabling White to take the corner, strengthen his own group, and weaken Black's, but Black will leave his group weak and play 4.
| Problem 6 White to play |

|

White's two stones on the left side need reinforcement badly, and the diagonal play, (10 points), which simultaneously attacks Black's upper left corner, is best. The one-point jump, (8 points), is another good point, but it has more to do with the upper side than with the left. The keima, (6 points), would cause an over-concentration of strength after White made the correct diagonal play. The right way to attack the two black stones in the lower left would be from underneath, (7 points).
Dia.1. (correct) White 1 transforms White's frail, vulnerable three-point extension into a robust, invasion-proof position, and at the same time forces Black 2, giving White the chance to take the large point at 3.

|
| Dia.1 |
Dia.2. IfBlack lets White 1 go unanswered, White attacks in earnest at 3. Now Black 4 does not work so well. White plays 5, and there is no way for Black to emerge whole and healthy from his troubled position.

|
| Dia. 2 |

| 
|
| Dia.3 | Dia.4 |
Dia.3. White 1 is so large a move that we have awarded it 9 points. It expands White's territory, prevents Black from extending, and aims at White a, but it does not stop Black 2.
Dia.4. This is the sequel to Black's invasion in the previous diagram. Besides making territory, Black is strengthening himself so that he can invade again, at a. At the same time, White has a serious cutting point between 3 and 7, and lacks room for two eyes on the side.
| Problem 7 |
| White to play |
|

A pushing battle is going on in the center, and White's next move should be the keima, marked 10 points. Another push, (8 points), would show the right thinking, but would be too slow.
Dia.1. (correct) After White 1, the natural flow would be for Black to jump out to 2 and for White to defend the upper side at 3. Next Black 4 is correct, but White 1 has made the center group strong enough that White can afford to play 5 on the left side.
Dia.2. If White defended at 1 immediately, Black would push him with 2, etc., gaining great strength over the left side. White 3 to 9, while necessary, would be nearly valueless because of Black's strong stones on the right side.

|
| Dia.1 |

|
| Dia.2 |

| 
|
| Dia.3 | Dia.4 |
Dia.3. White's extension to 1 here invites Black 2. Since Black has a etc. in reserve, White. is in some danger.
Dia.4. But after the correct White 1, Black 2 is not so good. White divides Black's two weak groups with 3 and 5. If next Black protects the group on the right, White a captures the one on the left.
Dia.5. Hopefully none of our readers chose White 1 here, a heavy move that just provokes Black's connection at 2. White's center group is greatly weakened by this exchange, and Black can now attack two stones on the right side, with a, for instance, instead of just one.

|
| Dia.5 |
| Problem 8 Black to play |

|

Weak stones are the key to this problem. Black wants to find some way of strengthening his group coming up from the lower right into the center. Taking note of the weak white group adjacent to it, he should make the full extension on the lower side, (10 points). Lesser extensions in the same direction, (6 or 7 points), would not do the trick.
Dia.1. (correct) Black 1 puts White's group on the lower side in an uneasy position. This automatically takes some of the pressure off the black group to its right.

|
| Dia.1 |
Dia.2. The author was White in this game. He could see that he needed to invade the left side, so against Black 1 he played kikashi with 2 to get his group out of immediate danger, even though that provoked a strengthening of Black's position with 3, then made a base for himself with 4 and 6. But Black continued to attack with 7, 9, and so on, keeping White weak while enlarging his own territories.

|
| Dia.2 |

|
| Dia.3 |
Dia.3. White cannot afford to let Black 1 go unanswered. If, for example, he plays 2 here, Black will shut him in with 3. Now there is nothing for White to do but play 4 and 6 to live on the lower side, but this has a distressing effect on the white group on the right side.
Dia.4. If Black plays 1 to make territory on the left side, White will gratefully extend to 2. Now that his own weak group is out of danger, he can aim to attack Black's weak group, (starting with a, perhaps), and can easily enter one of the gaps on the left side.

|
| Dia.4 |
| Problem 9 Black to play |

|

Here it is important for Black to extend down from his shimari, and the three-point extension on the third line is best.
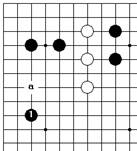
Dia.1. If Black does not extend—if he runs out into the center at 1, for example—White 2 is enormous. Now White is threatening to wreck Black's corner with a, and on the lower side he can swell his territory with 6.
Dia.2. After playing 1, Black need not be afraid of White 2; in fact, he should thank White for giving him a good chance to play 3, threatening the cut at a. On the other hand, if White played 3, Black could play 2.

|
| Dia.1 |

|
| Dia.2 |
| 
| 
|
| Dia.3 | Dia.4 | Dia.5 |
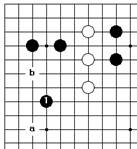
Dia.3. A four-point extension is just a bit too far, since a white invasion at <z could easily materialize in the future. On the other hand, Black 1 at a would be unnecessarily cautious and too narrow.
Dia.4- And Black 1 here would leave White a good point at a. There would also be the lingering possibility of an invasion at 6.
Dia.5. Black 1 here defends the corner, but White still gets the big point at 6.
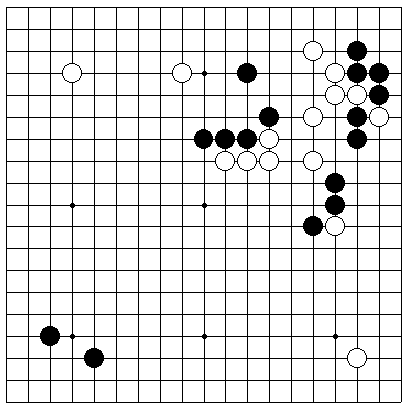
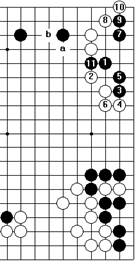
Dia.6. Here is what followed when the author played Black 1 in this position White went into action on the right side with 2. Even though Black 3 would have been better played at 6, the result on the whole board up to 15 was in Black's favor.

|
| Dia.6 |
| Problem 10 White to play |

|

The board has already been pretty well divided up, all the black and white groups are strong, and it is time for White to make the last move of the opening. The one-point extension on the right side is best. It may seem narrow, but it follows the principle of keeping away from thickness.
Dia.1. If White made one of the moves in the left-hand half of the board, (5 or 6 points), his upper right corner would be invaded. Black 1 and 3 challenge White's defenses. If White lets Black connect to the left, he takes a big loss, but if he stops Black with 4, Black can live with the moves from 5 to 11.
In some circumstances this would not be so bad for White. He becomes solid and strong on the outside, and if there were any weak black stones around, he could recover his loss by attacking them. But in this game all the groups are safely settled, and White cannot afford the loss of his corner territory.
Dia.2. A variation. This time White plays 6 differently, but Black still lives. If White plays a next, Black answers at b.
Dia.3. Another variation. Now White has made a diagonal play with 2, and Black has carried on through 9. White 10 keeps Black from making two eyes, but Black pushes out at 11, and White cannot win the coming fight.
White 10 at a would be better, to be followed by Black 10 and White b, but the possibility of Black 11 would remain, and the exchange would be in Black's favor.

| 
| 
|
| Dia.1 | Dia.2 | Dia.3 |

| 
| 
|
| Dia.4 | Dia.5 | Dia.6 |
Dia.4. (correct) After White 1, the invasion at 2 does not work. White 3, 5, and 7 are as before, but now White can block Black 8 at 9. Black plays atari at 10 and tries to live with 12, but....
Dia.5. White kills him.
Dia.6. White 1 and 3 here, (8 points), would also keep the corner safe, but Black would get to extend to 4. Besides taking valuable territory along the side, Black 4 aims once more at a corner invasion.
White 1 at a, (6 points), or b, (5 points), would suffer from the same disadvantages.
Dia.7. We suspect that a lot of our readers chose White 1 in this diagram, but this is one of those times when even a two-point extension is going too far. For one thing, there is not much to be gained by getting this close to Black's strong group in the lower right corner. More important, Black can still invade at 2. White 3 offers the strongest resistance, but Black plays 4, and against White 5 he lives easily with 6, 8, and 10.
Dia.8. If we read this life-and-death problem out closely, something we do not have to do to realize that White 1 is a bad move, it gets just a bit hard. What if White plays 5 this way? After Black 6 and 8, White can attack with 9 and 11.
Dia.9. Up to 19, White is very close to making the kill, but Black saves himself with 20. If White blocks at a, Black will play 6 and win the race to capture by one move, a fact that you can verify for yourself.
Дата добавления: 2015-10-31; просмотров: 117 | Нарушение авторских прав
| <== предыдущая страница | | | следующая страница ==> |
| The Diagonal Play 3 страница | | | Р.Х. Токарева |