Читайте также:
|

|
| Dia.13 |
The best way is for Black to make White heavy from the very beginning by playing 1, 3, and 5 in Dia.13. Again, White will take the large point on the upper side with 6, but now when Black makes his pincer, he has three stones to attack, instead of just one or two. Black 7 takes a key point in this shape, and White does not want to move into the center with a, because Black will turn him with b, forcing him to make an empty triangle at c.
White cannot afford to prevent the attack with 1 in Dia.14, letting Black get the key point at 2. It is rather pointless for White to extend toward a stone like,; on the right side neither he nor Black stands to make territory at any great rate.
The correct way for White to answer Black's pincer, following Dia.13, is to run into it head-on with 1 in Dia.15. Black can shut White in by playing a or, as seems best here, he can come down with 2 to keep White short of eye space. White jumps out at 3, and Black 4 works well. Later on, Black will return to attack White's heavy group, using pressure against it to gain profit on the upper side, or elsewhere on the board.

| 
|
| Dia.14 | Dia.15 |
| (9) Attack and Defense | ▲ |
By now the reader has seen many examples of running battles, that is, of groups without adequate eye space at the side of the board being chased out into the center, and he should have a fairly good idea of the disadvantages of being under attack. The main one is that you cannot very well stop to make territory while you are fleeing for safety. At the same time, if your opponent can manage to form territory while chasing you, then he will be making profit in the most efficient way possible. Even if he cannot build territory directly, he can usually derive some kind of advantage from threatening you. Every unsafe group you have to look after is a liability; every weakness in your position a source of profit to your opponent.
The techniques of attack and defense belong mostly to the middle game, but the battles waged there have their

|
| Dia.1 |
origins in the opening, and their strategic implications need to be understood there. We shall bring this chapter to a close by looking at three opening situations in which play was guided by considerations of attack and defense, starting with a very simple one, illustrating defensive strategy.
You may not recognize the joseki that has been played in the upper left corner in Dia.1, but it doesn't matter, since the sequence of moves there is irrelevant to our discussion. It is now White's turn. If you run your eye over the board you will see several large points, but one of them is much more important than the others. No one can afford to miss a play like this.
White must without fail connect at 1 in Dia.2. That lets Black extend to 2 on the right side, but White has no weak groups to worry about, and from this point on he can play with a free hand.

|
| Dia.2 |

|
| Dia.3 |
If White plays 1 in Dia.3, aiming at the invasion point a, Black will cut at 2, putting the white stones in the upper left corner on the run. White will have no time to play a until this group is out of immediate danger. Furthermore, with one group drifting unsteadily in the center, he is unlikely to be able to afford an invasion at b on the upper side.

|
| Dia.4 |
Not only that, but his group on the left side is rather weak, and c could easily become Black's sente; this extension is not very wide, but it strengthens the lower left corner significantly. White's thirst for profit on the right side will end up costing him dearly in every other part of the board.
White 1 in Dia.4 is a bad mistake which we trust none of our readers would make. Closing off the left side in this way is much less important than preventing the cut. Black plays 2, and White has the same trouble on his hands as in Dia.3.
As another example of defensive strategy in operation, we shall study the moves shown in Dia.5, following Black's pincer play at 1 and extension to 3. White's counter-extension to 4 had the advantage of keeping Black 1 and 3 weak, although White a on the left side would have been just as good. Black's keima at 5 prompted White 6 and 8 in the corner, and although these moves more or less followed joseki, they were guided by considerations of attack and defense. Let's start by looking at White 4.

|
| Dia.5 |

| 
|
| Dia.6 | Dia.7 |
One joseki variation has White making pincer attack on the right side as shown in Dia.6. In this game, however, after Black marches out with 2 and 4, White is in a predicament, for his three stones on the lower side do not have eye space yet, and the strong black stone marked,in the upper right corner leaves him with no good play on the right side. The black group including 2 and 4 is weak, but one weak group between two weak enemy ones is a strong position to have.
If, were a white stone, then White 1 would not be in so much danger, and White would have the upper hand, but as it stands, Black, makes White's pincer attack turn out badly. White 1 goes against the principle of not confronting strong stones.
Thus White played 1 in Dia.7 instead, and Black built up the right side with 2. White 3 and 5 were extremely important moves. They made corner territory, they undercut Black's right side, and most of all, they gave White a sure, living shape.
If White omits these moves to occupy the large point at 1 in Dia.8, Black slides into the corner at 2. White's stones are now rootless, and as he flees blindly into the center, Black strengthens himself on one side with 4 and takes territory on the other with 6. To be attacked like this, when there is nothing to counterattack against, is intolerable. We have here the archetype of a heavy group on the run, a perfect example of a game going down the drain because of failure to take the most elementary defensive precautions.
|
| Dia.8 |

| 
|
| Dia.9 | Dia.10 |
Before going on, it is worth noting that White can live by playing 1 in Dia.9, instead of a. This gives him sente, but is incorrect all the same. Black 2 strengthens the group on the lower side appreciably. White a, aiming under the black stones on the right side and leaving the group on the lower side in a more vulnerable condition, is a play well worth taking gote to make.
Since we are talking about attack and defense, it is interesting to see what happens if Black becomes overly aggressive and plays 1 in Dia.10, instead of the keima at a.
White answers with 2 in Dia.11, and pushes out into the open while Black crawls along the third line. This time Black

| 
|
| Dia.11 | Dia.12 |
is not making so much territory on the right side, and White can make good use of his wall by attacking the two stones on the lower side. If Black answers White 2 by pushing through and cutting, as in Dia.12, White is in a good position to put up a fight, since Black has three weak groups to look after at once.
Dia.13 shows the first sixteen moves of the last example game in this chapter. After the initial corner moves, White played 6 and 8 on the lower side, an alternative to a shimari in the lower right corner. Black made a kakari at 9, then went to the upper left to build territory on the upper side.
After Black 15, White made a five-line extension to 16. The key to understanding this opening turns out to be White 10, sitting firmly on the third line.

|
| Dia.13 |
If White had put this stone on the fourth line, as shown in Dia.14, Black would have followed an entirely different strategy, playing 2 on the right side instead of making the kakari at a. Indeed, this extension in front of a shimari is the normal move to expect, and the reader may be wondering why it was not chosen in the actual game.
Black 2 in Dia.15, however, violates the principle of not playing in the direction of strong stones. It is a good move as far as the upper part of the board is concerned, but it has practically no adverse affect on White 1. That is, White 1 is too strong to be threatened by any black extensions toward it, but it is too low for Black to have to worry about White's making a lot of territory by extending up from it.

| 
|
| Dia.14 | Dia.15 |

|
| Dia.16 |
After White's sixteenth move in the actual game, Black would have liked, among other things, to invade the right side, but that was out of the question. If he had the temerity to play 1 in Dia.16, White 2 would give him something to think about. Two separated, weak stones like 1 and, have no business being on the board this early in the opening. Black may think that he is destroying his opponent's territory, but he is going to have his hands full keeping his invasion from turning into a suicide mission, while White does as he pleases. White was well aware of all this when he made his extension up the side.
An invasion does make sense at this point, but the place for it is not on the right. If we think of the strong, solid position occupied by White., an invasion there does not seem like such a good idea after all, even if it could be managed without being cut apart by White 2. It does not pay to try to fight against a stone like..
Dia.17 shows a more promising idea. Black begins by developing his weak stone with 1 and 3, helping his opponent, in a way, by removing any possibility of breaking open the right side, but limiting White to a modest amount of territory there, taking advantage of the low position of White.. Next, if White plays 4, Black invades at 5. Black 1 and 3 make it that much harder for White to fight back, and although Black may not be able to capture either of the two stones that his invasion conies between, he should be able to keep White from making any territory at all on the lower side.

|
| Dia.17 |
In the actual game, White did not give in so easily to Black's tactics, but resisted by playing 1 and 3 in Dia.18 instead of 4 in Dia.17.
The purpose of this combination was to put a cutting point into Black's formation, so that White would have something to aim at in the fighting ahead;
|
| Dia.18 |
this, too is one of the techniques of the opening. Black, undismayed, buttressed his line with 4, 6, 8, and 10, then invaded at 12, and what came next belongs to the middle game. In case you are worried, however, if White pushes through and cuts with 1 and 3 in Dia.19, Black can answer at 4, and all will be well.

|
| Dia.19 |
CHAPTER 3
| Ten Problems | ▲ |
It has amused us, in the first chapter, to collect and classify some of the more common moves and shapes of the opening, and in the second, to try to organize the subject on strategic principles, but we have been aware all along that what the reader is going to have to do, when it comes down to actual play, can be best described as looking for the big points on the board and deciding which is biggest. Theoretical knowledge will help him, but for the most part he will have to rely on his own powers of visualization, which are best sharpened through experience. The following are ten opening situations that have confronted the author or his opponents at various times in the past. Each is presented as a problem, and you are invited to look at the game diagram and select your move. On the three pages following each problem will be found an answer diagram showing various reasonable choices, ranked from 10 points for the best move downwards, and some explanation of what the problem is all about.
There are many times in the game of go when it is impossible to decide which of two or more likely-looking moves is better, and there are many times when one move can be probably identified as the best, but several others are close behind in merit. There are also times when we simply do not have a clue; no one can pretend to say how the first four stones of the game should be played, for instance. This is why go admits so many different styles of play, and remains fascinating even to professional players.
The situations in the following problems, however, are not of this vague type. As the answer diagrams will show, there will always be several fairly good moves, (7 points or above), and the reader should congratulate himself for finding any of them, but the author does not have any great qualms in ranking the best choice well ahead of the others.
| Problem 1 Black to play |

|

The focal point of the game as it stands now is the unsettled position on the right side. Black should make a pincer play at either of the two points marked 10, attacking the white stones marked. while forming territory in front of his shimari. If you chose to play one line higher,
at one of the points marked 8 in the upper right, you can take credit for finding the right direction of play, but you are being too timid.
Dia.1 After Black 1, White should push out into the center with 2 and 4, then jump to 6, (or, if he prefers, keep pushing at a). This starts a four-way fight between two weak black groups and two weak white ones. It will be difficult, but Black has already staked out his claim on the best ground by playing 1.

|
| Dia.1 |
Dia.2. Black 1, capturing two stones and tieing Black's forces together, is an important point, but White 2 makes White's position safe, too, and robs Black of territory on the right side.
Dia.3. Similarly, if Black plays 1 and 3, White will extend to 4, with nothing to fear from Black's cutting at a.

| 
| |
| Dia.2 | Dia.3 | |

| 
| |
| Dia.4 | Dia.5 | |
Dia.4. If White answers Black 1 directly by playing, say, 2, Black will capture at 3. White, his three stones on the right side sandwiched between two strong black positions, faces a dreary prospect. White cannot play this way; the fight in Dia.1 is inevitable.
Dia.5. If Black plays on the left side, 1 looks best, but then White will play 2, 4, and 6, and be one move ahead on the right side of where he was in Dia.1.
Dia.6. For your reference, the position in the lower right corner arose from this pincer joseki.

|
| Dia.6 |
| Problem 2 Black to play |

|

This game has started with some heavy action in the lower right. White has lost a couple of stones, but he has lived in the corner and made good shape in the center, and the fighting in that quarter of the board is over for the time being. Now Black needs to enter the huge open space in the upper left, which could rapidly become White's territory if left unattended.
Dia.1. (correct) The joseki from 1 to 5 was made to order for this occasion. White's prospects for a large territory suddenly vanish in the face of Black's plays.

|
| Dia.1 |
Dia.2. Black 1 here is a bit off the mark. Black does succeed in eliminating white territory on the upper side, but his own stones are weaker than in Dia.1, and White can build on the left side with 6. Black has made the mistake of playing against a strong white group, when he should have put his pressure on the weaker stone on the three-three point.

|
| Dia.2 |

|
| Dia.3 |
Dia.3. There are various other ways of playing kakari against a stone on the three-three point, which have been given credit in the diagram on page 116. To take one of them, if Black plays 1 here, (8 points), White will answer at 2, making territory on the left side. Black 3 has little effect on the white group to the right, where White.is standing rock-steady on the third line. If. were on the fourth line, however, Black 1 and 3 would be good plays.
Dia.4. Black 1 here is a large play as regards the lower side, but White will take sente and make a larger play on the upper side. Similarly, if Black played a or b, White would answer at 4.

|
| Dia.4 |
| Problem 3 Black to play |

|

The obvious feature in this problem is the massive wall Black has made in the lower left corner. What should he do with it? He has already started correctly by playing kakari at,; now he should keep on by making a one-point jump, (10 points), setting his sights on a really large area. A more conservative extension down the left side, (5 points), would be too close to the wall to be efficient.
Dia.1. (correct) When Black plays 1, White should respond immediately with 2 and 4. Black can afford to play 5, aiming at the invasion at a. Black 5 at b would be an over-concentration of strength in relation to the lower left corner.
Dia.2. This position confronted the author in one of his games. The move he actually played was 1 here, and when his opponent answered at 2 and 4, Black got a better result than in Dia.1.
Dia.3. But if White had foregone the usual play at 4 in the previous diagram, and siezed the key point with 4 in this diagram, keeping Black from making adequate use of his wall, he would have had the lead.
If you appreciate the value of White 4, then you can see that Black 1 at a, (6 points), provoking an immediate reply at 4, would be bad strategy.

| 
| 
|
| Dia.1 | Dia.2 | Dia.3 |

| 
| 
|
| Dia.4 | Dia.5 | Dia.6 |
Dia.4. Perhaps you are worried about White's playing 1 here. This may become a serious threat in the future, but for the present White is only committing himself to the defense of a heavy group of stones while reducing his own corner territory, (assume Black a, White 6, Black c, etc.). Accordingly, for Black to play 2 before White gets the chance to play 1 is only a fifty per cent move right now.
Dia.5. Coming to the right side of the board, notice that Black 1, even though it is the usual idea after White has played., is not appropriate here, because Black's position on the lower left is open at the edge of the board.
Dia.6. It would be better for Black to attack in this way, for with his outward-facing power in the lower left, he need not be afraid of getting into a running fight. But Black 1 in Dia.1 is more important than these moves.
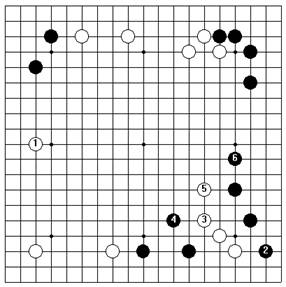
| Problem 4 Black to play |

|

In this game Black is developing a large territory on the lower side, while White is doing the same on the left side. The pivotal point in regard to both of these areas is the keima marked 10 points. The invasion on the upper side, (7 points), is a big move, too, but if Black plays it now, and starts a running battle, he is likely to end up by helping White to make sure territory out of the left side. Conversely, if he invades the left side, (4 or 5 points), White should be able to secure the upper side while attacking him.
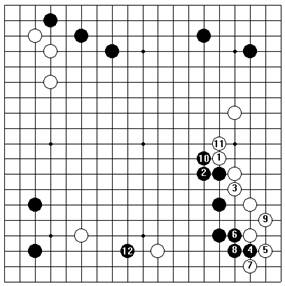
Dia.1. (correct) Black 1 threatens to make so much territory on the lower side that White is almost forced to do something about it. White a would not be enough: Black would answer at 6. It is hard to be sure of the best entry point, but White 2 seems likely, and the moves up to 5 are a possible development. By attacking, Black is taking the initiative in the game. If he becomes strong in the center, he can invade effectively at c. If he gets some stones in place to the left of White's group on the right side, then Black d may assume some attacking force.

|
| Dia.1 |
Dia.2. If White answers 1 this way, Black will play 3, 5, and 7, followed by 9, a, or 6, which would be more than White could bear to see. Black should not, however, play 3, 5, and 7 before 1, since they reduce the value of Black c.

|
| Dia.2 |

| 
|
| Dia.3 | Dia.4 |
Dia.3. Black 1 here is an example of bad technique. Although it does build up Black's territory, it builds up White's to an even greater extent. If Black had played 3 first, (the correct move), and White played 2, Black would not then play 1.
Dia.4. If Black plays 1 here, or at a, b, or c, White will get the key point with 2. This aims into Black's lower side, and more important, see what it does for White's prospects on the left and upper sides.
| Problem 5 White to play |

|

It should be fairly clear that the biggest play lies somewhere on the lower side, so the issue becomes what kind of extension White should make there. To begin with, since there is nothing much for White to aim at on the right side, there is no point in extending on the fourth line. That leaves the third line, and for reasons to be explained, the ogeima, (10 points), is best. One point to the right would be too meek. Farther to the left would be too adventurous.
Dia.1. (correct) Since Black has gotten well dug in front of White's shimari with,, White must think about defending his rear. White 1 settles things nicely. Black will then take the large point in the upper left corner.
Дата добавления: 2015-10-31; просмотров: 110 | Нарушение авторских прав
| <== предыдущая страница | | | следующая страница ==> |
| The Diagonal Play 2 страница | | | The Diagonal Play 4 страница |