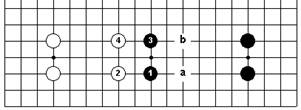
Dia.1 shows a hypothetical opening situation. After Black has taken the ideal point between the two shimari and White has made his counter-extension at 2, the next order of business on this side of the board is for Black to make a one-point jump to 3. White follows suit with 4. If Black did not play 3, White would find it rather easy to eliminate Black's prospective territory on the side by invading at a,
but after 3, it is hard for him to do more than reduce Black's territory by playing 6, (which Black can answer at a).
|
| Dia.1 |
If White does not play 4 in Dia.1, then Black can make another one-point jump, as shown in Dia.2, forcing White into a low position and extending his influence toward the left side.
White should patiently withdraw to 2 and wait for a chance to poke into Black's weak point at a.

|
| Dia.2 |
What about Black's making a 2-point jump, as in Dia.3? The trouble with this move is that it is too easy for White to break the connection between 1 and 3, so that Black is likely to be forced to strengthen his extension with a third stone, something he cannot do very efficiently. If White plays a, for example, Black will be hard put both to defend his side territory and to keep Black 3 from being cut off.

|
| Dia.3 |
From a two-stone wall, however, it is usually possible to get away with a two-point jump into the center—we see Black enlarging his territory with such a move in Dia.4— and from a three-stone wall a three-point jump may be safe.

| 
|
| Dia.4 | Dia.5 |
There are some common pincer joseki in which a two-point jump into the center from a single stone is made. In Dia.5, to take one of them, White 2 is a popular answer to Black 1, although the one-point jump, (White 2 at 3), is also playable. It is not that White 2 cannot be cut off—Black 3, 5, and 7 show that it can be—but if Black plays the cutting variation, White manages to build up a powerful attack on Black 1 in return.
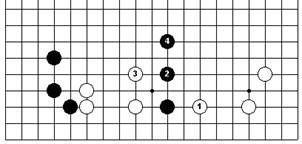
But the standard response, if there is such a thing, to a pincer attack is a one-point, not a two-point jump. Two examples of this have been shown already, on page 33. Dia.6 shows a third, in which Black responds to White 1 by jumping out with 2. He is threatening the white group to the left as well as running for his life, and White has to defend at 3, prodding Black into another leap forward to 4.
|
| Dia.6 |
Дата добавления: 2015-10-31; просмотров: 109 | Нарушение авторских прав
| <== предыдущая страница | | | следующая страница ==> |
| Extending from a Two-Stone Wall | | | The Diagonal Play 1 страница |