|
Читайте также: |
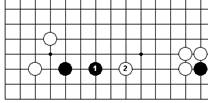
The basic minimal extension from a two-stone wall is a three-point one, as shown in Dia.11. Black holds himself to the minimum in Dia.11 because White has two strong positions on this side of the board, and could easily invade if Black extended any farther than 1. Notice, too, that Black is leaving room for a second good extension to a.
What if White invades the three-point extension, with 1 in Dia.12? Black should answer at 2, and although this fight can get complicated, White is at a disadvantage and deserves to come out of it with a bad result. His invasion was premature. He should first approach Black's formation at a, if he gets the chance, and then he can strike effectively at 1.
If Black made only a two-point extension, as in Dia.13, White could crowd him from the outside at 2. In Dia.13 the Black stones enclose too narrow a territory to be efficient, and in fact do not really have enough space to be sure of two eyes.

| 
| 
|
| Dia.11 | Dia.12 | Dia.13 |
The basic extension from a three-stone wall is a four-point one, and from a four-stone wall, a five-point one, provided there is enough room to make it. There is, furthermore, no theoretical upper limit to an extension from any position, except for the limits imposed by the size of the board. The next diagram will furnish us with several practical examples of extensions, both long and short.

|
| Dia.14 |
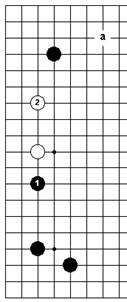
The game in Dia.14, taken from one of the Japanese professional tournaments, has just entered the post-shimari phase. Black begins with a conservative two-point extension down the left side to 1, to make a base for his stone in the upper left corner.
White takes advantage of Black's conservatism by exchanging 2 for 3, forcing Black into an overcrowded shape, as explained on the previous page. White 4 keeps Black from making what would be a powerful play at a. You may wonder why White does not extend one line farther to the right, but it is better for him to make a strong extension, covering his weak point, and follow with a longer one later.
Black now has sente, and extends toward White's shimari with 5 on the lower side, leaving room for the following extension to 7. White likewise reaches towards Black's shimari with 6, naturally choosing the safe two-point extension. With 8 and 10, however, White opens up and extends the limit, since he is backed up by already stable positions on both the right and upper sides, and is approaching a relatively weak black one in the upper right corner. White 8 is both an extension and a kakari.
Take note of the priorities followed in this game: first an extension to make a base for an isolated stone, next extensions in front of shimari, and then other extensions. Both Black's and White's moves illustrate sound go strategy.
Now we have a problem for you to solve: Black, in the diagram below, has just invaded the lower side with the kakari at 1, and White has made the joseki response at 2. Black's next move is up to you; make your choice, and then turn the page.

|
| Problem 1 |

| 
|
| Answer to problem 1 | Dia.1 |
The answer is a two-point extension on the third line, as shown in the diagram above. Nothing is so important as to make a safe base for the black stone in the lower left corner, and Black 1 is the only good move for the job.
When we say 'safe base', we do not mean that these two stones are proof against any kind of assault that may come in the future, but for the present, Black is well enough dug in.
White has his eye on a counter-extension to a, preceded, as a matter of good technique, by the exchange of White b for Black c, but White a is too narrow to be worth making now.
Even though it is a kind of attack, Black would be able to ignore it.
Black 1 in Dia.1 is too small an extension. By holding himself back unnecessarily in this way, Black is only inviting White 2, which can be made either now or in the near future, and which leaves Black with insufficient eye space.

| 
|
| Dia.2 | Dia.3 |
Black 1 in Dia.2, however, goes one line too far to be safe. White can do quite a bit of damage by invading right
away with 2, and even if he plays elsewhere, the possibility of his playing White 2 later is a terrible imperfection in Black's shape.
If Black plays on the fourth line, as in Dia.3, perhaps under the mistaken belief that he should try to aim into the open bay created by the white wall in the lower right, White will not take immediate advantage of his error, but just extend up the left side. Black's position is a bit unsteady: White a would threaten it—this will help White to make territory on the left—and there is the weak point at b which White can use by playing c.
Now another problem: after Black's correct play, (, in the diagram below), White should make an extension on the left side. As a test of your go judgement, choose a point on the third line for him, then look at the explanation on the next two pages.

|
| Problem 2 |

| 
| 
|
| Answer to problem 2 | Dia.1 | Dia.2 |
White 1 in the diagram on the left above is the best answer. This is a bit hard to prove—good and bad are not as clearly defined as they were in the problem before—but notice that White is leaving room for a second extension to a. He is safe in reaching out as far as 1 because he has that second possible extension in front of him, and because the two stones he has in the rear are in no imminent danger of being attacked.
White 1 in Dia.1 is almost as good; if this was your choice, you can still be satisfied with your feeling for the length of an extension. The only slight complaint that can be made against it is that it leaves Black a bit more room than is really necessary. Black will play 2 without delay.
But from this point on, the farther back White pulls his extension, the worse it gets. Against White 1 in Dia.2, Black will be extremely happy to be able to make a four-space counter-extension with 2. In go, the meek do not inherit the earth.
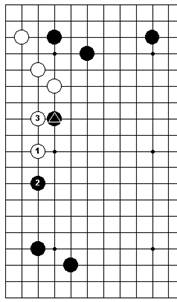
Black 2 in Dia.3 shows what can happen to White if he goes too far; even one line beyond the correct distance is a serious error. White has only room for a one-space extension to 3 while Black can make a proper two-space extension to 4, and it is easy to see who is coming out ahead on this exchange. A more interesting way for White to play, after Black 2 has exposed his mistake, is to attack with 3 in Dia.4, causing Black and White to shoot out with the plays from 4 to 10, but this still gives him a bad result.
Black's spearhead in the center greatly reduces the usefulness of the white wall in the lower right corner, but White 1 to 9 fail to have any very strong effect on the black shimari in the upper left corner. This sequence could also come about, by the way, if White played 1 at 3 and Black counter-extended to 2.

| 
|
| Dia.3 | Dia.4 |
| (9) Pincer Attacks | ▲ |
A pincer attack is a play that attacks an enemy stone by taking away its room for extension along the side. The function of a pincer attack is to keep the opponent both from getting territory and from forming a basis for eye shape.
This kind of play is at its best when it works with other friendly stones to build territory while attacking.

| 
|
| Dia.1 | Dia.2 |
White 1 in Dia.1 is an ideal pincer play, since it also happens to be an extension from the enclosure in the lower right corner. Black now has neither territory nor room for eyes at the edge of the board, so if he is going to put his beleaguered stone in motion, there is no place for him to extend except up into the center, where he faces a doubtful future.
Black would heave a sigh of relief if he could extend to 1 in Dia.2, making his position safe, at least for the time being, and taking over the territory at the edge that White got in Dia.1. The difference between these two diagrams is enormous.
Pincer attacks are common starting points for joseki, especially in answer to a kakari against a stone on the 3—4 point. Black 1 in Dia.3 is typical. Once again the basic

| 
|
| Dia.3 | Dia.4 |
idea is that White does not have enough room to form two eyes at the edge of the board, so he must run upwards into the center. His hope is that he will be able to make a counterattack against one or the other of the black stones hemming him in. Black a and 6, instead of 1, are two more possible pincer attacks in this position. Even Black c might be called a pincer attack, although it is not much of one, since it leaves White room to make a two-point extension to a.
Pincer attacks can be made on the fourth line, too, as at 1, a or & in Dia.4. A pincer attack on the fourth line gives the opponent some room to move around in at the edge of the board, while a pincer attack on the third line is subject to pressure from above. To make this idea more concrete, and to illustrate some of the ways of dealing with a pincer play, here are two of the joseki that Dias.3 and 4 can lead to.

| 
|
| Dia.5 | Dia.6 |
In Dia.5, where Black, is on the fourth line, White jumps out to 1, then makes a counter-pincer play at 3.
When Black jumps out to 4, White can connect underneath by playing 5, reaching a stable position. This is a possible stopping place for the joseki.
In Dia.6, where Black, is on the third line, White again plays 1, but now after Black 2 he strikes from above with 3, and Black runs along the edge of the board while White spreads out in the center. White comes out of this joseki with no definite territory, but Black does not have so much himself, and both of his positions are still vulnerable to attack.

| 
| 
|
| Dia.7 | Dia.8 | Dia.9 |
| ^ elsewhere | ^ elsewhere |
In Dia.7, Black usually answers White's kakari by extending to a, but there are times when, for one reason or another, he does not defend. White can then move in from the other side by playing 3. Although this pincer attack does not keep Black from making two eyes in the corner, if he plays 1 in Dia.8, which gives him a living shape, White will barricade him in with 2. This exchange of a small corner territory for an outside wall is generally in White's favor, since his stones have potential for development, while Black's have practically none. Black usually plays 1 at 2, a, or b and fights his way out, even though the resulting joseki have a way of awarding White the corner.
Dia.9 shows a similar example in which Black's stone is on the 3— 4 point. After Black 8, White can be expected to extend out from under Black's overhanging wall on the lower side, and Black will, perhaps, aim to attack White 3, 5, and 7 with a pincer play from farther up the left side.
Extensions are the basic building blocks of the opening, pincer attacks are the basic offensive weapons, and moves which are both extensions and pincer attacks are the ideal.
This is a fundamental strategic principle. A clear awareness of it is worth far more than any detailed knowledge of joseki, or of the other techniques presented in this book.
| (10) Invasions | ▲ |
White 1 in Dia.1 lands squarely between two black positions, and is therefore an invasion. Either a black or a white play at 1 is extremely large. If Black played 1 first, extending from two corners simultaneously, White would have no easy way to establish himself on the left side, which could fall entirely to his opponent. In Dia.1, however, White has a safe foothold from which he cannot be dislodged.
If Black threatens White from below with 1 in Dia.2, White has room to extend upward to 2. If Black approaches from above, as in Dia.3, White has room to extend downwards.
This makes White 1 in Dia.1 an Irreproachable move.

| 
| 
|
| Dia.1 | Dia.2 | Dia.3 |
Dia.2, incidentally, is better for Black than Dia.3. In Dia.2, Black 1 is a good extension from the lower left corner, and Black can still make good use of his stone in the upper left corner, by playing 3 at a, for instance. In Dia.3, however, White has pitched his camp on the fertile ground in front of the shimari, and there is nothing Black
can do about it. Black's position in the upper left corner is still open to invasion at a and b, and it will be hard for him to reach a satisfactory arrangement of his stones.

| 
|
| Dia.4 | Dia.5 |
When a double-wing formation, a very desirable structure, has been made around a stone on the 4—4 point, as in Dia.4, it is always easy to invade at the 3—3 point. Sometimes this is a good idea and sometimes it is not; when White is able to attack one of Black's two outposts on the sides, and in various other circumstances, he may do better to make a kakari from the appropriate direction and fight on the outside. White 1 at the 3—3 point does have the virtue, however, that in all of the joseki variations following it, White quickly makes a stable, living shape. If White does not invade this formation somewhere, Black can fortify the corner by playing a, and then White's job will be much harder.
Dia.5 shows the counterpart of this formation in which Black's corner stone is on the 3—3 point. This time there should be no hesitation about playing White 1, an important shimari-preventing move. Black will get some territory around the edges while White lives in the center.
Dia.6 introduces another kind of situation in which an invasion is practical. This time White does not have enough space at the side to be sure of an easy life for himself, but he is making a pincer attack as well as invading, and Black, has even less elbow room than White 1. This will make it hard for Black to overpower White 1; if he tries, White has ample means of fighting back.
The relative strength of White 1 and Black, is the key to this example, and if Black, were not so insecure, White 1 would not be such a good move. On the other hand, if the black stones in the lower left corner were weaker, then White 1 would be even better.

|
| Dia.6 |
While we are looking at this position, note the placement of White 1. White a, on the third line, would also be correct, but White should play neither farther up nor farther down the side than either of these two points.
|
| Dia.7 |
If he invades at 1 in Dia.7, in order to make more of an attack on Black,, Black will just extend to 2, a good example of light play, and his profit will be greater than White's.
If an invasion is made into an area that does not furnish enough room for easy eye formation, and the invasion does not act as a pincer attack, then the invader is going to be in for a hard time of it. Even if his invading force manages to survive, its struggles to live are as likely to do damage to his own positions in other parts of the board as to his opponent's territory. Such invasions are contrary to go sense in the opening, and although they are occasionally necessary, they are usually wrong.
| (11) Extending into the Center | ▲ |
Both pincer attacks and invasions tend to force the play upwards, and for this and other reasons, extensions into the center turn out to be just about as common during the opening as extensions along the side.
They often have important offensive and defensive implications, and sometimes they serve to build territory directly.
It is not safe to extend as far in the center as it was near the side of the board. The basic tools now are the one-point jump, the diagonal play, and the keima, which we shall take up in that order.
Дата добавления: 2015-10-31; просмотров: 139 | Нарушение авторских прав
| <== предыдущая страница | | | следующая страница ==> |
| Extending in Front of a Shimari | | | The One-Point Jump |