Читайте также:
|
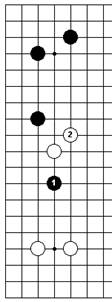
White 2 in Dia.1 is a diagonal play. It is slower than the one-point jump, but stronger, and in the particular shape illustrated in Dia.1 it is a standard idea. Besides just running out into the center, White is aiming to attack at a or b, and is keeping Black from connecting his two stones.
If White played a one-point jump, as in Dia.2, Black would play at 3, and there would be no way for White to disconnect Black's position, a fact which you should be able to prove for yourself. If Black tried to make this connection after Dia.1, however, he would fail, as shown in Dia.3. White sacrifices a stone at 2 in order to drive down with 4 and 6, then continues as in Dia.4, and Black's crude tactics have given White a superior result.
This same shape appears in a different position in Dia.5, where Black has just invaded at 1. White 2 cuts him off and moves out toward the center, in anticipation of a running fight.

| 
| 
|
| Dia.1 | Dia.2 | |

| 
| |
| Dia.3 | Dia.4 | Dia.5 |

| 
| 
|
| Dia.6 | Dia.7 | Dia.8 |
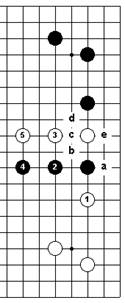
Dia.6 shows the diagonal play at work again, this time making a determined attack on White.. White can get away, as shown in Dia.7, but Black pressures him in sente up to 8, then plays 10 make some eye shape for his own group.
In this kind of position it is always a difficult question whether the diagonal play or the one-point jump is better, and in fact Black could also play 2 in Dia.8. This permits White a somewhat easier escape than before, but is not necessarily wrong. There is also the possibility that White will fashion some kind of connection underneath at a. (We leave the details for you to work out). Black can prevent that by exchanging 6 for c, but he is reluctant to do so, since that strengthens White's line and deprives Black of moves like d and e.
The Keima
White 1 in Dia.1 is a keima. This word was borrowed from the Japanese game of shogi, where it is the name for the piece analogous to a knight in chess, and in some English go writings White 1 is called a knight's move.
The idea behind White's keima at 1 is to nudge Black toward the edge of the board, that is, to have him play at a on the second line. White 1 is better than the one-point jump to b, which would let Black extend on the third line unhindered. In this joseki, Black usually plays 2 at c.
The keima is a move which must be made with care, since it can often be cut. Black 1 and 3 show the basic cutting maneuver. Here they are not usually very effective—even if White cannot capture Black 1 in a ladder at a, he seems to have the upper hand when he plays 4—but this shows you what to watch out for.

| 
|
| Dia.1 | Dia.2 |
One common use for the keima is to advance from the third line to the fourth in answer to a capping play. In Dia.3, for instance, Black 1 aims toward a large territory in the lower left quarter of the board. White has to get into this area, and his keima at 2 is the right move for the job. (If White were not so concerned with moving upwards, then a one-point extension to a on the third line would be a stronger play).

|
| Dia.3 |
Since this keima is so close to the edge of the board, it can not be cut through as the previous one was, but all the same, there is a soft spot between the two white stones that Black can exploit, as shown in the next diagram. Black sacrifices a stone at 1, cuts at 3, plays atari with 5 and 7, and throws the lower side into confusion by bringing about a ko fight. White should not try to evade the ko by playing 6 at 7, since that would leave Black with a good attacking move at a. Whatever the outcome of the fight, it illustrates the fact that the keima is always a move with a weakness.

|
| Dia.4 |

|
| Dia.5 |
Some more typical keima moves can be seen in Dia.5. This game started with an involved joseki in the lower right corner that left Black and White with one weak group apiece in the center. When White connected at 1, Black played keima at 2. Even though there was some danger of an invasion between 2 and Black,, it was better for Black to keep on the heels of White's weak group by playing 2 on the fourth line than to make the safe, but flat extension at a.
Now White played 3 to give his group some breathing space, something that he had to do before he could think about invading the lower side or attacking in any other part of the board. This keima, being backed up by White 1 as well as White., could not be cut. Since it outflanked Black's weak center group, Black had to make an extension of his own, and chose 4. This kind of extension into the center
sometimes comes hard to inexperienced players, for it does not seem to have anything to do with territory, so we want to be sure that the reader understands the reasons for it.
Firstly, it took the pressure off Black's center group. Other extensions, closer to the right side, would have done so too, but Black 4 had the virtue, secondly, of putting some pressure back on White's center group—not very much, perhaps, but enough to keep White from risking an immediate invasion of the lower side. White therefore played 5, and the third purpose of Black 4 became manifest, namely, that it enabled Black to play 6, blocking White on the right side and obtaining tangible profit there.
| 12) Pushing and Crawling | ▲ |
Dia.1 below gives us an example of another of the standard maneuvers of the opening. Black has played keima at 1 and is pushing White along the side of the board, further isolating White. and building toward a large exterior territory. White, by crawling along the third line, is gaining secure territory at the edge.
Dia.2 shows an idealized version of this situation. Considered by themselves, White's third line territory and Black's outside wall are about equal in value, although in actual play this position would probably be favorable to one side or the other,

| 
|
| Dia.1 | Dia.2 |
depending on the extent to which Black could make use of his wall for building territory or attacking.
This idealized version would not be likely to occur, however, in actual play, for in a pushing and crawling battle, one side is always a step ahead of the other, and the competition to stand in that privileged position causes breaks and bends to appear in the solid lines.
The man behind in a crawling battle will always try to jump out and get ahead. For example, in Dia.1 White was the man behind, and his next move, if he is going to keep going along the left side, should be White 6 in Dia.3, jumping one line ahead of Black. If Black answers 6, Black a, b, or c would be correct. If Black does not answer, then White can start pushing to the right, as in Dia.4, extending his sway in new directions while forcing Black into a constricted shape. If, on the other hand, White does not play 6 in Dia.3, then Black 1 in Dia.5 stops him for good, and puts Black in a position to make territory in all directions.
The value of the moves in these three diagrams depends upon what lies out of view in the surrounding areas, but generally speaking, they are all quite big.

| 
| 
|
| Dia.3 | Dia.4 | Dia.5 |

| 
| 
|
| Dia.6 | Dia.7 | Dia.8 |
| h connects |
The man ahead in a pushing and crawling battle will try to press his advantage as soon as possible by playing a move known as a hane, (pronounced ha-neh), in front of his opponent's stones. In the joseki in Dia.6, for example, Black loses no time in playing hane at 4, forcing White down to the second line. Notice, however, that he plays straight out at 8 instead of trying a second hane at a, since Black a would leave too many cutting points for White to chop into.
White, for his part, does not want to crawl along the second line any farther than necessary, so instead of continuing with a, he plays 9 and 11 in Dia.7. He can do so in sente, since the cutting point at b forces Black to connect at 12. White has gone far enough along the second line that Black cannot play a in sente, so if White wants to crawl farther up the left side at some time in the future, chances are that he will be able to do so.
Dia.8 gives another variation of this joseki, in which Black plays a second hane with 1, instead of playing 6 in Dia.6. Although 1 becomes a sacrifice stone, Black gets to make a solid wall with 3 and 5, and White can no longer be sure of playing a in sente.
Many joseki involve pushing and crawling of one kind or another; Dia.9 shows another of them. First Black jumps out at 4 to get a step ahead of his opponent, then with hardly time to catch his breath, he bends upward with 8 and 12. His position seems to be full of cutting points, but White can gain surprisingly little advantage from them.
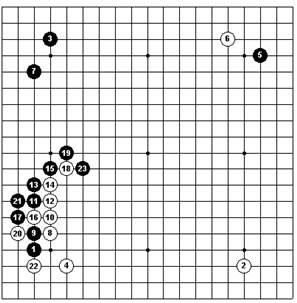
You can see this joseki being used in an actual game in Dia.10. After the moves from White 8 to Black 19, which duplicate the sequence in Dia.9, White takes time out from the pushing and shoving to cut at 20, forcing Black 21, and then play 22. This is as much as he can do with all the cutting points at his disposal. Black plays atari at 23, offering to give up 1 and 9 in return for White 18.

| 
|
| Dia.9 | Dia.10 |
This hypothetical exchange is pictured in Dia.11, where for the sake of clarity we have removed the captured white stone from the board. White's profit in the corner is not small—twenty points would be a good estimate for the value of White 1—but Black's capture completely overshadows White's wall, as well as every other part of the board, and is even more valuable.
The actual game continued as in Dia.12, with White and Black saving their stones at 24 and 25 respectively, then continuing the pushing battle up to White 40. Black played 41, for he could not allow White to take that point and start a second wall, and the game entered another phase. On the left side, Black had roughly fifty points of territory in the bank, but White's wall, in cooperation with the two stones marked., gave him a fully equal position.

| 
|
| Dia.11 | Dia.12 |
By now you should begin to have a fair idea of what pushing and crawling are all about. To help you refine your technique in this important part of the game, we are going to end this section by working through a few more examples.
In Dia.13, (another joseki), we see a position in which White has done some crawling along the fourth line. This is an advantageous line along which to crawl, but in spite of that, if it is White's turn to go next, he should play the keima at 1, giving up altitude for speed. If it is Black's turn, then of course a is a big move.
Should White just plod ahead with 1 in Dia.14, Black will push him to the side of the board with the double hane at 2 and 4. Although Black seems to be running a risk in leaving two cutting points open, the best that White can do is to play 5, letting Black connect at 6. This is clearly much worse for White than the previous diagram.
If White tries to resist, instead of letting Black connect, his strongest play is 1 and so on in Dia.15, but Black 10 threatens both a and b, and White has failed. Even if the ladder does not work, so that White can capture three black stones by playing c, the sequence of Black a, White d, Black e gives Black the strong outer wall he is seeking.

| 
| 
|
| Dia.13 | Dia.14 | Dia.15 |

|
| Dia.16 |
So far we have been looking at pushing battles that ran along the edge of the board, so perhaps it is time to show one that goes upwards. White 1 in Dia.16 is played both to develop the weak stone. and to attack Black,. Black pushes back with 2 and 4, then sprints out with a keima to 6. White also jumps ahead, to 7, and Black goes back to make some eye space for himself by playing 8. Later on, a will be the key point in the center for whoever wants to continue the running fight. This kind of side-by-side flight into the center for freedom is a common theme in the opening and early middle game, and we have already observed several other variations of it.
We close this section by studying one more case involving a pushing battle in the center of the board. In Dia.17, Black very badly wants to get the point 7, making a nice extension from his stone,, avoiding a white pincer, and attacking the two white stones in the upper left corner.
First, however, he plays the aggressive double hane at 1 and 3. The exchange up through 9 sees White with a strong, influential center position, while Black has gotten to make two moves on the upper side, and has some chance left to put 3 to work in the future. This whole sequence will be examined in the next five diagrams.

|
| Dia.17 |
To begin with, if Black plays 1 in Dia.18 without making any preparatory moves, White will jump out to 2. This may not seem so different from the actual sequence, but now White is developing effortlessly, and the black stones marked, are much weaker than they were after White 6 in the previous diagram.

|
| Dia.18 |
After Black tries to push White aside with 1 in Dia.19, White may feel inclined simply to extend down the side to 2, but then Black 3 forces White 4, and when Black attacks with 5, he has a considerable amount of strength and territorial potential in the center. Rather than accept this, White should push back by playing 2 at 3.

|
| Dia.19 |

|
| Dia.20 |
Now it is Black's turn to be wary of playing in too relaxed a manner. If he just goes along with 3 and 5 in Dia.20, then after White 6 and Black 7, White's side is much larger than in the last diagram, and Black does not have anywhere near the prospects for expanding in the center that he had before. Furthermore, if White does not mind being attacked on the left, he can play 6 in Dia.21, and Black will get nothing at all on the upper side.

|
| Dia.21 |
So it is imperative that Black play the double hane at 3 in Dia.22, and after atari at 4, White has to defend at 6. Black is rewarded for his energetic tactics by having built up his position in sente, so that his attack at 7 assumes much greater significance when finally it comes. White 4 is a more important stone than the two in the corner, which are alive but no longer have much scope for action, so next the exchange of White a for Black b, followed by eye-making moves by White on the upper side, is natural.

|
| Dia.22 |
CHAPTER 2 Nine Concepts
| (1) Make Your Stones Work Together | ▲ |
You can probably imagine how the first twelve stones of the game in Dia.1 were played. Black has made a shimari and extended down the right side, while White has just made a kakari in the lower left corner and established himself on the left side. Now it seems to be Black's turn for a kakari in the upper left corner. Which side should he attack from?
No experienced player would miss Black 1 and 3 in Dia.1.
These moves combine with the three black stones on the right to give Black immense territorial prospects in the upper right quarter of the board, and he is gaining momentum with every step. Each one of his stones heightens the value of the others. Next Black a, which would have been rather strange before 1 and 3, has become a large point, and we shall return to this position a little later.

|
| Dia.1 |
There is a certain kind of go player who cannot bear to see his opponent make any territory, and who would therefore be tempted to break up the left side with Black 1 in Dia.2. The joseki through Black 5 follows. Black's newly formed group is crowded in between two stronger white positions, and has no relation to any of the other black stones on the board. The territory that White cannot get on the left side he will take on the upper side, and he has his eye open to the possibility of attacking Black 1, 3, and 5 when he gets the chance. Black has completely lost step.
But if the position in the lower left corner were slightly altered, as in Dia.3, Black 1 would become reasonable. Now Black's plays would be working with his shimari to squeeze the two white stones caught in between, which would be even weaker than the black group above them. Relationships like these are what make plays work, or fail to work, in the game of go.

| 
|
| Dia.2 | Dia.3 |
| (2) Efficiency | ▲ |
Efficiency means making the maximum of territory with the minimum of stones. This is what go is all about, and all of the advice in this book is really just guidance on how to play efficiently. During the opening, besides going for the corners and extending along the sides, efficient play means always searching the board for the area where the largest play is possible, taking all the advantage you can of your own strong positions and your opponent's weak ones, and never wasting time on unnecessary moves. Let's look at one example.
The game in Dia.1 began with Black playing on the 4—4 points and White on the 3—4 points. Next came Black's kakari at 5, chosen over a possible kakari in the upper left corner because it was also an extension from Black 3. White 6 started a common joseki, which Black finished by extending to 11, picking the fourth line instead of the third just as a matter of taste.

|
| Dia.1 |
Against White's kakari at 12, which kept Black from making a double-wing extension, Black used the pincer play at 13, and the moves from 14 to 22 followed.
This joseki often ends with Black next playing a, but here that move would be inefficient.
Black's best play is shown in Dia.2, where Black 1 and 3 work beautifully with Black, and the two stones farther up the right side to map out a really large area. White cannot get up off the third line on the lower side. It is best for him to play 2, then leave that part of the board for the time being, perhaps choosing the kakari at 4 for his next move. White. has its back to a solid wall of black stones, and must be abandoned for the forseeable future.
If it does not occur to Black to play 1 and 3, then an extension to b, or a kakari in the upper left corner, would be almost as good, but Black a would be a mistake.

|
| Dia.2 |

| 
|
| Dia.3 | Dia.4 |
This play, shown in Dia.8, does not take advantage of Black's strength, and becomes a sort of wasteful overkill directed against White., while doing nothing to halt White's movements on the lower side. Considering the number of black stones in the area, White. should die a natural death without Black 1 having to be played at all.
In a position like Dia.4, however, where Black does not have the reinforcements that he had before, Black 1 is a good move. This time, if White. got loose, Black could find himself attacked both above and below. Black would no longer want to push with 1 and 3 in Dia.5, because White could climb up onto the fourth line with 4 and 6.

| 
|
| Dia.5 | Dia.6 |
If White had a stone already in place further to the left, he could even reach the fifth line by playing 6 at a. If Black tried to cut under White 4, as in Dia.6, White would push him down with 6, block at 8, and Black would have to crawl away, if he could, along the second line.
| (3) Play Away from Strength | ▲ |
This is an important principle of the game, and it applies both to your opponent's strong positions and to your own. To play close to enemy strength is ineffective, and sometimes dangerous; to play close to your own strength is inefficient.
The professional game introduced in Dia.1 below started with shimari and extensions all around the board, followed by a joseki in the lower right corner that gave both sides strong positions. Immediately after it, White played 1 and 3 to trim down Black's territory on the right aide, choosing,

|
| Dia.1 |
as only made sense, the more open part of it for his intrusion.
His choice serves as the first illustration of the main point of this section.
For comparison, see what happens in Dia.2, when White plays 1 on the wrong side, and Black drives to the left with 2 and 4. Black is doing a great deal to strengthen and enlarge his area in the upper right with these moves, while White 1 and 3 fail to harm Black's strong lower right corner at all. The few points of territory that White may be able to take away from Black in the area around 1 do not add up to much of anything.
But we are mainly interested in the plays that followed White 1 and 3 in Dia.1. White was thinking, perhaps, of Black 1 and 3 in Dia.3, which are a kind of joseki in this shape, and which give him the chance to play a very nice keima at 4. He is threatening to cut off and surround the shimari in the upper right corner, but if Black defends with 5, White can combine 4 with another keima at 6 to take control of a huge potential territory on the upper side.

| 
|
| Dia.2 | Dia.3 |
This sequence, in which White simultaneously reduces Black's territory and builds up his own, puts him well out in front. The reason is that Black 1, 3, and 5 violate the principle of playing away from strong stones, in this case, the stones in the lower right corner.
Black, being a professional player, was well aware of this, and so he came up with a more interesting and effective sequence. In order to attack White without causing a redundancy of power, he played 1 in Dia.4. White defended his weak stones with 2, and Black drove deep into his opponent's potential territory with 3, 5, and 7, revenging himself fully for the damage that White was causing on the
right side. Black 1 is not the kind of extension to be played all the time, but the particular circumstances of this game made it work well. The trick of leaving strong stones to look after themselves in order to break ground in some new direction is always useful, one of the easier techniques to learn and one of the most rewarding to put into practice.
Дата добавления: 2015-10-31; просмотров: 114 | Нарушение авторских прав
| <== предыдущая страница | | | следующая страница ==> |
| The One-Point Jump | | | The Diagonal Play 2 страница |