Читайте также:
|

|
| Dia.4 |
| (4) Thickness and Walls | ▲ |
A wall, as the word is used in go, is a solid, or nearly solid, line of stones that does not face the edge of the board. Thickness refers to a position with no weak points. Pushing operations and joseki often produce walls, or thickness, or thick walls, in the opening, and the key to handling them can be partly found in the principle of the previous section. It is always wrong to play close to thickness. It is similarly unwise to play close to a wall, since that either causes an inefficient formation, if the wall is one of your own, or leads to being attacked, if the wall is one of your opponent's. A wall, however, is inherently useful for making territory, and is foolish to ignore. It is extremely desirable to extend from your own walls and towards your opponent's, but at the same time, it is desirable to do so at a distance that does full justice to the power of the wall. The professional game which we have taken to illustrate this section shows several examples of the proper technique.
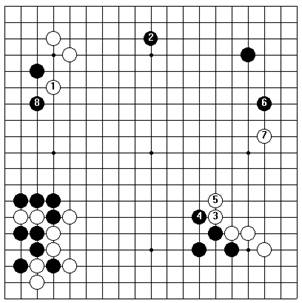
Dia.1 gives the moves that we are interested in. The joseki played in the lower left corner has left Black a thick group with a wall facing up the left side, and White sets about trimming down Black's area by pressing on the black stone in the upper left corner with 1.
White 1 does not keep Black from taking territory on the left side, as eventually be did by playing 8, so it is fair to ask why White did not put his stone down at 1 in Dia.2, invading the left side and also making a pincer attack against Black,.
Actually, this gets White into trouble. Black counters with 2 and 4, creating a serious cutting point at a, and with his thickness in the lower left, he has White 1 in an uncomfortable position, too. White has very little to hope for in the coming fight. 'Stay away from thickness' is a basic principle of go, which White 1 in Dia.2 blatantly violates.
| 
|
| Dia.1 | Dia.2 |
If we turn things around as in Dia.3, however, White's pincer attack at 1 becomes a good move, better now than White a would be.

|
| Dia.3 |
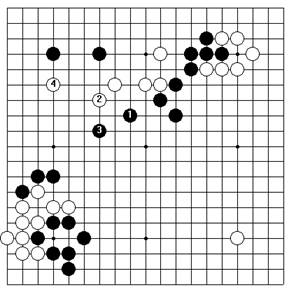
But in the game under consideration, White 1 in Dia.4 was correct. White was hoping that Black would answer at 2 and let him extend across the upper side to 3. In order to take advantage of the wall made by 1, he should go that far, or to a at the very least.

|
| Dia.4 |
Black 2 in Dia.4 is a big move, but somehow it looks narrow and inadequate in relation to the thickness in the lower left corner; you do not have to be a strong player to appreciate this. White's full extension to 3 is a more efficient play, and so Black rejected this diagram.

|
| Dia.5 |
Instead, he took the point on the upper side for himself, as shown in Dia.5. Since he was extending toward a white wall, he did not want to get too close, but at the same time, he did not want to play too far away. Practiced judgement wavers between Black 1, the move played, and Black a, which would still have left White not enough room for a fully efficient counter-extension.
If Black had extended one line further than he did, playing 1 in Dia.6, White would have cut in behind him at 2, with space for a good extension to 4 in front of him.
Black would lack a similar amount of space to the left of 1. His best extension would be into the center with 3, but Dia.6 is a clear failure for him.

|
| Dia.6 |
To return to the actual game, White next played 1 and 3 in Dia 7, building a thick, high wall, and Black immediately extended toward it with 4, to forestall a kakari against the upper right corner. A move like 4 is so important that it becomes almost a reflex in an experienced player. It is not necessary to come very far down the side to keep White from getting full value for his thickness. Black could, as a matter of fact, have afforded an extension to a, but he did not need to go that far; it would have been unsafe for him to exceed the point a.
Black 1 in Dia.8 comes one step too close to White's thickness, and invites disaster. After preparatory plays at 2 and 4, White invades at 6, whereupon he and Black chase each
|
| Dia.7 |

|
| Dia.8 |
other out into the center in the sequence through 10. Black gets away, but White 12 strikes into the upper side.
Black is going to lose quite a bit more there than he has taken away from White in the lower right, and the weakness of Black 1, 7, 9, and 11 may plague him for the rest of the game.
Looking back to Dia.7, in the actual game both players had managed to deal successfully with each other's thickness. The positions on the left and right were roughly parallel to one another, neither player having as much room to extend up the side as he would have liked. In spite of that, however, there was still room enough for two quite large plays, and the players did not let their disappointment deter them from
making what use they could of their strong positions.

|
| Dia.9 |
White's next play was 1 in Dia.9, and Black matched it with 2 on the other side of the board. These plays seem about equally valuable; White could just as well have taken the upper left corner with a, leaving Black to move another length down the right side to b. Either way leaves the black and white positions in equilibrium, and attention shifts to the largest remaining open spaces, on the upper and lower sides.
A way for White to deal with the latter—not, as it

|
| Dia.10 |
happens, the way he chose, but perhaps the way he should have chosen—is given in Dia.10. White pushes with 1 and 3, then immediately extends toward the thick wall that this creates for Black by playing 5, coordinating all his stones very well.
| (5) Open at the Bottom | ▲ |
The position in Dia.1 is rather artificial, but it illustrates an important concept in go. White has played a joseki in the lower right that gives him a strong outer wall in return for the corner territory. Now it is Black's turn, and it would be proper for him to extend toward White's thickness by playing a or 6. Which of these two points is better? The key to this situation is the black stone marked

|
| Dia.1 |
Black 1 in Dia.2 is wrong. White will, of course, make a kakari at 2, and after Black 3, he can build toward quite a large area with 4, or some such move.

|
| Dia.2 |
The right move for Black to make is 1 in Dia.3. White 2 and 4 are similar to 2 and 4 in the previous diagram, except that now White's flagship territory has a hole in it below the waterline, for Black can jump out from, to a, a play that reduces White's territory by a surprisingly large amount. Considering this, it would actually be better for White to make his kakari from the other side, at b, or to take the large point at c on the upper side, than to play 2.

|
| Dia.3 |
Black should not panic and jump out to a with his next move, for at this early stage of the game other points are bigger. Thus White may get the chance to plug the leak by playing at the point between a and,, but the fact that he needs this third move to seal off his territory is enough to show that 2 and 4 are inefficient. Black, makes the lower side an unimportant place for either player to play.
This condition is called 'susoaki' in Japanese, a word that means 'open at the bottom'.
| (6) The Third Line and the Fourth | ▲ |
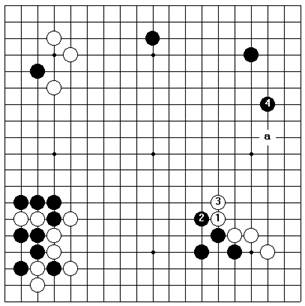
Dia.1 shows the position after thirty-five moves in a recent championship game. A running battle had given White about thirty points of territory along the upper side, while Black had the beginnings of a sizeable territory in the lower left quarter of the board. White made the kakari at 1 to keep Black's territory under control, and then extended to 3. In this section, we shall study his reasons for playing 3 on the fourth line, and the consequences of his doing so.
But first, while we have the opportunity, we want to mention Black 2. This is not the usual way to answer a kakari, but here the conditions on the left side made it correct. Black 2 in Dia.2 comes too close to the three stones marked, to be efficient. Especially considering that the corner can still be invaded at the 3—3 point, Black is getting nowhere near enough territory for his effort.
| 
|
| Dia.1 | Dia.2 |
But to return to the main question, what made White play 3 in Dia.1 on the fourth line?
Dia.3 shows what happens when White plays on the third line. Black strikes with 2 and 4; a stone on the third line always invites this kind of pressure from above. Black's plays not only enlarge his territory, they also intensify the pressure on White's eyeless center group. Furthermore, since White.is on the third line, it will be hard for White to make a large amount of territory on the lower side, even if
Black never invades there. In the opening, it is not a good idea to string all your stones out along the third line like this.
In spite of the preceding tirade, White 1 in Dia.3 is not really a bad move; it is still too early in the game to make positive judgements. It certainly looks as if circumstances call for an extension on the fourth line, but it is impossible to criticize the extension on the third line very harshly, especially since it is right in so many other positions.

|
| Dia.3 |

|
| Dia.4 |
In Dia.4, for example, where Black has only, on the left side and White. is on the 4—4 point, White should definitely extend as shown. To play White 1 at a would only be to ask for an invasion of the lower side.

|
| Dia.5 |
Astone on the fourth line always invites an invasion, and in the game under study, Black made a landing straightaway with 2 and 4 in Dia.5. Black 4 confronted White 1, aiming under and behind it, in the same way that White's kakari at. had confronted Black, a few moves earlier, and Black now had the initiative.

|
| Dia.6 |
White 1 in Dia.6 looks like a reasonable pincer play to make to protect the white stones to the left, but professional judgement rejected it. By playing that way, White seems to be spreading himself too thinly. Black 2 attacks the stone in the lower right corner. At the same time, White's center group is weak, and even after White 1, the possibility of Black's invading and attacking the group on the lower side exists, so White may soon find himself in trouble in one place or another.

|
| Dia.7 |
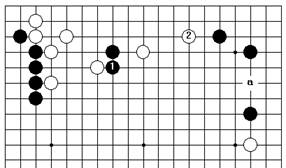
It was better for White to play 1 in Dia.7 and tolerate Black's extension to 2. White 3, Black 4, and White 5 followed. After this Black attacked in the center, but since White had formed two strong groups on the lower side, he had no trouble defending. White 3 reduced Black's territory, too, another advantage in White's choosing this line of play.
| (7) Reverse Strategy | ▲ |
'If you want to play on the right, push first on the left, sounds like a fragment of Oriental nonsense, but it is often the right strategy in go. For an example let's look back to an earlier stage of the game that appeared in the previous section.
The situation was then as shown in Dia.1, and Black's main concern was to attack the two white stones marked., against which he had already made a pincer play. His own pair of stones in the upper left corner, however, were none too strong themselves, and in particular, White was threatening to cut through at a. Black's task was to strengthen himself in such a way as to keep up the attack he had started.
The trick was for Black to push against the white stones on the upper side, the ones he was not interested in attacking.

|
| Dia.1 |

|
| Dia.2 |
Black 1, 3, and 5 in Dia.2 were one way of doing this. Although the last of these plays was clearly sacrificial, it forced White to play 6 and 8, while Black connected at 7 and jumped out to 9. He now had a strong, uncuttable line of stones, and had greatly improved his position in relation to the two white.'s, which were still as weak as ever.
|
| Dia.3 |
Moreover, he was threatening to shut White in by playing a, again making use of Black 5 and isolating the three white stones in the upper right corner. White had to defend with 1 in Dia.3, and Black continued to push against the upper side with 2 and 4. When he finally struck with 6, the attack he had been aiming toward, he had a long and solid wall to squeeze White against. This was a good example of reverse strategy being used to buttress an assault.
To see reverse strategy being used in another way, let's look at the position in Dia.4. There the part of the board that calls for immediate attention is the upper side, where a weak white stone lies next to a weak black group. White must do something right away to keep Black from playing a, but in the longer run, the region that is most important is on the left side. For one thing, the area that Black has mapped out there is bigger than anything else on the board, and for another, the three stones marked,are weak, so that White has a good chance to attack.

|
| Dia.4 |
Since White wants to enter the area on the left, he should start by pushing against Black on the right, by playing 1 in Dia.5. If Black answers passively with 2, White will push along with 3 and 5, then jump out to 7, building a canopy that promises a great deal of damage to the left side. Black 2, 4, and 6 do not have a similar effect on the right side because of the strong line of stones marked. that White has there.

|
| Dia.5 |
Rather than allow this, Black will play 2 and 4 in Dia.6, but now White is moving smoothly and naturally to the left. It is as if he has thrown himself at Black, and Black has flung him back in just the direction he wants to go, with added momentum.
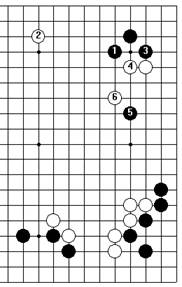
In this game, Black now faced a difficult choice of moves. Eventually he decided to cast himself headlong into the attack with 1 and 3 in Dia.7, even though it meant driving White directly into the area he had been hoping for, and

|
| Dia.6 |
left him with frighteningly little actual territory. White 2 in this sequence is another example of reverse strategy that we shall examine; first White elbowed Black in one direction, then he shot ahead in another.
|
| Dia.7 |

| 
|
| Dia.8 | Dia.9 |
If White had just made another one-point jump forward, as shown in Dia.8, Black would have welcomed the opportunity to defend the left side with 3. White 2 would not be helping White's cause very much; he would still be two moves away from getting out into the center.
If Black defended with 3 after White's diagonal extension in Dia.9, however, White could escape with one move at 4. Once his running group is out of danger, he still has room to invade the left side or the upper left corner, and Black has a running group of his own that can come under attack.
| (8) Light and Heavy | ▲ |
The concepts of light and heavy play are important in the opening and the middle game. Both of them refer to the way a player handles himself in parts of the board where he is weak. 'Heavy' is a term of criticism, used to describe a stubborn, slow-witted play that only serves to make a group of weak stones bigger, without strengthening it or counterattacking in any significant way. A heavy group is one that has grown too fat to be given up, but is serving no purpose except that of providing the opponent with something easy to attack. A light group is one that, although weak, is not in a position to be effectively attacked, or if attacked, can be sacrificed. Light play refers to the kind of fast and slippery style that gives the opponent no big targets to hit. Let's look at a couple of examples.
In the game in Dia.1, White has just played., isolating one of Black's stones and advancing toward the upper right corner. How should Black answer?

|
| Dia.1 |
|
| Dia.2 |
Black 1 in Dia.2 is the right way to bring the isolated stone out into the center, but here it is a heavy move. White has room to extend to 2; now his group has a base on the side and Black's does not. Caring for this heavy group is going to be a nuisance to Black for some time to come, while attacking it will be a source of both pleasure and profit to White. He can build up his own strength by chasing it, then invade at a, for example.

|
| Dia.3 |
The correct, light play is Black 1 in Dia.3, which offers to let White have, and the territory around it on the upper side, but takes full compensation in the upper right corner. White has no choice but to accept the offer, for after Black 1, Black a would become both an escape and an attack. First White exchanges 2 for 3—this profits him on the left side, and if he is going to capture Black,, he will have no need to play 3 himself as an eye-making move—then he traps Black's stone with 4 and 6. Black is perfectly happy. The 4-5 exchange has made his upper right corner very strong, and Black,, which has been only loosely captured, remains as a sort of tender spot in the belly of White's territory.
Light play is especially called for in reducing large areas that the opponent is building up, and as an example of this, we return to the game we left on page 59. Dia.4 shows the position reached. Black has laid the foundations of a giant territory in the upper right quarter of the board, and it is White's move. If White contents himself with building

|
| Dia.4 |
his own territory by extending to 1 in Dia.5, Black will play 2. White 3 makes a double-wing formation around the shimari in the lower right corner, but Black's territory is developing on a larger scale, and can grow faster, than White's.

|
| Dia.5 |
Therefore, White should play 1 in Dia.6. This is a light move. White does not go in too far, lest he be attacked, but settles for making a modest-sized dent in Black's prospective territory. The sequence from 2 to 6 is natural, and next White leaves his new, light group as it is, to extend to 7 and 9. Compare Black's territory now with what it was in the last diagram, taking note that White can split the upper side by playing a at some time in the future. Even though White 1, 3, and 5 do not have much in the way of eye shape, since they are riding down Black's territory from above, there is no very profitable way for Black to attack them. His next move was actually an invasion at the 3—3 point in the upper left corner.

|
| Dia.6 |
What if White had made a deeper invasion, choosing, we imagine, 1 in Dia.7? In some circumstances this would be a good move, but not here, and any experienced player, seeing White 1, would think to himself, 'too heavy'.
Next, our experienced player would ponder for a bit. It is one thing to accuse a move of being heavy, and another to see how best to take advantage of the mistake.
Black a, White b, Black c in Dia.7 are one idea that comes to mind,

|
| Dia.7 |
|
| Dia.8 |
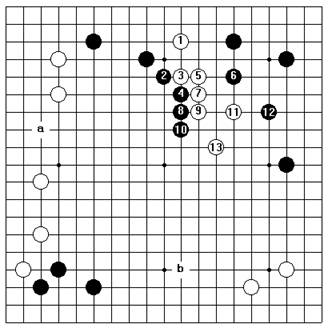
but after some thought, Black 2 in Dia.8 seems to work better. The sequence up to White 13 flows naturally, and Black secures his territory on the right while attacking White with 6 and 12.
White has, of course, reduced Black's territory by much more in this diagram than he did in Dia.6, but on the other hand, he has not made any territory for himself. Furthermore, Black has gotten to play 2, 4, 8, and 10, making a wall in the center which will support an effective invasion at a on the left side.
With 13 White has gotten out into the open, but his group still does not have two eyes, a fact that has consequences all over the board. On the lower side, for example, Black can extend to b. Normally White would have no trouble invading behind this extension, but now, with one weak group already floating in the upper right, he may not be able to afford another. All in all, White's invasion has turned out to cost
him a great deal.
There is one more example for us to look at, this time of plays designed to make the opponent's stones heavy. Most of the early action in the game in Dia.9 has taken place in the lower half of the board, but stable positions have been reached all around, and Black's low-lying, strong stone at, makes the right side an uninviting place to play, so attention centers on the large open space on the upper side. It is Black's turn.

|
| Dia.9 |

|
| Dia.10 |
Black would like to take the big point for himself with 1 in Dia.10, but that does not work out very well. White leaps on his back with 2 and 4, forcing Black 3 and 5, and Black 1 becomes an inefficient stone. Black would never have bothered to make such a small extension from a safe position if 3 and 5 had been in place already. White builds on a large scale with 6 and 8 and takes the lead. (If Black failed to play 7, by the way, White 7 would seal him in tightly).
As a way of preventing this bad result, Black might try the diagonal extension at 1 in Dia.11. White would then take the large point at 2. Black turns his attention toward White., but this stone is light, and hard to attack. If Black makes a pincer attack with 3, White lives easily with 4, 6, and 8. White 2 and the stones in the lower right pretty well nullify Black's outward-facing wall.
After White 2, it would be much better for Black to exchange 3 for 4 in Dia.12, so as to make White heavier, before attacking with 5. Now White cannot reach the living shape that he got before, and Black has something to hope for, but still, White can handle himself by playing 6.

| 
|
| Dia.11 | Dia.12 |
Дата добавления: 2015-10-31; просмотров: 109 | Нарушение авторских прав
| <== предыдущая страница | | | следующая страница ==> |
| The Diagonal Play 1 страница | | | The Diagonal Play 3 страница |