Читайте также:
|
Introduction
Cadifra UML Editor is a graphical editor to draw Unified Modeling Language (UML) diagrams on Windows 7, Windows Vista or Windows XP.
Cadifra UML Editor программасы Unified Modeling Language (UML) диаграммаларды салуға арналған графикалық редактор болып табылады.
As of version 1.3, Cadifra UML Editor supports the following kinds of UML diagrams:
Cadifra UML Editor 1.3 нұсқасы UML диаграммалардың мынадай түрлерін қолдайды: Class, Object, Sequence, State and Use Case.
With Cadifra UML Editor, you can create and edit Cadifra diagram files (*.cdd). The file format is xml.
Cadifra UML редакторының көмегімен, сіз диаграммалық файлдарды (*.cdd) форматында жасай және өңдей аласыз. Файл пішімі XML болып табылады.
With Cadifra UML Editor, you cannot generate code nor does it build a database. But you can draw good looking UML diagrams easy and very fast. Diagrams can be embedded in text processing documents like Microsoft Word, without loss of quality or ease of use.
Cadifra UML редакторы кодты генерациялау немесе деректер қорын құруға мүмкіндік бермейді. Бірақ сіз оңай және тез диаграммаларды сала аласыз. Бұл бағдарламаны пайдалану қарапайым, оны Microsoft Word сияқты мәтін өңдеу құжаттарына да енгізуге болады.
The document you are reading right now, was created with Microsoft Word and Cadifra UML Editor, and then converted to pdf format. Here is an example of a small class diagram, created with Cadifra UML Editor and embedded into this document:
Бұл құжат Microsoft Word және Cadifra UML Editorда жасалды, содан кейін PDF форматына айналды. Төмендегі класс диаграммасы, Cadifra UML редакторында құрылды және ол құжатқа енгізілген мысал болып табылады:
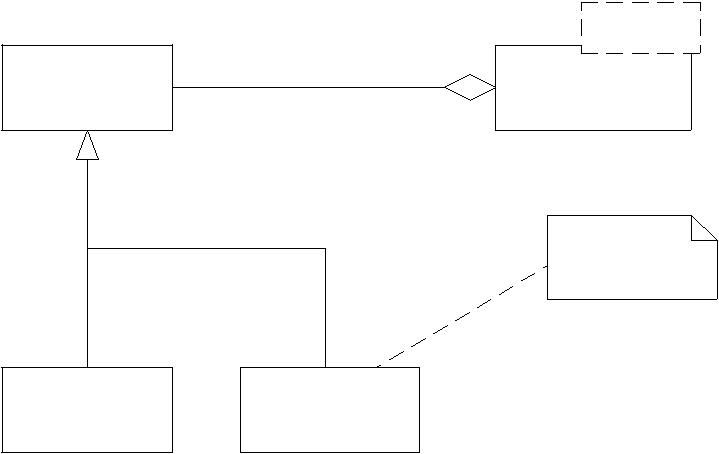
<Shape>
* owner
Shape Collection
note
Circle Rectangle
www.cadifra.com Cadifra UML Editor 1.3 User's Manual
Creating an Example Diagram
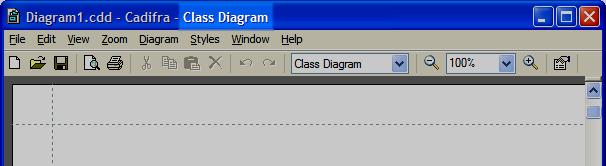
After starting Cadifra UML Editor, you have a window with an empty diagram. Cadifra UML Editor starts in Class Diagram mode, which is shown on the title bar of the window and in the toolbar.
2 мысал. Диаграмма жасау
Cadifra UML Editor бағдарламасын іске қосқаннан кейін, экранда бос диаграмма терезесі пайда болады. Cadifra UML редакторы терезесінде тақырып жолағында, яғни, құралдар тақтасында диаграмма кластары көрсетілген, сол режимнен керек класты таңдап, жұмысыңызды бастайсыз.
In Class Diagram mode, only UML elements that belong to a UML class diagram can be created, but you can mix UML elements from different UML diagram kinds in the same Cadifra UML Editor diagram as you like. Just switch between the different UML diagram kinds by changing the diagram mode in menu Diagram or by using the drop down list in the toolbar.
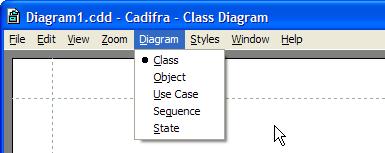 Класс диаграмма режимінде тек UML элементтерін жасауға болады, бірақ егер сізге басқа диаграммалар керек болса сол Cadifra UML редакторында диаграмма түрлерін таңдап, UML элементтерін араластыруға болады. Ол ушін мәзірден Diagram тізімін ашып, режимін өзгерту арқылы әр түрлі диаграмма түрлеріне ауыса аласыз.
Note: The diagram mode is saved together with the diagram data. If you open an existing diagram,the diagram mode is the one that was present when the diagram was saved.
Ескерту: Диаграмма жазылған деректерімен бірге сақталады. Бұрыннан бар диаграмманы ашсаңыз, ол дәл сол сақталған күйінде ашылады.
Let’s assume we keep with the Class Diagram mode for now. To create a new class, right-click somewhere in the white space of the document window. A context menu appears, showing the possible UML elements that can be created here:
Біз қазір клас диаграмма режимінде жұмыс жасап жатырмыз делік. Жаңа класс жасау үшін, бір жерде құжат терезесінің ақ кеңістіктінде тінтуірдің оң жақ батырмасын басамыз. Сол кезде контекстік мәзірі ашылып, UML элементтері пайда болады:
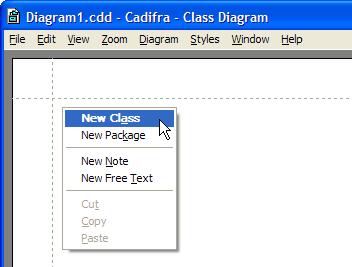
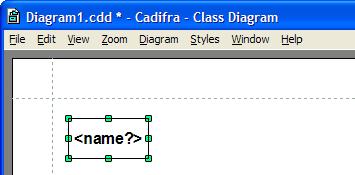
Select New Class from the menu. The class is placed nearby to the point where the context menu was opened. Now you should have your first UML element in Cadifra UML Editor:
Сол мәзірден Жаңа класс таңдалады. Сонда басқан жерде контекстік мәзірден «name?» пункті ашылады. Сонда сізде Cadifra редакторында бірінші UML элементі пайда болады:
Note: Bold text marks the default command. Every context menu saves the chosen command as thenew default. As an easy shortcut, you can call the default command with ctrl+right-click.
Ескертпе: Мәтін үнсіз келісім бойнша Bold режимінде жазылады.
Note the star appearing after the name of the diagram (“Diagram1.cdd”) in the title bar. The star appears whenever the diagram needs to be saved.
Тақырып тақтасының ең жоғарығы бөлігінде диаграма атының (мысалы «Diagram1.cdd») жанындағы жұлдызшаға назар аударғаныңыз жөн. Егер жұлдызша болса, диаграмма, болмаса оны сақтау қажет.
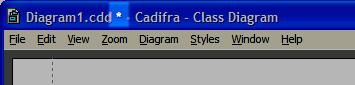
If you undo the creation of the class (ctrl+z or Edit > Undo), the star disappears. If you redo (ctrl+y), it reappears again. By the way: you can always undo/redo any number of steps. There is no limit in the number of steps that can be undone. Undo/redo is also available in the toolbar.
Егер сіз жасалған жұмысты жойып тастасаңыз (Ctrl + Z немесе Edit> Undo), жұлдызша жоғалып кетеді. Ал егер жай ғана өзгерткен жағдайда (Ctrl + Y), онда ол қайта пайда болады. Сіз әрқашан undo / redo қадамдарын шектеусіз қолдана аласыз. Болдырмау, яғни артқа жүру және қайтару қадамдарын шексіз қолдануға болады.
Note: The undo stack is not saved with the diagram. The undo stack is always discarded when youclose a diagram.
Ескертпе: Бірақ сақталып тұрған диаграмманы қайта ашқан кезде Undo яғни болдырмау қадамдары диаграммада сақталмайды. Сіз сақтап қойған диаграмманы ашқан кезде undo / redo батырмаларымен қолдана алмайсыз.
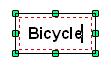
So, we still have our new class. The newly created (or undone and redone) class is selected. If a single element with a text is selected, you can start typing its name on the keyboard. The name is replaced by the text you enter. No need to double click. No ugly dialog box to fight with. So, let’s say we enter “Bicycle” as the new name of the class:
Бізде жаңадан құрылған класс бар. (немесе болдырылмайды және қайта жасалған) класс таңдалады. Мәтіні бар бір элемент таңдалған болса, сіз пернетақтадан атауын бере аласыз. Осылайша, біз жаңа класс атауын «Bicycle» деп айталық:
Note: You can also switch to text edit mode by double-clicking on a text.
Класс жолағындағы мен жыпылықтаған мәтін курсоры ішінде штрих қызыл терезесін ескеріңіз. Сіз бос сол шерту жерде класс атауы, мәтінді өңдеу режиміне қалдыру немесе ESC пернесін соққы болады.
Ескерту: Сондай-ақ, мәтін үстінен екі рет басып атын өзгерте аласыз.
Now let’s drag the newly created class around. Just hold down the left mouse button over the Bicycle class and move the mouse.

www.cadifra.com Cadifra UML Editor 1.3 User's Manual
A dashed red rectangle follows the mouse movement. Note the faint lines – they appear when the moving box is in exact alignment with another element).
Note: You can always escape from the moving mode by hitting the ESC key.
Now, while still dragging (moving mouse while holding left mouse button down) press and hold the ctrl key on the keyboard. The mouse cursor gets a small plus sign – this is copy move.
Пунктир красного прямоугольника следует за движением мыши.Обратите внимание на слабые линии - они появляются, когда движется окно в точном соответствии с другим элементом).
Примечание: Вы всегда можете выйти из режима движущегося нажав клавишу ESC.
Теперь во время перетаскивания (перемещение мыши, удерживая левую кнопку мыши), нажмите и удерживайте клавишу Ctrl на клавиатуре. Курсор мыши получает небольшой плюс - это копия ход.

If you release the left mouse button during copy moving, a copy is created and the drag operation is terminated.
Если вы отпустите левую кнопку мыши при копировании перемещения, копирования создается и операции перетаскивания прекращается

Rename the second Bicycle to “Person” (just type on the keyboard). So now, we have a Bicycle and a Person class.
Переименовать второй велосипед "Человек" (просто наберите на клавиатуре). Так что теперь у нас есть велосипед и класс Person.
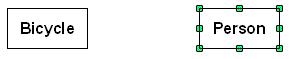
Now, let's create an association. Position the mouse cursor over the Bicycle class and hold down the right mouse button to display the context menu of the Bicycle class element.
Теперь, давайте создадим ассоциацию. Наведите курсор мыши на классе велосипедов и удерживайте нажатой правую кнопку мыши, чтобы отобразить контекстное меню элемента класса велосипедов.
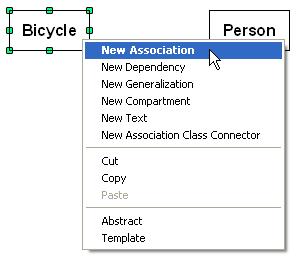
Select New Association from the context menu to enter the association drawing mode.
Выберите Новое объединение из контекстного меню, чтобы войти в режим рисования ассоциации.

В режиме объединения рисунок, курсор мыши изменится на знак разъема (как показано выше). Примечание: Вы всегда можете выйти из режима рисования ассоциации, нажав клавишу ESC.
In association drawing mode, the mouse cursor changes to the connector sign (as shown above).
Note: You can always escape from the association drawing mode by hitting the ESC key.
www.cadifra.com Cadifra UML Editor 1.3 User's Manual
Move the mouse and see how a dashed red line follows your mouse movement from the box of the Bicycle class. Now, position the mouse cursor over the Person class. Note how the mouse curser gets bold when it's over the Person class. This is a hint that the association can snap to the Person class.
Перемещение мыши и посмотреть, как пунктирная красная линия следует за движением мыши из окна класса велосипедов. Теперь, поместите курсор мыши над класса Person. Обратите внимание, как curser мыши станет полужирным, когда он по классу Person. Это намек, что объединение может привязать к классу Person.

While the mouse cursor looks bold, click the left mouse button to finish the creation of the association. Now, you should have a new association as shown below.
В то время как курсор мыши выглядит смелым, нажмите левую кнопку мыши, чтобы завершить создание ассоциации. Теперь, вы должны иметь новую ассоциацию, как показано ниже.

Note that the newly created association is selected with small green squares at its ends.
Now, let's add a role to the Bicycle side of the association. To do this, position the mouse cursor over the Bicycle end of the association
Следует отметить, что вновь созданный ассоциации выбран с небольшими зелеными квадратами на концах. Теперь, давайте добавим роль в сторону велосипедов ассоциации. Чтобы сделать это, поместите курсор мыши на конец велосипедов ассоциации

and click the right mouse button to display the context menu of the association end.
и нажмите правую кнопку мыши, чтобы отобразить контекстное меню в конце ассоциации.
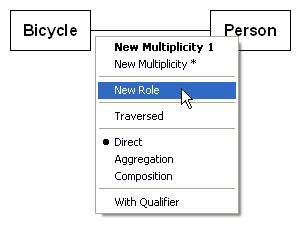
Select New Role from the context menu
Выберите новую роль в контекстном меню
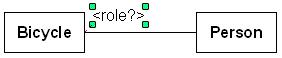
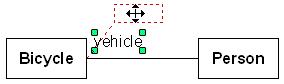
and enter the text "vehicle".
и введите текст "автомобиль". 
Вы можете перемещать текст автомобиля, перетаскивая его. При этом, красной пунктирной линии обращается на конце ассоциации, чтобы показать, где она принадлежит.
You can move the vehicle text around by dragging it. While doing this, a dashed red line is drawn to the end of the association, to show where it belongs to.
www.cadifra.com Cadifra UML Editor 1.3 User's Manual
Это было первый маленький тур на использовании UML редактор Cadifra. Мы рекомендуем экспериментировать самостоятельно с Cadifra UML Editor, чтобы исследовать другие функции или читать в следующих главах.
This was a first little tour on using Cadifra UML Editor. We recommend experimenting yourself with Cadifra UML Editor to explore other features or read on in the following chapters.
www.cadifra.com Cadifra UML Editor 1.3 User's Manual
Resizing
Дата добавления: 2015-10-31; просмотров: 221 | Нарушение авторских прав
| <== предыдущая страница | | | следующая страница ==> |
| Дешифрування гірських порід із субгоризонтальним та нахиленим заляганням. | | | Single Element Resizing |