Читайте также:
|
Institute of Aerospace Control Systems
Department of Flying Vehicle Control Systems
Manufacturing Technologies of the Devices
for On-Board Control Systems
Laboratory work # 10
CVG sensing axis misalignment measurement
1. Introduction
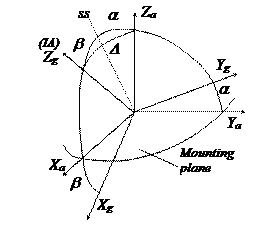
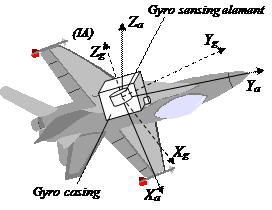
At measuring vehicle angle rate with the aid of gyroscope, for example, airplane roll angle rate, it is usually assumed that the gyro sensing axis, input axis (IA), coincides with the longitudinal axis of airplane, and gyro IA that measures the pitch and yaw angle rates coincide, accordingly, with a transverse axis and axis perpendicular to the airplane wings plane. Only in this case every gyro will measure the angle rates along roll, pitch, and yaw axes. However, due to gyros manufacturing and assembling errors, non-orthogonality of IA to the gyro mounting plane often exceeds the established IA misalignment (i.e. deviation from parallel) accuracy requirements. In case of gyro IA misalignment, the gyro mounted along airplane longitudinal axis will measure not only roll angle rate but also components of pitch and yaw angle rates, too. Really, two systems of coordinates, connected with airplane XaYaZa (Xa is roll axis, Ya is the pitch axis, and Za is the yaw axis) and with gyro IA XgYgZg (Zg is the gyro IA axis, Yg is the axis, perpendicular to IA and directed toward the gyro connector, mounted on the gyro casing, Xg is the axis, perpendicular to IA and directed to the lateral wall of the gyro), are presented in fig.1. These two coordinate systems are turned relative to each other through the angles a and b, characterizing IA misalignment. These angles are determined as follows: the first turn is about the Xa axis through the angle a, and, the Ya axis coincides with position of Yg axis, and the Zg axis passed to intermediate ss position. Second turn is about Yg axis, and, the Xa axis occupied the Xg position, and ss axis passed to the Zg position (gyro IA).
 | |||
 | |||
|
Now, gyroscope, which IA mounted along the airplane yaw axis, due to gyro manufacturing and assembling errors will measure all three angle rates(pitch, yaw, and roll). In order to separate all of these components and accurate selection of the yaw angle rate it is necessary to measure misalignment angles a, b and on their basis to make the orientation matrix of two coordinate systems. This matrix is determined as a directional cosine matrix (every element of matrix is cosine of angle between the corresponding axes of two coordinate systems indicated higher) and in this case can be written down as follows:

 (1)
(1)
Since gyroscope conducts measurements in the XgYgZg coordinate system, and we need to know angle rates in the airplane coordinate system XaYaZa, then, multiplying the angle rates measured by the gyro by the matrix  , we will get angle rates in projections on the airplane coordinate system XaYaZa:
 =
=  (2)
(2)
The gyro measures the angle rate  , i.e. projection of angle rate on its IA. Thus, the angle rate along each of airplane coordinate system axis is determined by next expressions:
 (3)
(3)
The aim of this laboratory work is to measure gyo IA misalignment angles a and b.
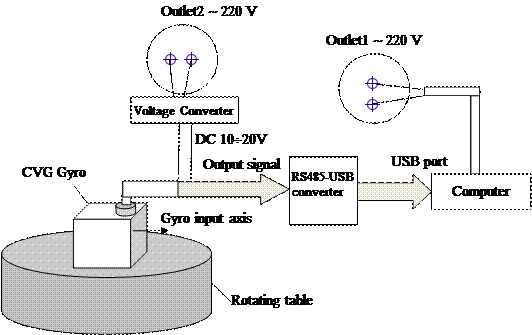
2. Get together the following measurement set-up:
 |
Fig 2.
3. The order of the lab work accomplishment
3.1. Connect the three-ended cable to the gyro output connector.
3.2. Connect the informative end of the three-ended cable to the RS485-USB converter and connect the output of the RS485-USB converter to USB port of the computer using additional cable.
3.3. Start the gyro data acquisition program CVGcom on the computer. Press the button “device and port setting” and in the appeared window “device type” install “CVGx_new”, then USB serial port number (for example, com3:USB serial port), in the frame “device #” insert family or/and name of the student (or students), then press the button “generate file name” the file with student name(s) will be stored. In the table bellow, column “value” install 0 1 1 1 from up to down and press “Ok” button. The window is closed. Press the button “start sampling process” and in 3-5 seconds the data from the gyro can be seen on the computer screen. There will be two columns of data: The 1st is proportional to angle rate, the second is the temperature inside the gyro in degrees Celsius (oC).
3.2. Give the gyro to warm-up during 5 min.
4. Measurement methodic
4.1. Install the angle rate of the rotating table equal to 90 deg/s.
4.2. Install the CVG on the rotating table so that its input axis (IA) is in horizontal plane with gyro connector directed to upward. Start measurement for 10 sec dwell time to measure gyro bias.
4.3. Switch on the rotation table clockwise and measure output signal during 5 revolutions, and then stop rotation. In about 3 sec start rotation counterclockwise during 5 revolutions and stop rotation again.
4.4. Turn up the CVG gyro by hand so, that its connector is directed to the right with the gyro input axis in horizontal plane.
4.5. Switch on the rotation table clockwise and measure output signal during 5 revolutions, and, then stop rotation. In about 3 sec start rotation counterclockwise during 5 revolutions and stop rotation.
5. Calculation methodic
 5.1. Calculate average values of output gyro reading for the clockwise and counterclockwise rotations:
N1+ =  ; N1 - =
  ; N2+ =
  ; N2 - =
  (4)
(4)
5.2. Calculate angles a and b using the following formulas:
 (5)
(5)
5.3. Draw a graph of the measurements in MathLab with calculated a, and b as depicted in fig.3.
  |
Fig 3.
Questions:
4. Why should the CVG sensing axis be laid in horizontal plane during measurements?
Дата добавления: 2015-10-26; просмотров: 118 | Нарушение авторских прав
| <== предыдущая страница | | | следующая страница ==> |
| Контрольные задания | | | The order of measurements modeling and analysis of its results |