|
Читайте также: |
Both of the cubes in the example use only the same three kinds of lines. You see the top of the cube below the horizon line (your eye level). You see the bottom of the cube above the horizon line and more of its left side because it is to the right of your position in the center of the vanishing points.
USING LINEAR PERSPECTIVE
The use of linear perspective to draw architectural subjects is obvious. All subjects, though, still obey the same rules as geometric shapes. A thorough knowledge of perspective is required to successfully position objects in space.
ATMOSPHERIC PERSPECTIVE
Atmospheric perspective deals with how the appearance of an object is affected by looking at it through a layer of air. Moisture, dust and pollutants in the atmosphere act to filter the visual information.
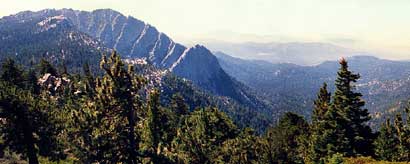
Contrast is greatest for close objects. Distant objects have less contrast in them and less to their surroundings. Each row of hills receding into the distance has less contract with the next (see photo above).
Remember that value contrast is the strongest contrast when creating spatial illusions.
Colors also change with depth. All of the colors are clear on near objects. Bright colors are only seen on close objects. Warm colors also show up more on near objects. As objects get farther away the colors dull and eventually turn blue gray.
Partially because of this warm colors appear to closer than cool colors (more about this under color). Choose colors in an image accordingly.
F ocus in an image also gives depth clues. Close objects are generally more sharply focused than distant objects. It is possible to alter this with a camera but the mind sees softly focused edges as being farther away than sharp edges.
There may be compositional reasons to soften the focus of close objects in an image to call attention on something farther back in space.
Details are much more apparent on near objects because of all of the above. Linear perspective makes more distant details too small to see but it is low contrast that tends to flatten distant objects.
Pay attention to how these concepts play out when you are looking at landscape. The same tree looks not only smaller in the distance (linear perspective) but also less leafy (contrast, detail and focus) and not as bright a green (color). As the trees get farther away they blend into the landscape and eventually all you see are rows of hills, flat as cutouts, receding to the horizon. This is especially true on a hazy day or when looking into the sun.
DEEP SPACE PHOTOMONTAGE
Make a photomontage that uses overlap, linear perspective and atmospheric perspective to give a convincing illusion of deep space (from several feet to several miles). At least three different photo references must be used: one for the foreground, one for the middle ground and one for the background.
PROCEDURE
The foreground and background are the most critical parts. For the foreground look for a large sharply focused picture of an object with bright, warm colors. For the background look for a large photograph that shows deep space and has cool colors in the distance (warm colored sunsets are hard to make look like deep space).
The middle ground must fit somewhere in between the foreground and background in space. There is a lot of flexibility with the middle ground. One strategy is to use the interior of a room for the middle ground with the background seen through a window or door. This allows you to use a smaller photograph for the background.
LINEAR PERSPECTIVE CONSIDERATIONS
Size: Choose the pictures to use for each of the three depths with size in mind. Remember that objects appear to get smaller the farther away they are. Try to judge the depth of the image from the size of the objects in it and choose accordingly.
The foreground object will need to be large (close). The background should include distant mountains (small now in size). A cloudy sky may not be used as a background because the depth is hard to verify. The middle ground should fit in the middle.
Horizon line: Every photograph has a horizon line that represents the level of the camera that took the picture. The horizon lines for all of the picture parts in your photomontage must be on the same line.
Look carefully at each image and try to find where the horizon line is. The only surefire way to tell is if the ocean is in the background. Then the horizon and the horizon line are the same.
Ask yourself if you are looking up, down or straight at the scene or object. This can be difficult with natural objects but lines of perspective will help if there is any architecture in the photo. Your point of view represents the horizon line.
ATMOSPHERIC PERSPECTIVE CONSIDERATIONS
Contrast: Use a highly contrasting image for the foreground. It should have high contrast within it and contrast with its surroundings in your image. As the scene goes farther back, use less and less contrast. Be aware of a highly contrasting background with a softer middle ground.
Color: Keep the foreground bright and warm in color. The background should be the dullest and coolest in color. Be careful of warm colors in the background since they will want to come forward.
Focus: Make the foreground the sharpest in the image, the middle ground the next sharpest and the background the dullest if possible.
Details: Use an object for the foreground that has a lot of details. The background should be chosen because it has little in the way of details. The middle ground, as usual, is in the middle.
Cut out the three layers carefully (you may use more layers) and stack them to see if they give a convincing illusion. You may have to move the parts around some to get the horizon lines to seem right.
The finished product should look like a single photograph that shows a scene that starts close to the observer and goes for miles into the distance.
Дата добавления: 2015-10-31; просмотров: 83 | Нарушение авторских прав
| <== предыдущая страница | | | следующая страница ==> |
| Крупнейшие владельцы СМИ | | | Компания Peugeot |