■ 7.1 User setting
■ 7.2 E-MAP setting
■ 7.3 E-MAP usage
7.1 User setting
E-MAP setting is allowed only to the ADMIN level user registered in “Environment
setup/User setting”. There are some authority setting needed as below to set E-MAP.
Only the admin level user can set the E-map, and the admin & manager level user can use
the E-map function.
 |
7.2. E-MAP setting
 |
Click the button of the main screen to enter the E-map screen.
The below picture is the default mode of the E-map screen.
 | |||
 |
To set E-MAP, click icon and inactivate it first.
7.2.1 Map add
 Click the button at the bottom-right side to open the setting box, and select the
directory that includes the map at the left side.
The user can use the BMP, JPG, GIF file format for the map.
Choose the map file in the middle, and click the “Add map“ button.
 |
7.2.2 Select Map
The user can position a map on the specific place among the 5 icons at the bottom of the
E-map screen.
Double-click the icon to position, and select a map in the file list.
Input the map name in the box and press “Select Map” button.
 |
7.2.3 Map setup
 The user can set maps & rotation period for the auto-rotation function.
The unit of the rotation period is “second”.
Check the maps to use the auto-rotation function in the below box.
 |
7.2.4 Move to the next screen
 |
This button moves the screen to the next map.
7.2.5 Auto-rotation button
 |
The maps selected in 7.2.3 are automatically rotated in order in the set period.
7.2.6 Positioning Cameras, Sensors, & Relays
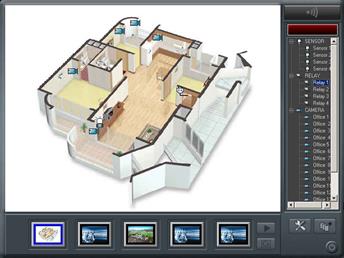 |
Select a mini-map at the bottom of the screen, and click the camera, sensor, or relay to
position.
Then, click the place in the map to position the selected one. If the user wants to move the
position of a camera, sensor, or relay in the same map, select it on the right tree and click
the place to move in the map. If the user wants to move the position to another map, select
it on the right tree and choose the map to move among the mini-maps at the bottom of the
screen. Then, click the place to move in the selected map. After all settings are done,
 activate the E-map function by pressing icon.
7.3. Using E-MAP
If the user clicks a camera, sensor, or relay on the right tree, the selected one flickers in the
left map.
7.3.1 Camera information
 The user can see the camera information by putting the
mouse cursor on the camera icon in the map.
 If a camera is disconnected, the camera icon is
displayed as
The user can see the live image of the selected camera
by double click on the camera icon.
If the user double-clicks on the icon, the screen goes
directly to the live image screen of the camera.
7.3.2 Sensor information
 The color of the sensor icon shows the sensor status.
 |
means normal status, and means alarm status.
The user can check the connected camera by click the right button of
the mouse on the sensor icon. If the user clicks the connected camera,
the screen goes directly to the live image of the camera.
7.3.3 Relay output control
The color of the relay shows the relay on, off status.
 | |||
 | |||
means relay off, and means relay on.
The user allowed to use relay control function can control it by click on
the relay icon in the map.
7.3.4 E-MAP Off

The user can exit the E-map screen by pressing the E-map off button.
Дата добавления: 2015-08-27; просмотров: 70 | Нарушение авторских прав
| <== предыдущая страница | | | следующая страница ==> |
| Playback | | | Для использования в сети НФ ОАО «Ростелеком» для подключения абонентов по технологии DHCP |