Читайте также:
|
10.4a Remove the upper mounting bolt (arrowed)...
B... and lift the shock out of the frame
of the swingarm, unscrew the shock absorber lower mounting bolt (see illustration).
4 Support the shock absorber, then unscrew
the upper mounting nut (where fitted) and bolt
and lift the shock out of the top of the frame,
noting the routing of the drain hose (see
illustrations).
Inspection
|
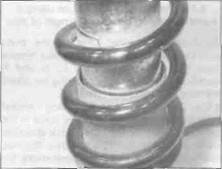
| 10.6 Check for signsof oil leaks |
5 Individual components for the rear shock absorber are available for all excep-. R models. Check with your dealer for availability. On R models, the entire unit must be renewed if it is worn or damaged.
6 Inspect the shock absorber for obvious physical damage and oil leakage, and the coil spring for looseness, cracks or signs of fatigue (see illustration).
7 Inspect the pivot hardware at the top and bottom of the shock for wear or damage.
8 On L, N and R models, withdraw the inner sleeve from the shock absorber lower mounting (see illustration). Inspect the sleeve, bearing and dust seals for signs of wear and renew worn components as necessary. The bearing is a press-fit and can be removed and installed using a drawbolt arrangement - see Tools and Workshop Tips in the Reference section.
9 To measure the shock absorber spring free length, the unit must be disassembled, which requires the use of a suitable spring compressor. If the tools or expertise are not available, take the unit to a dealer. Otherwise, on J and К models, compress the spring using a coll spring compressor by just enough to access the spring stopper ring. Remove the ring and the spring seat, then carefully release the compressor until the spring is relaxed. On L and N models, compress the spring using a coil spring compressor by just enough to access the spring seat halves, then remove them, noting how they fit. Remove the spring sleeve, then carefully release the compressor until the spring is relaxed. Remove the spring, noting which way up it fits. Measure the free length of the spring and compare it to the specifications. If the spring has sagged below its service limit, it must be renewed. Individual components for the rear shock absorber are available for all except R models. Check with
your dealer for availability. On R models, the entire unit must be renewed if it is worn or damaged.
Installation
10 Installation is the reverse of removal, noting the following.
a) Apply molybdenum disulphide grease to the pivot points.
b) Make sure the drain hose is correctly routed.
c) On L. N and R models, clean the threads of the lower mounting bolt and apply a suitable non-permanent thread locking compound (see illustration).
d) Install the bolts and nut(s) finger-tight only until both are in position, then tighten them to the torque settings specified at the beginning of the Chapter (see illustration).
e) Adjust the suspension as required (see Section 12).
11 Rear suspension linkage - f^>
removal, inspection and **
installation >c
Removal
1 Place the machine on an auxiliary stand. Position a support under the rear wheel so that it does not drop when the shock absorber

|

|

|
10.8 Withdraw the sleeve and check the bearing
Дата добавления: 2015-10-29; просмотров: 207 | Нарушение авторских прав
| <== предыдущая страница | | | следующая страница ==> |
| C ... and remove the lockwasher | | | A Apply a thread-lock to the bolt |