Читайте также:
|
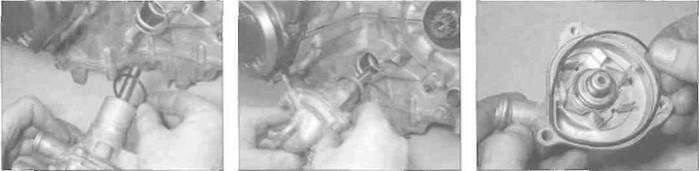
the impeller shaft with the tab on the oil pump shaft (see illustration).
| 8.8b Pump mounting bolts (arrowed) |
10 If the pump was removed as a whole, install the two bolts securing the pump to the crankcase, on L, N and R models not forgetting the wiring clip (see illustration 8.8b). Attach the coolant hoses to the pump and secure them with their clamps (see illustrations 8.8a and 8.5a or b). Otherwise install the single bolt securing the body to the crankcase, on L. N and R models not forgetting the wiring clip, then attach the hose and secure it with its clamp (see illustrations 8.8b and a).
11 To fit the cover, install a new O-ring into its groove in the pump body (see illustration).
|
A Fit a new O-ring...
B... and install the pump
Fit a new O-ring into the groove in the body...
3«8 Cooling system
12 Install the cover onto the pump, then install the bolts and tighten them securely (see illustrations 8.5a and b). Make sure the different bolts are in their correct locations.
13 If detached, attach the coolant hoses to the pump cover and secure them with their clamps (see illustrations 8.5a and b).
14 Refill the cooling system (see Chapter 1).
Coolant hoses -
removal and installation
Removal
1 Before removing a hose, drain the coolant (see Chapter 1),
2 Use a screwdriver to slacken the larger-bore hose clamps, then slide them back along the hose and clear of the union spigot. The smaller-bore hoses are secured by spring clamps which can be expanded by squeezing their ears together with pliers.
Caution: The radiator unions are fragile. Do not use excessive force when attempting to remove the hoses.
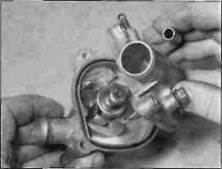
8.12... then fit the cover
3 If a hose proves stubborn, release It by rotating it on its union before working it off. If all else fails, cut the hose with a sharp knife then slit it at each union so that it can be peeled off in two pieces. Whilst this means renewing the hose, it is preferable to buying a new radiator.
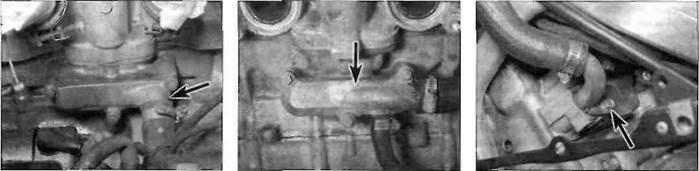
4 The water pipe inlet union to the cylinder block can be removed by unscrewing the retaining bolts (see illustrations). On J and К
models, remove the carburettors (see Chapter 4) for access. If the union Is removed, the O-ring must be renewed. The outlet pipes are each secured by a single bolt (see illustration). If they are removed, the O-rings must be renewed.
Installation
5 Slide the clips onto the hose and then work it on to its respective union.
[*СТ?ТЯ If the hose is difficult to
| hint |
push on its union, it can be softened by soaking it in very hot water, or
alternatively a little soapy water can be
used as a lubricant.
6 Rotate the hose on its unions to settle it in position before sliding the clamps into place and tightening them securely.
7 If either the Inlet union to the cylinder block or the outlet unions 'rom the cylinder head have been removed, fit a new O-ring, then install the union anc tighten the mounting bolts securely.
|
9.4a On J and К models, the union (arrowed) is on the back of the block...
9.4b... on L, N and R models, it is on the front (arrowed)
9.4c Each outlet pipe is secured by a bolt (arrowed)
4-1
Chapter 4
Fuel and exhaust systems
Contents
Air filter - cleaning and renewal.................................... see Chapter 1
Air filter housing - removal and installation.................................. 4
Carburettor overhaul - general information................................ 6
Carburettor synchronisation...................................... see Chapter 1
Carburettors - disassembly, cleaning and inspection............... 8
Carburettors - reassembly, and float height check..................... 10
Carburettors - removal and installation....................................... 7
Carburettors - separation and joining........................................... 9
Choke cable - removal and installation........................................ 12
Exhaust system - removal and installation................................... 13
Fuel hoses - check and renewal................................. see Chapter 1
Degrees of difficulty
Fuel pump - check, removal and installation.............................. 14
Fuel system - check.................................................... see Chapter 1
Fuel tank - cleaning and repair...................................................... 3
Fuel tank and fuel tap - removal and installation....................... 2
General information and precautions........................................... 1
Idle fuel/air mixture adjustment - general information................ 5
Idle speed - check.......................................................... see Chapter 1
Throttle and choke cables - check and adjustment....see Chapter 1
Throttle cables - removal and installation..................................... 11
Throttle position sensor - check and replacement... see Chapter 5
Easy, suitable for novice with little experience
Fairly easy, suitable §^
for beginner with
some experience ^
Дата добавления: 2015-10-29; просмотров: 236 | Нарушение авторских прав
| <== предыдущая страница | | | следующая страница ==> |
| A Fit a new O-ring into the groove ... | | | Fairly difficult, |