|
Читайте также: |
None
Reagents, Materials, and Equipment
Anti-A antiserum
Serological pipettes, 1 mL
Micropipettes
Disposable plastic microtiter plates
Disposable glass test tubes, 12 x 75 mm
Saline solution (0.85 percent)
Type A red blood cells (3 to 4 percent solution)
Centrifuge
Procedure
Macrotiter
1. Make a 1:10 dilution of reagent anti-A antiserum by adding 1 mL of anti-A to 9 mL of saline for every 10 mL of reagent desired. Allow approximately 1.5 mL of antiserum per student. This will be enough to run the dilutions with a little extra for repeat testing.
2. If type A red blood cells are not purchased, a 4 percent solution of red blood cells can be made using type A blood collected in ethylenediaminetetraacetic acid (EDTA). Spin the collection tube in a centrifuge for approximately 10 minutes at 1500 revolutions per minute (rpm). Remove the serum and add saline to the remaining red blood cells. Transfer the solution to a disposable conical centrifuge tube that has graduations marked on it. Spin again for 10 minutes and note the color of the saline wash on top. Remove saline wash and resuspend in additional saline. Make sure all cells are uniformly resuspended. Repeat this procedure for three washes or until the saline supernatant is clear.
Note the final volume of the packed red blood cells. Make a 4 percent solution by suspending 4 mL of packed red cells in 96 mL of saline. Each student needs approximately 4 mL of the final solution.
3. Label eight 12 x 75 mm test tubes as follows: 10, 20, 40, 80, 160, 320, 640, 1280.
4. Using a 1 mL serological pipette, add 0.2 mL of saline to tubes two through eight.
5. Add 0.2 mL of anti-A antiserum to tubes one and two, using a clean serological pipette.
6. With a new serological pipette, mix tube two by drawing fluid up and down five to ten times.
7. Transfer 0.2 mL from tube two to tube three and mix.
8. Repeat the transfer and mixing process with tubes three and four, and so on through tube eight. After tube eight is mixed, discard the last 0.2 mL of the dilution.
9. Using a 1 mL serological pipette, add 0.2 mL of 4 percent type A red blood cells to each tube.
10. Centrifuge for 30 to 45 seconds.
11. Observe for agglutination by gently shaking the red blood cell button loose from the side of each test tube. A positive reaction is indicated by cells that remain clumped together after shaking. Note that the size of the clumps decreases with further dilution, but any visible clumping is considered positive.
12. Record the titer. This is the last tube in which visible agglutination can be discerned. The titer is written as the reciprocal of the dilution – that is, if the 1:160 tube is the last positive one, the titer is written as 160.
Microtiter
1. Label one row of a microtiter plate as follows: 10, 20, 40, 80, 160, 320, 640, 1280.
2. Using a micropipette, add 20 µL of saline to wells two through eight on the microtiter plate.
3. With a new pipette tip, add 20 µL of anti-A antiserum to wells one and two.
4. Using the micropipette set to 20 µL and a new pipette tip, mix well number two by drawing up and down in the pipette several times. Wipe the outside of the pipette tip, and transfer 20 µL to well number three.
5. Repeat this process with successive wells through well number eight.
6. Add 20 µL of 4 percent type A red blood cells to all wells.
7. Rotate plate on the lab bench for 1 minute, making a concentric circular pattern. Let the plate sit for 30 minutes at room temperature.
8. Observe for agglutination with a microtiter plate reader, or carefully hold up to the light. A smooth button on the bottom of a well indicates that the red blood cells have settled out with no agglutination. If agglutination has occurred, an irregular or crenulated pattern is seen at the bottom of the well (Fig. 2).
9. Report the titer as the last well in which agglutination can be seen. Compare the results with those from the macrotiter. The titers obtained should be within one dilution of each other (plus or minus).
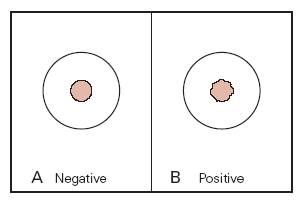
FIGURE 2. Microtiter agglutination patterns. (A) A negative result is indicated by a smooth button. (B) Agglutination is a positive result and is indicated by a ragged edge as the cells settle out.
Дата добавления: 2015-10-26; просмотров: 148 | Нарушение авторских прав
| <== предыдущая страница | | | следующая страница ==> |
| Dilution 1:10 dilution 1:10 dilution | | | Теоретичні відомості |