Читайте также:
|
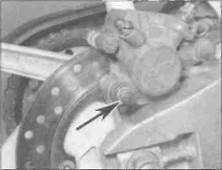
brake hose on the caliper then unscrew the brake hose banjo bolt and separate the hose from the caliper (see illustration). Plug the hose end or wrap a plastic bag tightly around it to minimise fluid loss and prevent dirt entering the system. Discard the sealing washers as new ones must be used on installation. Note: If you are planning to overhaul the caliper and don't have a source of compressed air to blow out the piston, just loosen the banjo bolt at this stage and retighten it lightly. The bike's hydraulic system can then be used to force the piston out of the body once the pads have been removed. Disconnect the hose once the piston has been sufficiently displaced.
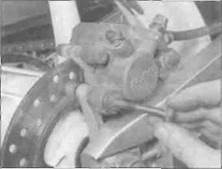
3 Unscrew the caliper mounting bolt, then swing the caliper up at the back and slide it sideways off of the bracket (see illustrations).
 | |
|

|
Note the alignment of the hose, then
Unscrew the brake hose banjo bolt
(arrowed)
A Unscrew the mounting bolt...
Brakes, wheels and tyres 7*11
7.18a Install the bolt...
18 Install the caliper mountng bolt, and tighten it to the torque setting specified at the beginning of the Chapter (see illustrations).
19 If removed, connect the brake hose to the caliper, using new sealing washers on each side of the fitting. Align the hose as noted on removal (see illustration 7.2). Tighten the banjo bolt to the torque setting specified at the beginning of the Chapter. Top up the master cylinder reservoir with DOT 4 brake fluid (see Daily (pre-hde) checks) and bleed the hydraulic system as described in Section 11.
20 Check for leaks and thoroughly test the operation of the rear brake before riding the motorcycle.
8 Rear brake disc - inspection,!b
removal and installation ^;
Inspection
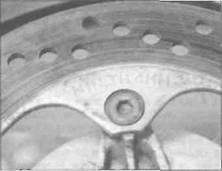
1 Visually inspect the surface of the disc for score marks and other damage. Light scratches are normal after use and won't affect brake operation, but deep grooves and heavy score marks will reduce braking efficiency and accelerate pad wear. If a disc is badly grooved It must be machined or renewed.
2 To check disc runout, position the bike on an auxiliary stand and support it so that the wheel Is raised off the ground. Mount a dial gauge on the swingarm, with the plunger on

Дата добавления: 2015-10-29; просмотров: 145 | Нарушение авторских прав
| <== предыдущая страница | | | следующая страница ==> |
| Push the caliper against the pad to create the extra room | | | B ... and tighten it to the specified torque |